Panasonic DVD-S700 DVD-S700 Owner's Manual (English) - Page 6
Connections, DVD-S500
 |
View all Panasonic DVD-S700 manuals
Add to My Manuals
Save this manual to your list of manuals |
Page 6 highlights
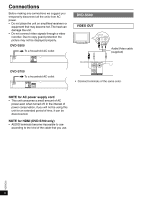
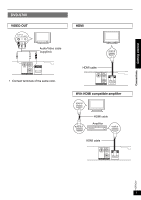
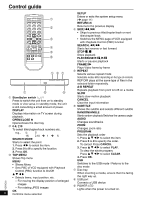
Connections Before making any connections we suggest you temporarily disconnect all the units from AC power. • Do not place the unit on amplifiers/receivers or equipment that may become hot. The heat can damage the unit. • Do not connect video signals through a video recorder. Due to copy guard protection the picture may not be displayed properly. DVD-S500 To a household AC outlet DVD-S500 VIDEO OUT AUDIO IN R L VIDEO IN Audio/Video cable (supplied) AUDIO OUT VIDEO OUT DVD-S700 To a household AC outlet AV OUT VIDEO OUT AUDIO OUT AUDIO OUT VIDEO OUT • Connect terminals of the same color. NOTE for AC power supply cord • This unit consumes a small amount of AC power even when turned off. In the interest of power conservation, if you will not be using this unit for an extended period of time, it can be disconnected. NOTE for HDMI (DVD-S700 only) • AUDIO terminals become impossible to use according to the kind of the cable that you use. VQT5C22 6
-
 1
1 -
 2
2 -
 3
3 -
 4
4 -
 5
5 -
 6
6 -
 7
7 -
 8
8 -
 9
9 -
 10
10 -
 11
11 -
 12
12 -
13
-
14
-
15
-
16
 |
 |
