Panasonic EW3039S Operating Instructions - Page 11
Setting
 |
View all Panasonic EW3039S manuals
Add to My Manuals
Save this manual to your list of manuals |
Page 11 highlights
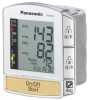
Setting the time and date Having inserted the batteries, set the time and date so that any future stored measurements are saved in the memory with the correct time and date. (If you attempt to take measurements without first setting the time and date then "-" will be displayed.) Fig. 4-a nl Fig. 4-b 1. Press the Set button "1" on the side of the unit for at least 3 seconds. The displayed date will flash on and off (Fig. 4-a). If the date and time have already been set and the button is not held pressed long enough, the display will change to the measurement notification sound setting display. Fig. 4-c Fig. 4-d ig. 4-e ig. 4-f 15:30 2. Adjust the month. Press the Adjust button "2" to adjust the number of the month (Figs. 4-b). 3. Adjust the date. (1) Press the Set button "1" and the number for the date will flash (Fig. 4-c). (2) Press the Adjust button "2" to adjust the number of the date. 4. Adjust the hour. (1) Press the Set button "1" and the time will flash on and off (Fig. 4-d). (2) Press the Adjust button "2" to adjust the number of the hour. 5. Adjust the minutes. (1) Press the Set button "1" and the number for minutes will flash (Fig. 4-e). (2) Press the Adjust button "2" to adjust the number of minutes. 6. Finally, synchronizing with a time signal, press the Set button "1" to complete the procedure (Fig. 4-f). 7. Press the On/Off and Start button to turn off the unit. 10
-
 1
1 -
2
-
3
-
4
-
5
-
 6
6 -
 7
7 -
 8
8 -
 9
9 -
 10
10 -
 11
11 -
 12
12 -
 13
13 -
 14
14 -
 15
15 -
 16
16 -
17
-
18
-
19
-
20
-
21
-
22
-
23
-
24
-
25
-
26
-
27
-
28
-
29
-
30
-
31
-
32
-
33
-
34
-
35
-
36
-
37
-
38
-
39
-
40
-
41
-
42
-
43
-
44
-
45
-
46
-
47
-
48
-
49
-
50
-
51
-
52
-
53
-
54
-
55
-
56
-
57
-
58
-
59
-
60
-
61
-
62
-
63
-
64
-
65
-
66
-
67
-
68
 |
 |
