Panasonic EW3039S Operating Instructions - Page 18
Measuring, Blood, Pressure
 |
View all Panasonic EW3039S manuals
Add to My Manuals
Save this manual to your list of manuals |
Page 18 highlights
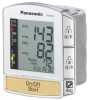
Measuring Your Blood Pressure Fig. 7-a On/Off Fig. 7-b EBBE Relax during measurements. 1. Place the storage case under your arm. (Please see correct position for measurement on pages 14-16.) 2. Press the On/Off and Start button (Fig. 7-a). • Everything on the display will be shown for approx. 2 seconds, apart from the battery symbol (Fig. 7-b). • The cuff will begin to inflate automatically. Changing inflation speeds and operating sounds occur during inflation and are a normal part of the measurements that are being performed at this time. Fig. 7-c • Once your pulse rate is detected, the IP mark will flash on the display with sounds (Fig. 7-c). • The A will be lit up when the reminder alarm is set. (See page 26 for instructions on setting and checking reminder-alarm times.) 3. Blood pressure values together with pulse rate are displayed when the measurement is complete with :4} 15: II sounds (Fig. 7-d). • The air in the pressure cuff is released automatically. • The blood pressure sign LEDs light up (for approx. 6 seconds) indicating your blood pressure level. Fig. 7-d o tp • Displayed readings will flash (for approx. 6 seconds) when in the high blood pressure range. d sys. "ea1 DIa Dc, Piurnlsine. n„3 Ar2)4 V Fig. 7-e On/Off • The or mark will be lit up. (See page 22 for information on how to record blood pressure readings.) • The displayed pulse rate indicates the number of heartbeats per minute as calculated from the number of heartbeats recorded during the measurement. 4. Press the On/Off and Start button to switch off the unit (Fig. 7-e). • If you forget to switch the unit off, it will do so automatically after approx. 5 minutes. 17
-
 1
1 -
2
-
3
-
4
-
5
-
6
-
7
-
8
-
9
-
10
-
11
-
12
-
 13
13 -
 14
14 -
 15
15 -
 16
16 -
 17
17 -
 18
18 -
 19
19 -
 20
20 -
 21
21 -
 22
22 -
 23
23 -
24
-
25
-
26
-
27
-
28
-
29
-
30
-
31
-
32
-
33
-
34
-
35
-
36
-
37
-
38
-
39
-
40
-
41
-
42
-
43
-
44
-
45
-
46
-
47
-
48
-
49
-
50
-
51
-
52
-
53
-
54
-
55
-
56
-
57
-
58
-
59
-
60
-
61
-
62
-
63
-
64
-
65
-
66
-
67
-
68
 |
 |
