Panasonic F200U Operating Instructions - Page 42
Ceiling mount bracket safeguards, Care and Replacement, Replacement procedure
 |
UPC - 791871111598
View all Panasonic F200U manuals
Add to My Manuals
Save this manual to your list of manuals |
Page 42 highlights
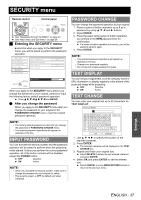
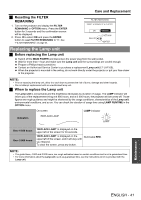
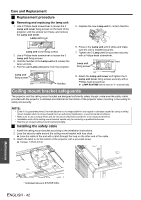
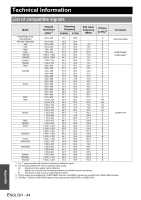
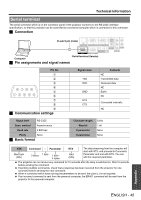
Care and Replacement J Replacement procedure Q Removing and replacing the lamp unit 1. Use a Phillips-head screwdriver to loosen the 2 Lamp unit cover fixing screws on the back of the projector until the screws turn freely, and remove the Lamp unit cover. Lamp unit cover 5. Replace the new Lamp unit in correct direction. Lamp unit cover fixing screws 2. Use a Phillips-head screwdriver to loosen the 2 Lamp unit fixing screws. 3. Hold the handles of the Lamp unit and release the lamp unit lock. 4. Pull the used Lamp unit gently from the projector. 6. Press in the Lamp unit until it clicks and make sure the unit is installed securely. 7. Tighten the 2 Lamp unit fixing screws securely with a Phillips-head screwdriver. Lamp unit fixing screws Press here Lamp unit fixing screws Handles 8. Attach the Lamp unit cover and tighten the 2 Lamp unit cover fixing screws securely with a Phillips-head screwdriver. LAMP RUNTIME will be reset to "0" automatically. Ceiling mount bracket safeguards The projector and the ceiling mount bracket are designed sufficiently safety though, make sure the safety cable provided with the projector is installed and attached to the bottom of the projector when mounting in the ceiling for safety and security. NOTE: • Even if it is guarantee period, the manufacturer is not responsible for any hazard or damage caused by using a ceiling mount bracket which is not purchased from an authorized distributors, or environmental conditions. • Make sure to use a torque driver and do not use an electrical screwdriver or an impact screwdriver. • Installation work of the ceiling mount bracket should only be carried by a qualified technician. • Remove an unused ceiling mount bracket promptly. J Installing the safety cable 1. Install the ceiling mount bracket according to the installation instructions. 2. Loop the security cable around the ceiling mount bracket with less slack. Lace the cable of the end with a latch through the loop on the other end of the cable. 3. Attach the latch on to the bottom of the projector with a provided screw. Torque: 1.25±0.2 N·m Maintenance * Indicated above is ET-PKF100S. ENGLISH - 42
-
 1
1 -
2
-
3
-
4
-
5
-
6
-
7
-
8
-
9
-
10
-
11
-
12
-
13
-
14
-
15
-
16
-
17
-
18
-
19
-
20
-
21
-
22
-
23
-
24
-
25
-
26
-
27
-
28
-
29
-
30
-
31
-
32
-
33
-
34
-
35
-
36
-
 37
37 -
 38
38 -
 39
39 -
 40
40 -
 41
41 -
 42
42 -
 43
43 -
 44
44 -
 45
45 -
 46
46 -
 47
47 -
48
-
49
-
50
-
51
-
52
-
53
-
54
-
55
-
56
-
57
-
58
-
59
-
60
-
61
-
62
 |
 |
