Panasonic KX-HNS101 Operating Instructions US - Page 15
Setup
 |
View all Panasonic KX-HNS101 manuals
Add to My Manuals
Save this manual to your list of manuals |
Page 15 highlights
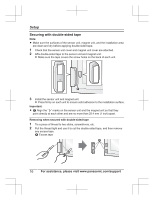
2 Sensor unit: Attach the sensor unit. 1 Screws 2 86.2 mm (3 25/64 inches) Magnet unit: Attach the magnet unit. 3 Screws 4 24.4 mm (31/32 inches) 1 3 2 Setup 4 3 1 5 3 Attach the covers. Important: R 5 Align the " " marks on the sensor unit and the magnet unit so that they point directly at each other and are no more than 25.4 mm (1 inch) apart. For assistance, please visit www.panasonic.com/support 15
-
 1
1 -
2
-
3
-
4
-
5
-
6
-
7
-
8
-
9
-
 10
10 -
 11
11 -
 12
12 -
 13
13 -
 14
14 -
 15
15 -
 16
16 -
 17
17 -
 18
18 -
 19
19 -
 20
20 -
21
-
22
-
23
-
24
-
25
-
26
-
27
-
28
-
29
-
30
-
31
-
32
-
33
-
34
-
35
-
36
-
37
-
38
-
39
-
40
 |
 |

2
Sensor unit:
Attach the sensor unit.
1
Screws
2
86.2 mm (3 25/64 inches)
Magnet unit:
Attach the magnet unit.
3
Screws
4
24.4 mm (31/32 inches)
2
4
1
1
3
3
5
3
Attach the covers.
Important:
R
5
Align the “
” marks on the sensor unit and the magnet unit so that they
point directly at each other and are no more than 25.4 mm (1 inch) apart.
For assistance, please visit www.panasonic.com/support
15
Setup