Panasonic KX-HNS105 KX-HNS105W - Owner's Manual - Page 10
Installation
 |
View all Panasonic KX-HNS105 manuals
Add to My Manuals
Save this manual to your list of manuals |
Page 10 highlights
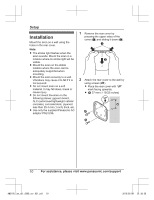
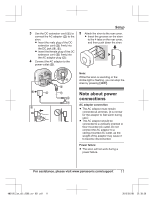
Setup Installation Mount the siren on a wall using the holes in the rear cover. Note: R The strobe light flashes when the siren sounds. Mount the siren in a location where its strobe light will be visible. R Mount the siren on the stable location where the siren can be adequately supported when mounting. R Mount the siren securely to a wall. Vibrations may cause it to fall if it is not secured. R Do not mount siren on a soft material. It may fall down, break or cause injury. R Do not mount the siren on the following places: gypsum board, ALC (autoclaved lightweight cellular concrete), concrete block, plywood less than 25.4 mm (1 inch) thick, etc. R Use only the supplied Panasonic AC adaptor PNLV236. 1 Remove the rear cover by pressing the upper sides of the cover (A) and sliding it down (B). A B 2 Attach the rear cover to the wall by using screws (1). R Place the rear cover with "UP" mark facing upwards. R 2 37 mm (1 15/32 inches) UP 2 UP 1 1 10 For assistance, please visit www.panasonic.com/support HNS105_(en_en)_0209_ver.031.pdf 10 2015/02/09 21:38:39
-
 1
1 -
2
-
3
-
4
-
 5
5 -
 6
6 -
 7
7 -
 8
8 -
 9
9 -
 10
10 -
 11
11 -
 12
12 -
 13
13 -
 14
14 -
 15
15 -
16
-
17
-
18
-
19
-
20
-
21
-
22
-
23
-
24
-
25
-
26
-
27
-
28
-
29
-
30
-
31
-
32
 |
 |
