Panasonic KXTG6583 KXTG6582 User Guide - Page 44
Caller list, Group ringer tone for, phonebook, Viewing the caller list and, calling back
 |
View all Panasonic KXTG6583 manuals
Add to My Manuals
Save this manual to your list of manuals |
Page 44 highlights
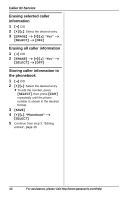
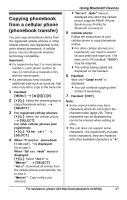
Caller ID Service L When you receive a call while on the phone, the 2nd caller's name is not announced even if you subscribe to both Caller ID and Call Waiting with Caller ID services. Phonebook name announcement When caller information is received and it matches a phone number stored in the phonebook, the stored name in the phonebook is announced. Group ringer tone for phonebook You can select the desired ringer tone to a group that each phonebook entry is assigned (page 29). When a call is received from a caller assigned to a group, the ringer tone you selected for that group rings instead of the called line's ringer tone (page 16, 36, 37) after caller information is displayed. If you select "Current ringer" (default), the unit uses the called line's ringer tone when calls from this group are received. 1 {C} i {MENU} 2 {V}/{^}: "Group" i {SELECT} 3 {V}/{^}: Select the desired group. i {SELECT} 4 {V}/{^}: Select the desired ringer tone. i {SAVE} 5 {OFF} Caller list Important: L Only 1 person can access the caller list at a time. L Make sure the unit's date and time setting is correct (page 14). Viewing the caller list and calling back ■ Using a cellular line 1 { is displayed, not all of the information is shown. To see the remaining information, press {>}. To return to the previous screen, press {}. To return to the previous screen, press {
-
 1
1 -
2
-
3
-
4
-
5
-
6
-
7
-
8
-
9
-
10
-
11
-
12
-
13
-
14
-
15
-
16
-
17
-
18
-
19
-
20
-
21
-
22
-
23
-
24
-
25
-
26
-
27
-
28
-
29
-
30
-
31
-
32
-
33
-
34
-
35
-
36
-
37
-
38
-
 39
39 -
 40
40 -
 41
41 -
 42
42 -
 43
43 -
 44
44 -
 45
45 -
 46
46 -
 47
47 -
 48
48 -
 49
49 -
50
-
51
-
52
-
53
-
54
-
55
-
56
-
57
-
58
-
59
-
60
-
61
-
62
-
63
-
64
-
65
-
66
-
67
-
68
-
69
-
70
-
71
-
72
-
73
-
74
-
75
-
76
-
77
-
78
-
79
-
80
-
81
-
82
-
83
-
84
-
85
-
86
-
87
-
88
 |
 |
