| Section |
Page |
| Table of Contents |
2 |
| Introduction |
2 |
| Preparation |
2 |
| Making/Answering Calls |
2 |
| Phonebook |
2 |
| Caller ID Service |
2 |
| Voice Mail Service |
2 |
| Programmable Settings |
2 |
| Useful Information |
2 |
| Index |
3 |
| Introduction |
4 |
| Introduction |
4 |
| Accessory information |
5 |
| Included accessories |
5 |
| 1 |
5 |
| 1 |
5 |
| 2 |
5 |
| 1 |
5 |
| 3 |
5 |
| 1 |
5 |
| 4 |
5 |
| 1 |
5 |
| 5 |
5 |
| 1 |
5 |
| 6 |
5 |
| 1 |
5 |
| 7 |
5 |
| 1 |
5 |
| 1 |
5 |
| 2 |
5 |
| 3 |
5 |
| 4 |
5 |
| 5 |
5 |
| 6 |
5 |
| 7 |
5 |
| Additional/replacement accessories |
5 |
| Important safety instructions |
6 |
| 1. Read and understand all instructions. |
6 |
| 2. Follow all warnings and instructions marked on this unit. |
6 |
| 3. Unplug this unit from power outlets before cleaning. Do not use liquid or aerosol cleaners. Us... |
6 |
| 4. Do not use this unit near water, for example near a bathtub, wash bowl, kitchen sink, etc. |
6 |
| 5. Place the unit securely on a stable surface. Serious damage and/or injury may result if the un... |
6 |
| 6. Do not cover slots and openings on the unit. They are provided for ventilation and protection ... |
6 |
| 7. Use only the power source marked on the unit. If you are not sure of the type of power supplie... |
6 |
| 8. Do not place objects on the power cord. Install the unit where no one can step or trip on the ... |
6 |
| 9. Do not overload power outlets and extension cords. This can result in the risk of fire or elec... |
6 |
| 10. Never push any objects through slots in this unit. This may result in the risk of fire or ele... |
6 |
| 11. To reduce the risk of electric shock, do not disassemble this unit. Take the unit to an autho... |
6 |
| 12. Unplug this unit from power outlets and refer servicing to an authorized service center when ... |
6 |
| A. When the power cord is damaged or frayed. |
6 |
| B. If liquid has been spilled into the unit. |
6 |
| C. If the unit has been exposed to rain or water. |
6 |
| D. If the unit does not work normally by following the operating instructions. Adjust only contro... |
6 |
| E. If the unit has been dropped or physically damaged. |
6 |
| F. If the unit exhibits a distinct change in performance. |
6 |
| 13. During thunderstorms, avoid using telephones except cordless types. There may be a remote ris... |
6 |
| 14. Do not use this unit to report a gas leak, when in the vicinity of the leak. |
6 |
| SAVE THESE INSTRUCTIONS |
6 |
| Battery |
7 |
| Medical |
7 |
| For best performance |
8 |
| Base unit location/noise |
8 |
| Environment |
8 |
| Routine care |
8 |
| Preparation |
9 |
| Preparation |
9 |
| Connections |
9 |
| Connecting the AC adaptor |
9 |
| Note: |
9 |
| Connecting the telephone line cord |
10 |
| To connect to a 2-line telephone jack |
10 |
| To connect to 2 single-line telephone jacks |
10 |
| If you use the unit as a single-line telephone only |
11 |
| If you subscribe to a DSL service |
12 |
| Connecting a 2 line telephone jack |
12 |
| 1 2-wire telephone line cord with TRANSPARENT plugs |
12 |
| 2 4-wire telephone line cord with GREEN plugs |
12 |
| Connecting 2 single-line telephone jacks |
13 |
| 1 2-wire telephone line cord with TRANSPARENT plugs |
13 |
| 2 4-wire telephone line cord with GREEN plugs |
13 |
| Battery installation |
14 |
| 1 Insert the battery (1), and press it down until it snaps into the compartment (2). |
14 |
| 2 Close the handset cover. |
14 |
| Battery charge |
14 |
| Note: |
14 |
| Battery strength |
15 |
| Recharging the battery |
15 |
| Note: |
15 |
| Battery performance |
15 |
| *1 Handset is off the base unit but not in use. |
15 |
| Note: |
15 |
| Battery replacement |
16 |
| 1 Press the notch on the cover firmly and slide it as indicated by the arrow. |
16 |
| 2 Replace the old battery with a new one, and close the cover (see page 14 for battery installati... |
16 |
| Attention: |
16 |
| Controls and display |
17 |
| Controls |
17 |
| Base unit |
17 |
| A Hook |
17 |
| B LINE 1 indicator |
17 |
| C LINE 2 indicator |
17 |
| D V.M. (Voice Mail) indicator |
17 |
| E Antenna |
17 |
| F Charge contacts |
17 |
| G CHARGE indicator LOCATOR indicator |
17 |
| H {HANDSET LOCATOR} |
17 |
| Handset |
18 |
| A Speaker |
18 |
| B Soft key |
18 |
| C Headset jack |
18 |
| D {C} (TALK) |
18 |
| E Navigator key |
18 |
| F {s} (SP-PHONE) |
18 |
| G {*} (TONE) |
18 |
| H {HOLD} |
18 |
| I Ringer indicator Message indicator |
18 |
| J Receiver |
18 |
| K Display |
18 |
| L {OFF} |
18 |
| M {MENU} |
18 |
| N {FLASH} {CALL WAIT} |
18 |
| O {REDIAL} {PAUSE} |
18 |
| P Microphone |
18 |
| Q Charge contacts |
18 |
| Using the navigator key |
18 |
| Display |
18 |
| Handset display items |
18 |
| Soft keys |
19 |
| Soft key examples: |
19 |
| Backlit display and handset keypad |
19 |
| Setting the unit before use |
19 |
| Setting the dialing mode |
19 |
| 1 Press {MENU}. |
19 |
| 2 Scroll to “Initial setting” by pressing {V} or {^}, then press {Select}. |
19 |
| 3 Scroll to “Set tel line” by pressing {V} or {^}, then press {Select}. |
19 |
| 4 Scroll to “Set dial mode” by pressing {V} or {^}, then press {Select}. |
19 |
| 5 Press {V} or {^} repeatedly to select the desired setting. |
19 |
| 6 Press {Save}, then press {OFF}. |
19 |
| Making/Answering Calls |
20 |
| Making/Answering Calls |
20 |
| Making calls |
20 |
| 1 Lift the handset and press {C}. |
20 |
| 2 Dial the phone number. |
20 |
| 3 When finished talking, press {OFF} or place the handset on the base unit. |
20 |
| Note: |
20 |
| To adjust the receiver volume |
20 |
| To use the speakerphone |
20 |
| 1 Lift the handset and press {s}. |
20 |
| 2 Dial the phone number. |
20 |
| 3 When the other party answers, speak into the microphone. |
20 |
| 4 When finished talking, press {OFF} or place the handset on the base unit. |
20 |
| Note: |
20 |
| To adjust the speaker volume |
20 |
| To dial after confirming the entered number |
20 |
| 1 Enter the phone number. |
20 |
| 2 Press {C} or {s}. |
20 |
| 3 When finished talking, press {OFF} or place the handset on the base unit. |
21 |
| To redial the last number dialed |
21 |
| 1 Press {C} or {s}. |
21 |
| 2 Press {REDIAL}. |
21 |
| To make a call using the redial list |
21 |
| 1 Press {REDIAL}. |
21 |
| 2 Press {V} or {^} repeatedly to display the desired number. |
21 |
| 3 Press {C} or {s}. |
21 |
| Answering calls |
21 |
| 1 Lift the handset and press {C} or {s}. |
21 |
| 2 When finished talking, press {OFF} or place the handset on the base unit. |
21 |
| Auto talk |
21 |
| Note: |
21 |
| Temporary ringer off |
21 |
| Using the other line during a conversation |
22 |
| To hang up the 2nd call and return to the 1st call |
22 |
| 1 Press {HOLD} to put the 1st call (LINE 1) on hold (page 23). |
22 |
| 2 Press {Line2} to make or answer a 2nd call. |
22 |
| 3 Press {OFF}, then press {Line1}. |
22 |
| To hold the 2nd call and return to the 1st call |
22 |
| 1 Press {HOLD} to put the 1st call (LINE 1) on hold (page 23). |
22 |
| 2 Press {Line2} to make or answer a 2nd call. |
22 |
| 3 Press {HOLD}, then press {Line} and {Line1} to return to the 1st call. |
22 |
| Conference calls |
22 |
| 1 Press {HOLD} to put the 1st call (LINE 1) on hold (page 23). |
22 |
| 2 Press {Line2} to make or answer a 2nd call. |
22 |
| 3 When the 2nd call is connected, press {Conf} to make a conference call. |
22 |
| Useful features during a call |
23 |
| HOLD button |
23 |
| Note: |
23 |
| Mute button |
23 |
| Voice enhancer |
23 |
| 1 Press {(VE)} during an outside call. |
23 |
| 2 To turn this feature on or off, press {(VE)}. |
23 |
| Note: |
23 |
| Clarity booster |
24 |
| 1 Press {MENU} during an outside call. |
24 |
| 2 Press {2} to select “Booster on” or “Booster off”. |
24 |
| Note: |
24 |
| PAUSE button (for PBX/long distance service users) |
24 |
| 1 Press {9}. |
24 |
| 2 Press {PAUSE}, then dial the phone number. |
24 |
| 3 Press {C} or {s}. |
24 |
| Note: |
24 |
| FLASH button |
24 |
| Note: |
24 |
| For Call Waiting service users |
25 |
| Note: |
25 |
| Temporary tone dialing (for rotary/pulse service users) |
25 |
| Note: |
25 |
| Handset locator |
25 |
| 1 Base unit: |
25 |
| 2 Base unit: |
25 |
| Phonebook |
26 |
| Phonebook |
26 |
| Using the phonebook |
26 |
| Adding items to the phonebook |
26 |
| 1 Press {V} or {^}. |
26 |
| 2 Press {Phonebook}. |
26 |
| 3 Press {Add}. |
26 |
| 4 Enter the name (max. 16 characters). See the character table for entry. |
26 |
| 5 Press {V}. |
26 |
| 6 Enter the phone number (max. 32 digits). |
26 |
| 7 Press {V}. |
26 |
| 8 Press {Save}. |
26 |
| 9 Press {OFF}. |
26 |
| Character table |
26 |
| To edit/correct a mistake |
26 |
| Note: |
26 |
| Calling someone in the phonebook |
27 |
| 1 Press {V} or {^}. |
27 |
| 2 Press {Phonebook}. |
27 |
| 3 Press {Search}. |
27 |
| 4 Press {V} or {^} repeatedly to display the desired item. |
27 |
| 5 Press {C}, {s}, {Line1}, or {Line2}. |
27 |
| Note: |
27 |
| To search for a name by initial |
27 |
| 1 Press {V} or {^}. |
27 |
| 2 Press {Phonebook}, then press {Search}. |
27 |
| 3 Press the dialing button ({0} to {9}, {#}, or {*}) which corresponds to the first letter you ar... |
27 |
| 4 Press {V} repeatedly to display the desired item. |
27 |
| Editing items in the phonebook |
27 |
| 1 Press {V} or {^}. |
27 |
| 2 Press {Phonebook}, then press {Search}. |
27 |
| 3 Press {V} or {^} repeatedly to display the desired item. |
27 |
| 4 Press {MENU}, then press {Edit}. |
27 |
| 5 Edit the name if necessary. See the character table on page 26 for character entry. |
27 |
| 6 Press {V}. |
27 |
| 7 Edit the phone number if necessary. |
27 |
| 8 Press {V}, then press {Save}. |
27 |
| 9 Press {OFF}. |
27 |
| Erasing items in the phonebook |
27 |
| 1 Press {V} or {^}. |
27 |
| 2 Press {Phonebook}, then press {Search}. |
27 |
| 3 Press {V} or {^} repeatedly to display the desired item. |
27 |
| 4 Press {MENU}, then press {Erase}. |
27 |
| 5 Press {Yes}. |
27 |
| 6 Press {OFF}. |
27 |
| Chain dial feature |
28 |
| 1 Dial from the phonebook: 1-800-012-3456 (Calling card access number). |
28 |
| 2 When prompted, dial from the phonebook: 1234 (Calling card PIN). |
28 |
| 3 When prompted, dial from the phonebook: 1-555-012-3456 (the person you want to call). |
28 |
| 1 During an outside call, press {MENU}. |
28 |
| 2 Press {1} to select “Phonebook”. |
28 |
| 3 Press {V} or {^} repeatedly to display the desired item. |
28 |
| 4 Press {Call}. |
28 |
| Note: |
28 |
| Caller ID Service |
29 |
| Caller ID Service |
29 |
| Using Caller ID service |
29 |
| Caller ID features |
29 |
| Call Waiting Caller ID display |
29 |
| Note: |
29 |
| Caller list |
30 |
| Missed calls |
30 |
| Viewing the caller list and calling back |
30 |
| 1 Press {V} or {^}. |
30 |
| 2 Press {Rcvd calls}. |
30 |
| 3 Press {V} to search from the most recent call, or press {^} to search from the oldest call. |
30 |
| 4 Press {C} or {s}. |
30 |
| Note: |
30 |
| Displayed symbols |
30 |
| Editing a caller’s phone number before calling back |
31 |
| 1 Press {V} or {^}. |
31 |
| 2 Press {Rcvd calls}. |
31 |
| 3 Press {V} or {^} repeatedly to display the desired item. |
31 |
| 4 Press {Edit} repeatedly until the phone number is shown in the desired format. |
31 |
| 1 Local phone number |
31 |
| 2 Area code – Local phone number |
31 |
| 3 1 – Area code – Local phone number |
31 |
| 5 To return a call, press {C} or {s}. |
31 |
| Caller ID number auto edit feature |
31 |
| Note: |
31 |
| Storing caller information into the phonebook |
32 |
| 1 Press {V} or {^}. |
32 |
| 2 Press {Rcvd calls}. |
32 |
| 3 Press {V} or {^} repeatedly to display the desired item. |
32 |
| 4 Press {MENU}, then press {Save}. |
32 |
| 1 Enter the name if necessary (see page 26, step 4). |
32 |
| 2 Press {V}, then press {Save}. |
32 |
| 5 Press {OFF}. |
32 |
| Note: |
32 |
| Erasing caller information |
32 |
| Erasing a selected item |
32 |
| 1 Press {V} or {^}. |
32 |
| 2 Press {Rcvd calls}. |
32 |
| 3 Press {V} or {^} repeatedly to display the desired item. |
32 |
| 4 Press {Erase}. |
32 |
| Erasing all items |
32 |
| 1 Press {V} or {^}. |
32 |
| 2 Press {Rcvd calls}. |
32 |
| 3 Press {All erase}. |
32 |
| 4 Press {Yes}. |
32 |
| Voice Mail Service |
33 |
| Voice Mail Service |
33 |
| Using Voice Mail service |
33 |
| Note: |
33 |
| Storing the Voice Mail (VM) access number |
33 |
| 1 Press {MENU}. |
33 |
| 2 Scroll to “Initial setting” by pressing {V} or {^}, then press {Select}. |
33 |
| 3 Scroll to “Voice Mail” by pressing {V} or {^}, then press {Select}. |
33 |
| 4 Scroll to “Store VM access#” by pressing {V} or {^}, then press {Select}. |
33 |
| 5 Press {V} or {^} to select the desired line. |
33 |
| 6 Enter your access number (max. 32 digits). |
33 |
| 7 Press {Save}, then press {OFF}. |
33 |
| Note: |
33 |
| To erase the Voice Mail access number |
33 |
| Voice Mail (VM) tone detection |
33 |
| Turning VM detection on/off |
34 |
| 1 Press {MENU}. |
34 |
| 2 Scroll to “Initial setting” by pressing {V} or {^}, then press {Select}. |
34 |
| 3 Scroll to “Voice Mail” by pressing {V} or {^}, then press {Select}. |
34 |
| 4 Scroll to “VM tone detect” by pressing {V} or {^}, then press {Select}. |
34 |
| 5 Select the line by pressing {V} or {^}. |
34 |
| 6 Press {V} or {^} repeatedly to select “On” or “Off”. |
34 |
| 7 Press {Save}, then press {OFF}. |
34 |
| Listening to Voice Mail messages |
34 |
| 1 Press {C}, {s}, {Line1}, or {Line2}, then press {VM} within 15 seconds. |
34 |
| 2 Follow the pre-recorded instructions. |
34 |
| 3 Press {OFF} when finished. |
34 |
| Note: |
34 |
| Message alert |
34 |
| 1 Press {MENU}. |
34 |
| 2 Scroll to “Initial setting” by pressing {V} or {^}, then press {Select}. |
34 |
| 3 Scroll to “Message alert” by pressing {V} or {^}, then press {Select}. |
34 |
| 4 Press {V} or {^} repeatedly to select “On” or “Off”. |
34 |
| 5 Press {Save}, then press {OFF}. |
34 |
| Note: |
34 |
| Programmable Settings |
35 |
| Programmable Settings |
35 |
| Guide to handset programming |
35 |
| Important: |
35 |
| – |
35 |
| – |
35 |
| – |
35 |
| – |
35 |
| – |
35 |
| – |
35 |
| – |
35 |
| – |
35 |
| – |
35 |
| – |
35 |
| – |
35 |
| – |
35 |
| – |
35 |
| – |
35 |
| – |
35 |
| – |
35 |
| Note: |
35 |
| Ringer settings |
36 |
| Handset ringer volume |
36 |
| 1 Press {MENU}. |
36 |
| 2 Scroll to “Ringer setting” by pressing {V} or {^}, then press {Select}. |
36 |
| 3 Scroll to “Ringer volume” by pressing {V} or {^}, then press {Select}. |
36 |
| 4 Press {V} or {^} to select the desired line. |
36 |
| 5 Press {V} or {^} repeatedly to select the desired volume. |
36 |
| 6 Press {Save}, then press {OFF}. |
36 |
| Note: |
36 |
| Handset ringer tone |
36 |
| 1 Press {MENU}. |
36 |
| 2 Scroll to “Ringer setting” by pressing {V} or {^}, then press {Select}. |
36 |
| 3 Scroll to “Ringer tone” by pressing {V} or {^}, then press {Select}. |
36 |
| 4 Press {V} or {^} to select the desired line. |
36 |
| 5 Press {V} or {^} repeatedly to select the desired setting. |
36 |
| 6 Press {Save}, then press {OFF}. |
36 |
| Note: |
36 |
| Handset interrupt tone |
37 |
| 1 Press {MENU}. |
37 |
| 2 Scroll to “Ringer setting” by pressing {V} or {^}, then press {Select}. |
37 |
| 3 Scroll to “Interrupt tone” by pressing {V} or {^}, then press {Select}. |
37 |
| 4 Press {V} or {^} repeatedly to select the desired setting. |
37 |
| 5 Press {Save}, then press {OFF}. |
37 |
| Call options |
37 |
| Auto talk |
37 |
| 1 Press {MENU}. |
37 |
| 2 Scroll to “Initial setting” by pressing {V} or {^}, then press {Select}. |
37 |
| 3 Scroll to “Auto talk” by pressing {V} or {^}, then press {Select}. |
37 |
| 4 Press {V} or {^} repeatedly to select “On” or “Off”. |
37 |
| 5 Press {Save}, then press {OFF}. |
37 |
| Note: |
37 |
| Voice enhancer |
38 |
| 1 Press {MENU}. |
38 |
| 2 Scroll to “Voice enhancer” by pressing {V} or {^}, then press {Select}. |
38 |
| 3 Press {V} or {^} repeatedly to select “On” or “Off”. |
38 |
| 4 Press {Save}, then press {OFF}. |
38 |
| Caller ID edit |
38 |
| 1 Press {MENU}. |
38 |
| 2 Scroll to “Initial setting” by pressing {V} or {^}, then press {Select}. |
38 |
| 3 Scroll to “Caller ID edit” by pressing {V} or {^}, then press {Select}. |
38 |
| 4 Press {V} or {^} repeatedly to select “On” or “Off”. |
38 |
| 5 Press {Save}, then press {OFF}. |
38 |
| Display options |
38 |
| Handset LCD contrast |
38 |
| 1 Press {MENU}. |
38 |
| 2 Scroll to “Initial setting” by pressing {V} or {^}, then press {Select}. |
38 |
| 3 Scroll to “LCD contrast” by pressing {V} or {^}, then press {Select}. |
38 |
| 4 Press {V} or {^} repeatedly to select the desired setting. |
38 |
| 5 Press {Save}, then press {OFF}. |
38 |
| Display language |
38 |
| 1 Press {MENU}. |
38 |
| 2 Scroll to “Initial setting” by pressing {V} or {^}, then press {Select}. |
38 |
| 3 Scroll to “Change language” by pressing {V} or {^}, then press {Select}. |
38 |
| 4 Press {V} or {^} repeatedly to select the desired language. |
38 |
| 5 Press {Save} or {Salvar}, then press {OFF}. |
38 |
| Note: |
38 |
| Telephone settings |
39 |
| Flash time |
39 |
| 1 Press {MENU}. |
39 |
| 2 Scroll to “Initial setting” by pressing {V} or {^}, then press {Select}. |
39 |
| 3 Scroll to “Set tel line” by pressing {V} or {^}, then press {Select}. |
39 |
| 4 Scroll to “Set flash time” by pressing {V} or {^}, then press {Select}. |
39 |
| 5 Press {V} or {^} to select the desired line. |
39 |
| 6 Press {V} or {^} repeatedly to select the desired setting. |
39 |
| 7 Press {Save}, then press {OFF}. |
39 |
| Note: |
39 |
| Line mode |
39 |
| 1 Press {MENU}. |
39 |
| 2 Scroll to “Initial setting” by pressing {V} or {^}, then press {Select}. |
39 |
| 3 Scroll to “Set tel line” by pressing {V} or {^}, then press {Select}. |
39 |
| 4 Scroll to “Set line mode” by pressing {V} or {^}, then press {Select}. |
39 |
| 5 Press {V} or {^} to select the desired line. |
39 |
| 6 Press {V} or {^} repeatedly to select the desired setting. |
39 |
| 7 Press {Save}, then press {OFF}. |
39 |
| Line selection |
40 |
| Important: |
40 |
| 1 Press {MENU}. |
40 |
| 2 Scroll to “Initial setting” by pressing {V} or {^}, then press {Select}. |
40 |
| 3 Scroll to “Set tel line” by pressing {V} or {^}, then press {Select}. |
40 |
| 4 Scroll to “Line selection” by pressing {V} or {^}, then press {Select}. |
40 |
| 5 Press {V} or {^} repeatedly to select the desired setting. |
40 |
| 6 Press {Save}, then press {OFF}. |
40 |
| Other options |
40 |
| Handset key tone |
40 |
| 1 Press {MENU}. |
40 |
| 2 Scroll to “Initial setting” by pressing {V} or {^}, then press {Select}. |
40 |
| 3 Scroll to “Key tone” by pressing {V} or {^}, then press {Select}. |
40 |
| 4 Press {V} or {^} repeatedly to select “On” or “Off”. |
40 |
| 5 Press {Save}, then press {OFF}. |
40 |
| Re-registering the handset |
40 |
| Important: |
40 |
| 1 Handset: |
40 |
| 2 Scroll to “Initial setting” by pressing {V} or {^}, then press {Select}. |
40 |
| 3 Scroll to “Registration” by pressing {V} or {^}, then press {Select}. |
40 |
| 4 Base unit: |
41 |
| 5 Handset: |
41 |
| Customer support |
41 |
| 1 Press {MENU}. |
41 |
| 2 Scroll to “Customer support” by pressing {V} or {^}, then press {Select}. |
41 |
| 3 Press {OFF}. |
41 |
| Programming via direct commands |
42 |
| 1 Press {MENU}. |
42 |
| 2 Enter the desired feature code (shown below). |
42 |
| 3 Enter the desired setting code (shown below). |
42 |
| 4 Press {Save}. |
42 |
| 5 Press {OFF} to exit programming mode. |
42 |
| Direct commands chart |
42 |
| Note: |
43 |
| Useful Information |
44 |
| Useful Information |
44 |
| Wall mounting |
44 |
| 1 Push the hook and turn it upward until it clicks into place. |
44 |
| 2 Press the tabs in the direction of the arrows (1), then remove the wall mounting adaptor (2). |
44 |
| 3 Connect the AC adaptor. Tuck the telephone line cord inside the wall mounting adaptor, then pus... |
44 |
| 4 Connect the telephone line cord. Mount the unit, then slide it down. |
44 |
| 5 To charge the handset battery: |
45 |
| Headset (optional) |
45 |
| To connect an optional headset to the handset |
45 |
| Note: |
45 |
| Belt clip |
46 |
| To attach the belt clip |
46 |
| To remove the belt clip |
46 |
| Shoulder rest attachment |
46 |
| To attach the shoulder rest attachment |
46 |
| To remove the shoulder rest attachment |
46 |
| Error messages |
47 |
| Troubleshooting |
48 |
| General use |
48 |
| Programmable settings |
48 |
| Making/answering calls, Paging |
49 |
| Phonebook |
49 |
| Caller ID |
50 |
| Battery recharge |
51 |
| Power failure |
51 |
| FCC and other information |
52 |
| Specifications |
54 |
| Base unit |
54 |
| Operating environment: |
54 |
| Frequency: |
54 |
| Dimensions: |
54 |
| Mass (Weight): |
54 |
| Power consumption: |
54 |
| Power supply: |
54 |
| Handset |
54 |
| Operating environment: |
54 |
| Frequency: |
54 |
| Dimensions: |
54 |
| Mass (Weight): |
54 |
| Power supply: |
54 |
| Security codes: |
54 |
| Note: |
54 |
| Warranty |
55 |
| Customer services |
57 |
| Index |
58 |
| Index |
58 |
| Index |
58 |
| If you need assistance with setup or operation; |
60 |
| 1 Visit our website: http://www.panasonic.com/consumersupport |
60 |
| 2 Contact us via the web at: http://www.panasonic.com/contactinfo |
60 |
| 3 Call us at: 1-800-211-PANA (7262) |
60 |
| Panasonic Consumer Electronics Company, Division of Panasonic Corporation of North America |
60 |

 1
1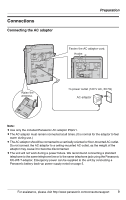 9
9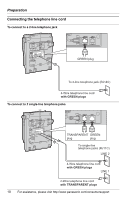 10
10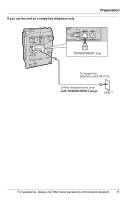 11
11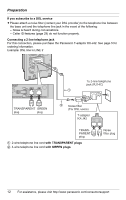 12
12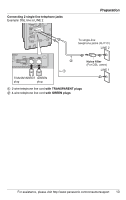 13
13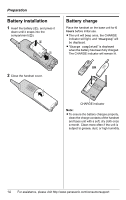 14
14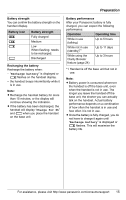 15
15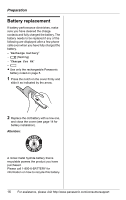 16
16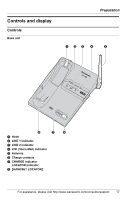 17
17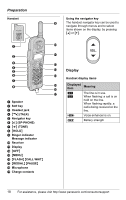 18
18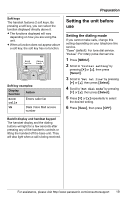 19
19

