Panasonic KXTGA248S KXTG2480 User Guide - Page 40
Other options
 |
View all Panasonic KXTGA248S manuals
Add to My Manuals
Save this manual to your list of manuals |
Page 40 highlights
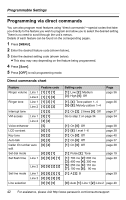
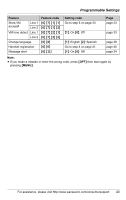
Programmable Settings Line selection The line selection mode determines which line is selected when you press {C} or {s}. "Auto" (default): When making a call, LINE 1 will be selected, If that line is unavailable, LINE 2 will be selected. When answering a call, the ringing line will be selected. L When you call back from the caller list (page 30), the indicated line will be selected. L If the auto talk feature turned on (page 37), the unit will select the ringing line when you lift the handset off the base unit to answer the call. "Line1": LINE 1 will be selected. "Line2": LINE 2 will be selected. Important: L You can select a line manually regardless of the line selection mode by pressing {Line1} or {Line2}. 1 Press {MENU}. 2 Scroll to "Initial setting" by pressing {V} or {^}, then press {Select}. 3 Scroll to "Set tel line" by pressing {V} or {^}, then press {Select}. 4 Scroll to "Line selection" by pressing {V} or {^}, then press {Select}. 5 Press {V} or {^} repeatedly to select the desired setting. 6 Press {Save}, then press {OFF}. Other options Handset key tone You can select whether or not key tones are heard when keys are pressed. Includes confirmation tones and error tones. The default setting is ON. 1 Press {MENU}. 2 Scroll to "Initial setting" by pressing {V} or {^}, then press {Select}. 3 Scroll to "Key tone" by pressing {V} or {^}, then press {Select}. 4 Press {V} or {^} repeatedly to select "On" or "Off". 5 Press {Save}, then press {OFF}. Re-registering the handset If "No link to base. Move closer to base, try again." is displayed even when the handset is near the base unit, you may need to re-register the handset to the base unit. Important: L Make sure the base unit is not being used. L Have the handset and base unit near each other when re-registering the handset. 1 Handset: Press {MENU}. 2 Scroll to "Initial setting" by pressing {V} or {^}, then press {Select}. 3 Scroll to "Registration" by pressing {V} or {^}, then press {Select}. 40 For assistance, please visit http://www.panasonic.com/consumersupport
-
 1
1 -
2
-
3
-
4
-
5
-
6
-
7
-
8
-
9
-
10
-
11
-
12
-
13
-
14
-
15
-
16
-
17
-
18
-
19
-
20
-
21
-
22
-
23
-
24
-
25
-
26
-
27
-
28
-
29
-
30
-
31
-
32
-
33
-
34
-
 35
35 -
 36
36 -
 37
37 -
 38
38 -
 39
39 -
 40
40 -
 41
41 -
 42
42 -
 43
43 -
 44
44 -
 45
45 -
46
-
47
-
48
-
49
-
50
-
51
-
52
-
53
-
54
-
55
-
56
-
57
-
58
-
59
-
60
 |
 |
