Panasonic LB60U Operating Instructions - Page 27
SELECT button or the DIRECT INPUT SELECT, Press the AUTO SETUP button when RGB
 |
UPC - 791871111284
View all Panasonic LB60U manuals
Add to My Manuals
Save this manual to your list of manuals |
Page 27 highlights
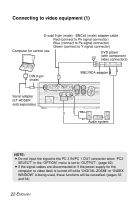
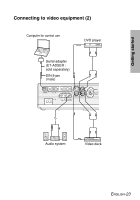
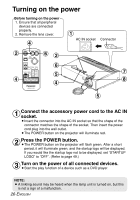
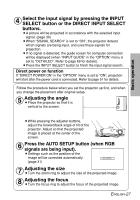
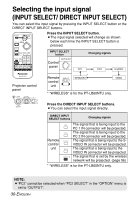
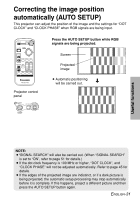
Basic operation & Select the input signal by pressing the INPUT SELECT button or the DIRECT INPUT SELECT buttons. BA picture will be projected in accordance with the selected input signal. (page 30) BWhen "SIGNAL SEARCH" is set to "ON", the projector detects which signals are being input, and uses these signals for projection. BIf no signal is detected, the guide screen for computer connection will be displayed (when "INPUT GUIDE" in the "OPTION" menu is set to "DETAILED". Refer to page 69 for details). BPress the INPUT SELECT button to finish the input signal search. Direct power on function If "DIRECT POWER ON" in the "OPTION" menu is set to "ON", projection will start after the power cord is connected. Refer to page 51 for details. Follow the procedure below when you set the projector up first, and when you change the placement after original setup. ' Adjusting the angle BPlace the projector so that it is vertical to the screen. BWhile pressing the adjuster buttons, adjust the forward/back angle of tilt of the projector. Adjust so that the projected image is placed at the center of the screen. ( Press the AUTO SETUP button (when RGB signals are being input). BSettings such as the position of the image will be corrected automatically. (page 31) ) Adjusting the size BTurn the zoom ring to adjust the size of the projected image. * Adjusting the focus BTurn the focus ring to adjust the focus of the projected image. ENGLISH-27
-
 1
1 -
2
-
3
-
4
-
5
-
6
-
7
-
8
-
9
-
10
-
11
-
12
-
13
-
14
-
15
-
16
-
17
-
18
-
19
-
20
-
21
-
 22
22 -
 23
23 -
 24
24 -
 25
25 -
 26
26 -
 27
27 -
 28
28 -
 29
29 -
 30
30 -
 31
31 -
 32
32 -
33
-
34
-
35
-
36
-
37
-
38
-
39
-
40
-
41
-
42
-
43
-
44
-
45
-
46
-
47
-
48
-
49
-
50
-
51
-
52
-
53
-
54
-
55
-
56
-
57
-
58
-
59
-
60
-
61
-
62
-
63
-
64
-
65
-
66
-
67
-
68
-
69
-
70
-
71
-
72
-
73
-
74
-
75
-
76
-
77
-
78
-
79
-
80
-
81
-
82
 |
 |
