Panasonic MCUL675 MCUL675 User Guide - Page 46
Removing and Installing Lower Plate, Fig. 1
 |
UPC - 037988690855
View all Panasonic MCUL675 manuals
Add to My Manuals
Save this manual to your list of manuals |
Page 46 highlights
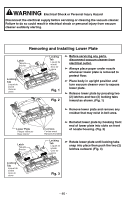
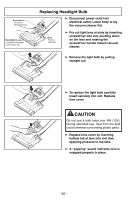
WARNING Electrical Shock or Personal Injury Hazard Disconnect the electrical supply before servicing or cleaning the vacuum cleaner. Failure to do so could result in electrical shock or personal injury from vacuum cleaner suddenly starting. Removing and Installing Lower Plate Latch Taquets Broche Locking Tab Loquet de sûreté Guía de cierre Locking Tab Loquet de sûreté Guía de cierre Fig. 1 Fig. 2 ➢ Before servicing any parts, disconnect vacuum cleaner from electrical outlet. ➢ Always place paper under nozzle whenever lower plate is removed to protect floor. ➢ Place body in upright position and turn vacuum cleaner over to expose lower plate. ➢ Release lower plate by pressing two (2) latches and two (2) locking tabs inward as shown. (Fig. 1) ➢ Remove lower plate and remove any residue that may exist in belt area. Lower Plate Plaque inféreure Base inferior Latch Taquets Broche Front Slots Fentes avant Ranuras frontales ➢ Reinstall lower plate by hooking front end of lower plate into slots on front of nozzle housing. (Fig. 2) Locking Tab Loquet de sûreté Guía de cierre ➢ Rotate lower plate until locking tabs snap into place then push the two (2) latches outward. (Fig. 3) Locking Tab Loquet de sûreté Guía de cierre Fig. 3 - 46 -
-
 1
1 -
2
-
3
-
4
-
5
-
6
-
7
-
8
-
9
-
10
-
11
-
12
-
13
-
14
-
15
-
16
-
17
-
18
-
19
-
20
-
21
-
22
-
23
-
24
-
25
-
26
-
27
-
28
-
29
-
30
-
31
-
32
-
33
-
34
-
35
-
36
-
37
-
38
-
39
-
40
-
 41
41 -
 42
42 -
 43
43 -
 44
44 -
 45
45 -
 46
46 -
 47
47 -
 48
48 -
 49
49 -
 50
50 -
 51
51 -
52
-
53
-
54
-
55
-
56
-
57
-
58
-
59
-
60
-
61
-
62
-
63
-
64
 |
 |
