Panasonic PT47WXD63G PT47WXD63 User Guide - Page 15
Remote Control Operation
 |
View all Panasonic PT47WXD63G manuals
Add to My Manuals
Save this manual to your list of manuals |
Page 15 highlights
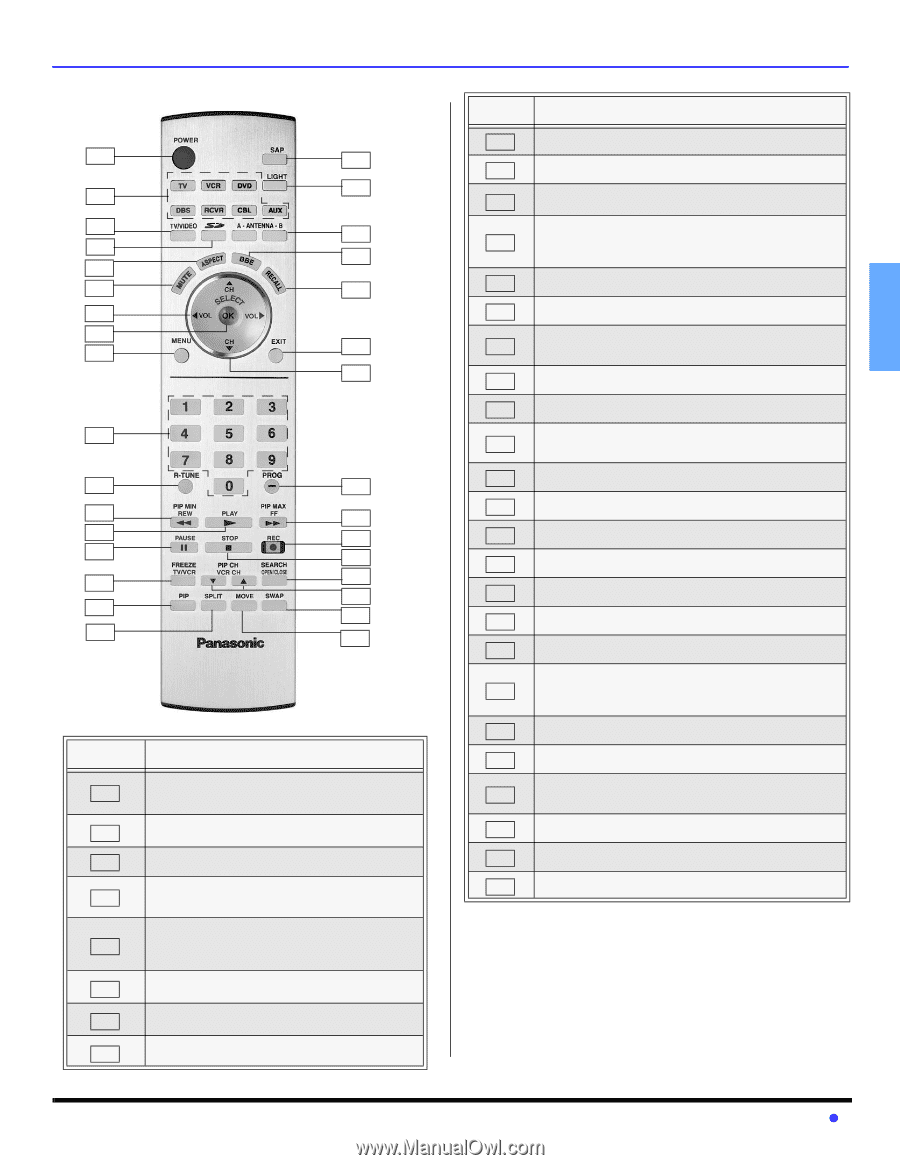
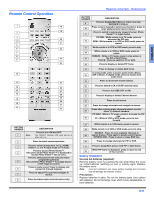
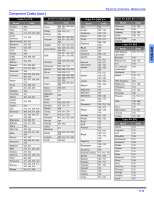
Remote Control Operation 1 18 19 2 3 20 4 21 5 6 22 7 8 9 23 24 10 11 25 12 26 13 27 14 28 29 15 30 16 31 17 32 BUTTON NUMBER 1 Note: DESCRIPTION Press to turn ON and OFF. The ON/OFF indicator LED (red) will be lit when set is on. 2 Press to select remote operation. Press to select (Component 1or 2), (HDMI), 3 (Video 1, 2, 3 or 4) input mode or TV mode. Press to access Photo Viewer™. 4 Also press while Photo Viewer™ is displayed to access Photo Viewer™ set up menu. Press to select picture size (ratio) to match programming format. 5 Also used for Photo Viewer™ to change aspect of the image on-screen. Press to mute sound. Press to display and 6 cancel CC (Closed Caption). Press to adjust TV sound and navigate in 7 menus. 8 Press to choose menu and sub-menu entry. REMOTE CONTROL OPERATION BUTTON NUMBER DESCRIPTION Press to display Main Menu or return one step 9 backward in menus. Press numeric keypad to select any channel or press to 10 enter alphanumeric input in menus. Press to switch to previously viewed channel, Photo 11 Viewer™ or input modes. PIP MIN - While remote is in TV mode, press to decrease the PIP size. 12 REW - While remote is in VCR or DVD mode, press to rewind. 13 While remote is in VCR or DVD mode, press to play. While remote is in VCR or DVD mode, press to 14 pause. FREEZE - While in TV mode, press to stop action in 15 the PIP or Split frame. TV/VCR - Press to switch to TV or VCR. 16 Press to display or delete PIP frame. 17 Press to display or delete Split frame. In analog mode, press to access audio modes (Stereo, 18 SAP or Mono). In digital mode, press to access next audio track. 19 Press to illuminate remote buttons. 20 Press to switch to (A or B) RF antenna input. 21 Press to turn BBE OFF or ON. 22 Press to display or delete Channel banner. 23 Press to exit menus. 24 Press to change channels and navigate in menus. Press after entering major channel numbers to enter 25 minor (-) channel numbers. PIP MAX - While in TV mode, press to increase the PIP size. 26 FF - While in VCR or DVD mode, press to fast forward. 27 While remote is in VCR mode, press to record. 28 While remote is in VCR or DVD mode, press to stop. SEARCH - Press to scan available channels in 29 search frames. Press again to delete search frames. OPEN/CLOSE - Press to open or close DVD tray. 30 Press to change channels for PIP or VCR. 31 Press to swap Main picture with PIP or Split frame. While PIP frame is displayed, press to move to one 32 of four corners. Battery Installation Use two AA batteries (supplied): Remove battery cover by pushing the tab while lifting the cover up. Install batteries matching (+) and (-) polarity signs. Replace the battery cover. Note: Incorrect installation can cause battery leakage and corrosion that will damage the Remote Control. Precautions Replace batteries in pairs. Do not mix battery types (zinc carbon with alkaline). Do not recharge, heat, short circuit, disassemble, or burn batteries. 13 z ENGLISH
-
 1
1 -
2
-
3
-
4
-
5
-
6
-
7
-
8
-
9
-
 10
10 -
 11
11 -
 12
12 -
 13
13 -
 14
14 -
 15
15 -
 16
16 -
 17
17 -
 18
18 -
 19
19 -
 20
20 -
21
-
22
-
23
-
24
-
25
-
26
-
27
-
28
-
29
-
30
-
31
-
32
-
33
-
34
-
35
-
36
-
37
-
38
-
39
-
40
-
41
-
42
-
43
-
44
-
45
-
46
-
47
-
48
-
49
-
50
-
51
-
52
-
53
-
54
-
55
-
56
-
57
-
58
-
59
-
60
-
61
-
62
-
63
-
64
-
65
-
66
-
67
-
68
-
69
-
70
-
71
-
72
-
73
-
74
-
75
-
76
-
77
-
78
-
79
-
80
-
81
-
82
-
83
-
84
-
85
-
86
-
87
-
88
 |
 |