Panasonic PT47WXD64J PT47WXD64 User Guide - Page 9
Front And Rear View Of The High Definition Projection Television - cameras
 |
View all Panasonic PT47WXD64J manuals
Add to My Manuals
Save this manual to your list of manuals |
Page 9 highlights
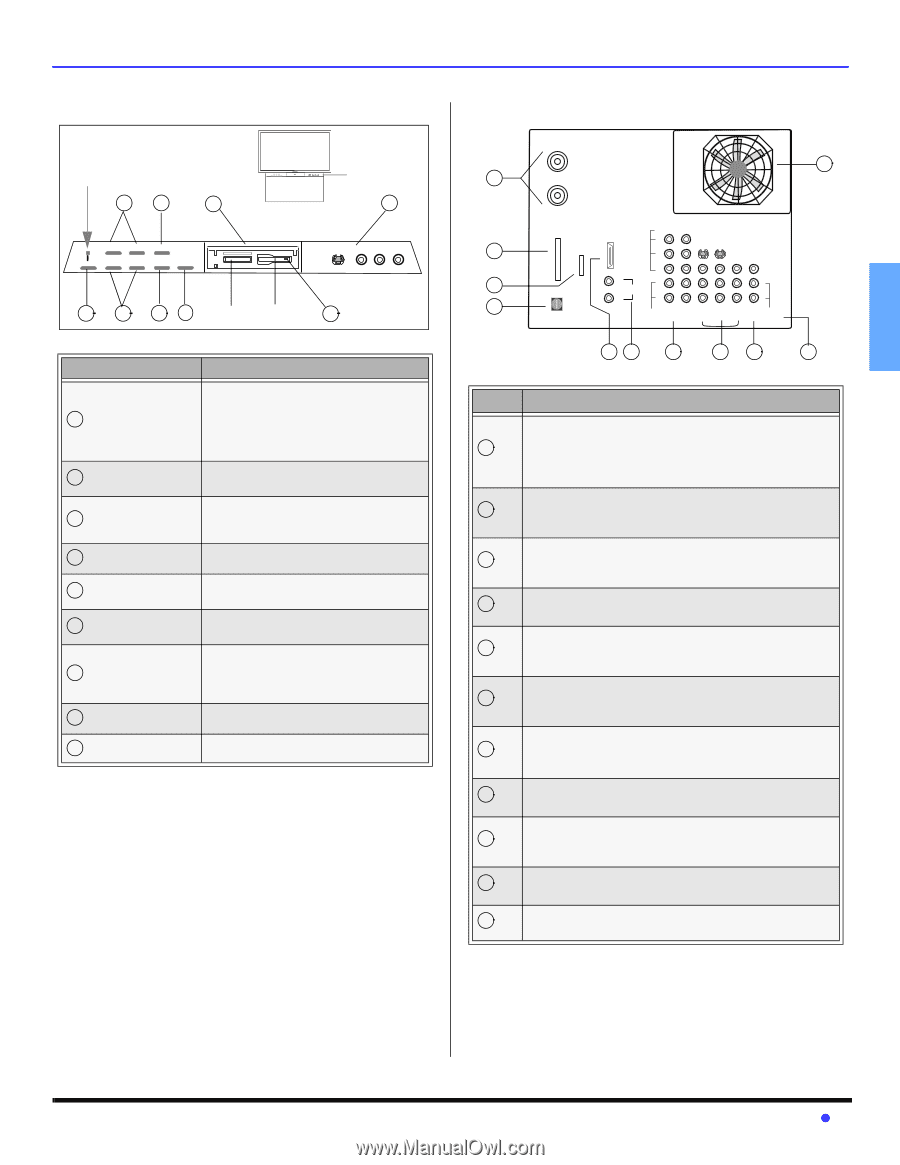
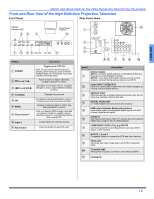
ENGLISH FRONT AND REAR VIEW OF THE HIGH DEFINITION PROJECTION TELEVISION Front and Rear View of the High Definition Projection Television Front Panel Rear Panel Jacks ON/OFF Indicator LED 2 4 7 POWER CHANNEL VOLUME TV/VIDEO OK MENU CHANNEL TV/VIDEO POWER VOLUME MENU OK S-VIDEO VIDEO 4 L - AUDIO - R Front Panel controls 8 S-VIDEO VIDEO 4 L - AUDIO - R 1 3 5 6 SD Slot PC Slot 9 ANT A Cable In 1 ANT B CableCARDTM INTERFACE HDMI SERVICE VIDEO Y 2 ONLY A/V IN PB S-VIDEO PR VIDEO 3 L AUDIO IN L R R 4 1 2 AUDIO COMPONENT INPUT INPUT INPUT PROG TO DIGITAL AUDIO OUT VIDEO INPUT 1 2 3 OUT AUDIO AMP 11 Feature 1 POWER 2 CH and CH 3 VOL and VOL 4 TV/VIDEO 5 OK 6 MENU 7 Photo Viewer™ 8 Input 4 9 Eject button Description Toggles power OFF/ON Note: In case of front panel lock-up or remote control hang-up, press and hold POWER button for more than 5 seconds until the unit resets itself. Tunes to lower or higher channels, navigate up/down in menus. Decrease or increase volume, navigate left/right in menu, adjust selected feature in menu. Changes Input source Completes channel specification, press to accepts menu and sub-menu selection. Display or remove menu or return one step backward in menus. Lets you display JPEG images recorded on memory cards by a digital camera. The Photo Viewer™ is located behind the door marked SD. Analog inputs for external devices Push this button to eject PC card. 56 7 89 10 Item # Description Antenna Inputs ANT A - Connect Cable Antenna or Terrestrial Antenna to 1 this input to receive Digital channels. ANT B - If you have both Cable antenna and Terrestrial antenna, connect the Terrestrial antenna to ANT B. CableCARD™ INTERFACE 2 Insert the CableCARD module from the Cable company to receive premium digital service. SERVICE ONLY 3 Card slot used by a certified service technician only. Do not insert any memory card into this slot. 4 DIGITAL AUDIO OUT 5.1 Dolby Digital surround sound optical output. HDMI (High Definition Multimedia Interface) 5 Input that accepts uncompressed digital signal and multi channel digital audio signal. AUDIO IN 6 Use these audio inputs when DVI devices are connected to HDMI input using the DVI to HDMI adaptor. COMPONENT VIDEO (Y-PB-PR) INPUTS 7 Use these jacks for connecting devices such as a DVD player or Set Top Box. 8 INPUTS 1, 2 and 3 Composite inputs for connecting VCR and other devices. PROG OUT 9 Terminals that output fixed audio and NTSC composite video. 10 TO AUDIO AMP Analog Audio Output to connect to an analog amplifier 11 Cooling fan 7 z
-
 1
1 -
2
-
3
-
 4
4 -
 5
5 -
 6
6 -
 7
7 -
 8
8 -
 9
9 -
 10
10 -
 11
11 -
 12
12 -
 13
13 -
 14
14 -
15
-
16
-
17
-
18
-
19
-
20
-
21
-
22
-
23
-
24
-
25
-
26
-
27
-
28
-
29
-
30
-
31
-
32
-
33
-
34
-
35
-
36
-
37
-
38
-
39
-
40
-
41
-
42
-
43
-
44
-
45
-
46
-
47
-
48
-
49
-
50
-
51
-
52
-
53
-
54
-
55
-
56
-
57
-
58
-
59
-
60
-
61
-
62
-
63
-
64
-
65
-
66
-
67
-
68
-
69
-
70
-
71
-
72
-
73
-
74
-
75
-
76
-
77
-
78
-
79
-
80
-
81
-
82
-
83
-
84
-
85
-
86
-
87
-
88
 |
 |