Panasonic PT56DLX75 PT56DLX75 User Guide - Page 23
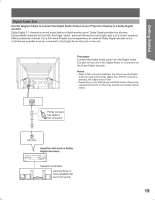
Procedure, Compatible formats, Audio signal PCM, Press TV/VIDEO to select HDMI input.
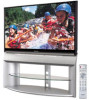 |
View all Panasonic PT56DLX75 manuals
Add to My Manuals
Save this manual to your list of manuals |
Page 23 highlights
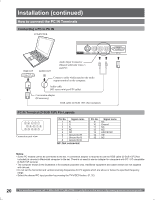
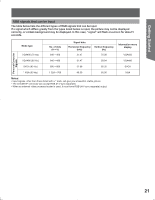
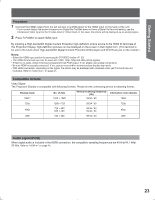
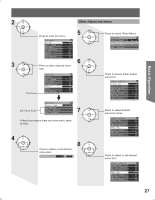
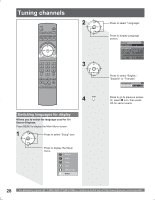
Getting Started Procedure 1 Connect the HDMI output from the set top box or a DVD player to the HDMI input on the back of the unit. • If you cannot display the picture because your Digital Set Top Box does not have a Digital Out terminal setting, use the Component Video Input (or the S-Video Input or Video Input). In this case, the picture will be displayed as an analog signal. 2 Press TV/VIDEO to select HDMI input. By inputting a High-bandwidth Digital Content Protection high-definition picture source to the HDMI IN terminals of this Projection Display, high-definition pictures can be displayed on the screen in their digital form. (This terminal is for use in the future when High-bandwidth Digital Content Protection DVD players and D-VHS are put on the market.) Notes: • Select the HDMI input position by pressing the TV/VIDEO button. (P. 32) • The HDMI IN terminals can only be used with 1080i, 720p, 480p and 480i picture signals. • If there is no audio, check if the source equipment has PCM output. If not, please use analog connections. • Be sure HDMI is securely connected. If not, picture noise and/or incorrect picture display may result. • With HDMI connection, depending on the signal, the picture may be displayed with unnatural colors (as if red and blue are reversed). Refer to "Color Corr." on page 41. Compatible formats Video Signal: The Projection Display is compatible with following formats. Please set the connecting device to following format. Display mode 1080i * No. of dots 1920 × 1080 Vertical scanning frequency (Hz) 59.94 / 60 Information menu display 1080i 720p 480p 1280 × 720 720 × 480 640 × 480 59.94 / 60 59.94 / 60 59.94 / 60 720p 480p 480i 720 × 480 59.94 / 60 480i Audio signal (PCM) When digital audio is included in the HDMI connection, the compatible sampling frequencies are 48 kHz/44.1 kHz/ 32 kHz. Refer to "HDMI In" on page 43. 23
-
 1
1 -
2
-
3
-
4
-
5
-
6
-
7
-
8
-
9
-
10
-
11
-
12
-
13
-
14
-
15
-
16
-
17
-
 18
18 -
 19
19 -
 20
20 -
 21
21 -
 22
22 -
 23
23 -
 24
24 -
 25
25 -
 26
26 -
 27
27 -
 28
28 -
29
-
30
-
31
-
32
-
33
-
34
-
35
-
36
-
37
-
38
-
39
-
40
-
41
-
42
-
43
-
44
-
45
-
46
-
47
-
48
-
49
-
50
-
51
-
52
-
53
-
54
-
55
-
56
-
57
-
58
-
59
-
60
-
61
-
62
-
63
-
64
-
65
-
66
-
67
-
68
-
69
-
70
-
71
-
72
-
73
-
74
-
75
-
76
-
77
-
78
-
79
-
80
 |
 |
