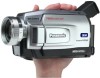
Panasonic PV-DV202 Digital Video Camcorder - Page 46
Copying your Tapes to, S-VHS or VHS Cassette, Monitor with your TV
 |
UPC - 037988976911
View all Panasonic PV-DV202 manuals
Add to My Manuals
Save this manual to your list of manuals |
Page 46 highlights
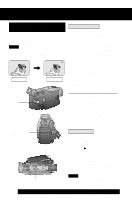
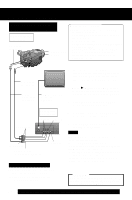
Editing Features Copying your Tapes to S-VHS or VHS Cassette Source (Playing) Palmcorder DC Cable (Supplied) S-VIDEO OUT A/V OUT Before you begin • Connect both Palmcorder and VCR to their power sources. • Connect the Palmcorder to a VCR as illustrated left. • Turn ON both units. • Set the recording VCR's Input Signal Selector to LINE. • Set the Palmcorder POWER to VCR. • Before using S-VIDEO Connector, insert the DC Cable into the DC IN Terminal. (p. 15) A/V Cable (Supplied) TV (To View) S-Video Cable (not supplied) VHF Connecting Cable (not supplied) To Audio In Recording: VCR (Rear) Audio In Video In To Video In To S-Video In (If there is S-Video In) S-Video In Monitor with your TV • Turn the TV ON and select its VCR channel (either CH3 or CH4). • Set the VCR/TV Selector on the recording VCR to VCR. 1 Insert a pre-recorded tape into the source (playing) Palmcorder and a blank tape, with record tab in place, into the target VCR (Recorder). 2Press (PLAY) on the Palmcorder. When the tape reaches the point you want to start dubbing, press PAUSE. 3 Place the VCR into REC/PAUSE mode. (See VCR manual.) 4 Simultaneously, press PAUSE on both units to begin copying. 5 Press STOP on both units when copying is completed. Note • For technical reasons, dubbing a tape may reduce its quality. • Press DISPLAY ON TV on the Palmcorder Remote Control to eliminate EVF/LCD Monitor indications. • If the Time Code is displayed in the EVF or LCD monitor, it cannot be reset. • Only the DATE/TIME, when displayed, will be recorded on the tape. CAUTION: Unauthorized exchanging and/or copying of copyrighted recordings may be copyright infringement. 46 Forassistance, pleasecall: 1-800-211-PANA(7262)orsende-mailto:[email protected]
-
 1
1 -
2
-
3
-
4
-
5
-
6
-
7
-
8
-
9
-
10
-
11
-
12
-
13
-
14
-
15
-
16
-
17
-
18
-
19
-
20
-
21
-
22
-
23
-
24
-
25
-
26
-
27
-
28
-
29
-
30
-
31
-
32
-
33
-
34
-
35
-
36
-
37
-
38
-
39
-
40
-
 41
41 -
 42
42 -
 43
43 -
 44
44 -
 45
45 -
 46
46 -
 47
47 -
 48
48 -
 49
49 -
 50
50 -
 51
51 -
52
-
53
-
54
-
55
-
56
-
57
-
58
-
59
-
60
-
61
-
62
-
63
-
64
-
65
-
66
-
67
-
68
-
69
-
70
-
71
-
72
-
73
-
74
-
75
-
76
-
77
-
78
-
79
-
80
-
81
-
82
-
83
-
84
-
85
-
86
-
87
-
88
-
89
-
90
-
91
-
92
-
93
-
94
-
95
-
96
-
97
-
98
-
99
-
100
-
101
-
102
-
103
-
104
-
105
-
106
-
107
-
108
-
109
-
110
-
111
-
112
-
113
-
114
-
115
-
116
-
117
-
118
-
119
-
120
 |
 |
