Panasonic SAAK220 SAAK220 User Guide - Page 4
SET-UP, AC power supply cord, AM loop antenna, Speakers, External unit optional
 |
View all Panasonic SAAK220 manuals
Add to My Manuals
Save this manual to your list of manuals |
Page 4 highlights
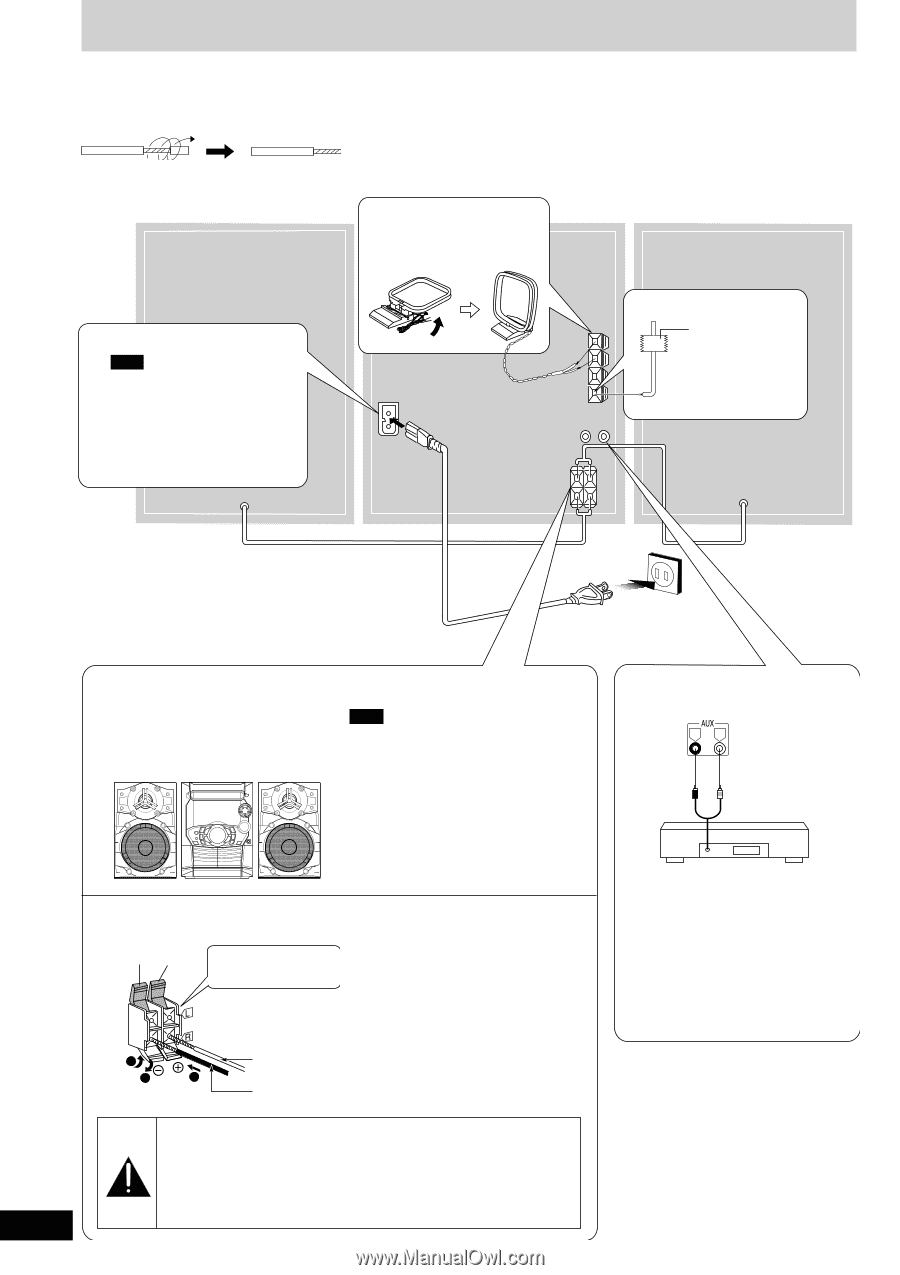
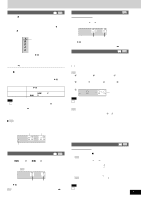
Set-up Connect the AC power supply cord only after all other connections have been made. Preparation Twist and pull off the vinyl tip of the antenna wires and speaker cords. 2 AM loop antenna Stand the antenna up (R) on its base. 4 AC power supply cord Note The included AC power supply cord is for use with this unit only. Do not use it with other equipment. For your reference Information you enter into the unit's memory, except for time, remains intact for up to a week after the AC power supply cord is disconnected. (L) 1 FM indoor antenna Adhesive tape Affix where reception is best. 3 Speakers Placement Speakers are designed identically so that no left or right channel orientation is necessary. MEMORY Note • Keep your speakers at least 10 mm (13/32˝) away from the system for proper ventilation. • These speakers do not have magnetic shielding. Do not place them near televisions, personal computers or other devices easily influenced by magnetism. • You cannot take the front net off the speakers. Connection Black Red Connect the left (L) side in the same way. Use only the supplied speakers. The combination of the main unit and speakers provide the best sound. Using other speakers can damage the unit and sound quality will be negatively affected. External unit (optional) RL (R) (L) Analog player (not included) • An analog player with a built-in phono equalizer can be connected. • For details, refer to the instruction manual of the units which are to be connected. • When units other than those described above are to be connected, please consult your audio dealer. 4 RQT7528 3 1 2 Red (+) Black (-) Caution • Use the speakers only with the recommended system. Failure to do so may lead to damage to the amplifier and/or the speakers, and may result in the risk of fire. Consult a qualified service person if damage has occurred or if you experience a sudden change in performance. • Do not attach these speakers to walls or ceilings.
-
 1
1 -
 2
2 -
 3
3 -
 4
4 -
 5
5 -
 6
6 -
 7
7 -
 8
8 -
 9
9 -
 10
10 -
11
-
12
-
13
-
14
-
15
-
16
 |
 |