Panasonic SC-PTX7 Dvd Home Theater Sound System - Page 13
Optional Connections - theater system
 |
UPC - 037988254873
View all Panasonic SC-PTX7 manuals
Add to My Manuals
Save this manual to your list of manuals |
Page 13 highlights
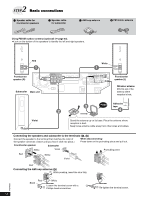
Getting Started 6 Video cable 7 AC power supply cord Preparations Television (not included) VIDEO IN AUDIO IN AUDIO OUT L R Audio cable (not included) This audio connection will enable you to play audio from your television through your home theater system (➜ page 86). Main unit (8Њ) CENTER SPEAKERS SUBWOOFER (4Њ) R FRONT (8Њ) L AC IN ʙ DIGITAL TRANSMITTER TV IN AUX XM VIDEO L L OUT PR R R DIGITAL Y P B OPTICAL COMPONENT VIDEO OUT LOOP ANT GND OUT IN(TV) AV OUT EXT LOOP AM ANT FM ANT 75Њ OPTION V.1 DC OUT 5V 500mA MAX LAN (10BASE-T/ 100BASE-TX) [Note] The included AC power supply cord is for use with the main unit only. Do not use it with other equipment. Also, do not use the cord for other equipment with the main unit. To household AC outlet (AC 120 V, 60 Hz) Conserving power The main unit consumes a small amount of power when it is in standby mode (approx. 0.5 W). To save power when it is not to be used for a long time, unplug it from the household AC outlet. You will need to reset some memory items after plugging in the main unit. Optional Connections ∫ For those who want to enjoy higher picture quality and have a TV equipped with an HDMI terminal (➜ page 17) ∫ For those who have a cable box or VCR (➜ page 18) ∫ For those who want to enjoy 5.1 ch surround sound by connecting with an amplifier or receiver (➜ page 18) ∫ For those who want to connect this unit with an external device (such as an MP3 player) (➜ page 19) ∫ For those who want to connect to XM satellite radio (➜ page 19) ∫ For those who want to connect to a network and import new album/artist information (➜ page 20) 13 RQT8926
-
 1
1 -
2
-
3
-
4
-
5
-
6
-
7
-
 8
8 -
 9
9 -
 10
10 -
 11
11 -
 12
12 -
 13
13 -
 14
14 -
 15
15 -
 16
16 -
 17
17 -
 18
18 -
19
-
20
-
21
-
22
-
23
-
24
-
25
-
26
-
27
-
28
-
29
-
30
-
31
-
32
-
33
-
34
-
35
-
36
-
37
-
38
-
39
-
40
-
41
-
42
-
43
-
44
-
45
-
46
-
47
-
48
-
49
-
50
-
51
-
52
-
53
-
54
-
55
-
56
-
57
-
58
-
59
-
60
-
61
-
62
-
63
-
64
-
65
-
66
-
67
-
68
-
69
-
70
-
71
-
72
-
73
-
74
-
75
-
76
-
77
-
78
-
79
-
80
-
81
-
82
-
83
-
84
-
85
-
86
-
87
-
88
-
89
-
90
-
91
-
92
-
93
-
94
-
95
-
96
-
97
-
98
-
99
-
100
-
101
-
102
-
103
-
104
-
105
-
106
-
107
-
108
-
109
-
110
-
111
-
112
 |
 |
