Panasonic SC-UA3 Owners Manual - Page 9
Link mode, Manual tuning, Memory presetting
 |
View all Panasonic SC-UA3 manuals
Add to My Manuals
Save this manual to your list of manuals |
Page 9 highlights
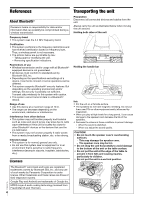
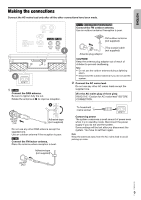
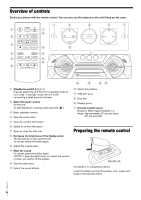
Link mode BLUETOOTH You can change the link mode to suit the connection type. Preparation If this system is connected to a Bluetooth® device, disconnect it (Z page 7). 1 Press [PLAY MENU] repeatedly to select "LINK MODE". 2 Press [R, T] to select the mode and then press [OK]. MODE 1 MODE 2 (default) Emphasis on connectivity. Emphasis on sound quality. Note: • When enjoying video contents with this function, the video and audio output may not be synchronized. In this case, select "MODE 1". • Select "MODE 1" if the sound is interrupted. █ Note on disc • This system can play CD-R/RW with CD-DA or MP3 format content. • Before playback, finalise the disc on the device it was recorded on. • Some CD-R/RW cannot be played because of the condition of the recording. █ Note on USB device • This system does not guarantee connection with all USB devices. • This system supports USB 2.0 full speed. • This system can support USB devices of up to 32 GB. • Only FAT 12/16/32 file system is supported. █ Note on MP3 file • Files are defined as tracks and folders are defined as albums. • Tracks must have the extension ".mp3" or ".MP3". • Tracks will not necessarily be played in the order you recorded them. • Some files can fail to work because of the sector size. MP3 file on disc • This system can access up to: - 255 albums (including root folder) - 999 tracks - 20 sessions • Disc must conform to ISO9660 level 1 or 2 (except for extended formats). MP3 file on USB device • This system can access up to: - 800 albums (including root folder) - 8000 tracks - 999 tracks in one album DAB+ SC-UA4 Preparation Press [RADIO/EXT-IN] repeatedly to select "DAB+". Note: If you select "DAB+" for the first time, the system will tune automatically. Manual tuning 1 Press [PLAY MENU] repeatedly to select "MANUAL SCAN". 2 Press [R, T] to select the frequency block and then press [OK]. If no station is detected, "SCAN FAILED" is shown. Adjust the antenna and try again. To tune automatically 1 Press [PLAY MENU] to select "AUTO SCAN" and then press [OK]. "START?" is shown. 2 Press [OK] to start tuning. "DAB AUTO SCAN" is shown. If no station is detected, "SCAN FAILED" is shown. Do manual tuning. Note: Preset frequencies are erased after you do automatic tuning. Memory presetting You can preset up to 20 stations. 1 Press [PLAY MENU] repeatedly to select "TUNE MODE". 2 Press [R, T] to select "STATION" and then press [OK]. 3 Press [2/3] or [5/6] to tune in to the station. 4 Press [OK]. 5 Press [R, T] to select a preset number and then press [OK]. Do steps 3 through 5 again to preset more stations. The new station replaces any station that occupies the same preset number. Note: You cannot preset a station when the station is not broadcasting or when you have selected a secondary service. █ Selecting a preset station 1 Press [PLAY MENU] repeatedly to select "TUNE MODE". 2 Press [R, T] to select "PRESET" and then press [OK]. TQBJ2015 3 Press [2/3] or [5/6] to select the preset station. 9 9 ENGLISH
-
 1
1 -
2
-
3
-
 4
4 -
 5
5 -
 6
6 -
 7
7 -
 8
8 -
 9
9 -
 10
10 -
 11
11 -
 12
12 -
 13
13 -
 14
14 -
15
-
16
-
17
-
18
-
19
-
20
-
21
-
22
-
23
-
24
-
25
-
26
-
27
-
28
-
29
-
30
-
31
-
32
-
33
-
34
-
35
-
36
-
37
-
38
-
39
-
40
-
41
-
42
-
43
-
44
-
45
-
46
-
47
-
48
-
49
-
50
-
51
-
52
-
53
-
54
-
55
-
56
-
57
-
58
-
59
-
60
-
61
-
62
-
63
-
64
-
65
-
66
-
67
-
68
 |
 |
