Panasonic SRYB05 SRYB05 User Guide - Page 9
Preparation For Cooking Rice
 |
View all Panasonic SRYB05 manuals
Add to My Manuals
Save this manual to your list of manuals |
Page 9 highlights
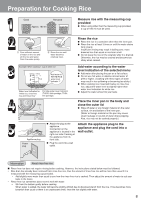
Preparation for Cooking Rice Good Approx. 180 ml Not good Measure rice with the measuring cup provided G When using other than the measuring cup provided, a cup of 180 ml must be used. 1 Pour sufficient amount of water on the rice and stir the rice and water. Drain the water quickly. 2 Rinse the rice until water becomes relatively clear. Rinse the rice G Rinse the rice in a container other than the inner pan. G Rinse the rice at least 3 times or until the water drains fairly clearly. Insufficient rinsing may result in boiling over, more browned rice than usual or rice bran smell. G Do not leave the rice on the colander after it is drained. Otherwise, the rice may be cracked and become too sticky when cooked. Example: When cooking 1 cup of white rice WHITE RICE PORRIDGE CUP THICK THIN Add water to WHITE RICE water level indicator "1". Water level indication for Porridge water level indication "white rice, rinse-free (THICK: thick porridge, THIN: rice and mixed rice" thin porridge) Add water according to the water level indication of the selected menu G Add water after placing the pan on a flat surface. G Do not use hot water or alkaline ionized water of pH9 or higher. (Cooking with these types of water may result in rice yellowing or becoming too sticky.) G When cooking rice mixed with barley or rinse-free rice, adjust the water level to slightly higher than water level indication for white rice. G Adjust the water amount to your taste. Place the inner pan in the body and Rim close the outer lid G Wipe off water or any foreign material on the outer surface, rim and bottom of the inner pan. (Water or foreign material on the pan may cause steam leakage or sounds of water drops popping. Also, rice may not be cooked properly.) Appliance plug Power plug G Attach the plug to the appliance. Connection on the appliance is located in the right rear side if looking at the appliance from its front side. G Plug the cord into a wall outlet. Attach the appliance plug to the appliance and plug the cord into a wall outlet. Information About rinse-free rice I Rinse-free rice does not require rinsing before cooking. However, the instructions stated below must be followed. • Rice bran has already been removed from rinse-free rice, thus the amount of rinse-free rice will be more than usual if it is measured with the measuring cup provided. ➝ Add slightly more water than usual to see how the rinse-free rice is cooked. Then adjust the amount of water to suit your taste in the future. • Rinse-free rice sometimes does not mix well with water. ➝ Stir from the bottom gently before cooking. When water is added, the water will become slightly whitish due to dissolved starch from the rice. If rice becomes more brownish than usual or there is an unpleasant smell, rinse the rice slightly with water. 8
-
 1
1 -
2
-
3
-
 4
4 -
 5
5 -
 6
6 -
 7
7 -
 8
8 -
 9
9 -
 10
10 -
 11
11 -
 12
12 -
 13
13 -
 14
14 -
15
-
16
-
17
-
18
-
19
-
20
-
21
-
22
-
23
-
24
-
25
-
26
-
27
-
28
-
29
-
30
-
31
-
32
-
33
-
34
-
35
-
36
-
37
-
38
-
39
-
40
 |
 |