Panasonic TH-42PZ85 Operating Instructions - Page 7
Basic Connection, Identifying Controls
 |
View all Panasonic TH-42PZ85 manuals
Add to My Manuals
Save this manual to your list of manuals |
Page 7 highlights
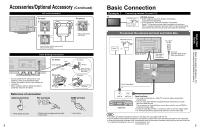
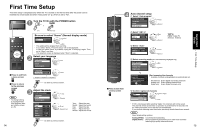
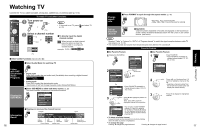
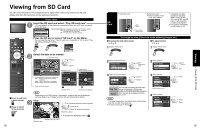
Basic Connection (Continued) AV cable connections High-Definition A To use HDMI terminals AV Equipment HDMI 1 HDMI 2 HDMI AV OUT e.g. DVD Recorder Connecting to HDMI terminals will enable you to enjoy high-definition digital images and high-quality sound. For "VIERA LinkTM connections", please refer to p. 41. B To use COMPONENT terminals L 1 COMPONENT R L IN 2 R L VIDEO 1 white PR PB Y red PR PB Y green blue white white AUDIO OUT R red red Y green blue green PB COMPONENT VIDEO OUT blue PR AV Equipment e.g. DVD Recorder red red red Recorders may also be connected to COMPOSITE or S VIDEO terminals. (see below) Standard-Definition C To use S VIDEO terminals 2R L PR PB VIDEO 1 IN R L PROG TO S VIDEO white red D To use COMPOSITE terminals 2R L PR PB S VIDEO OUT L white white AUDIO R OUT red red AV Equipment e.g. DVD Recorder or e.g. VCR AV Equipment VIDEO 1 IN R L PROG TO S VIDEO yellow white yellow white yellow L COMPOSITE white OUT R e.g. DVD Recorder or red red red e.g. VCR The S Video input will override the composite video signal when S Video cable is connected. Connect either S Video or Video cable. Connecting to S VIDEO terminals will enable you to enjoy greater picture quality than using Composite terminals. Note Some programs contain a copyright protection signal to prevent recording. When the copyright protection program is displayed, do not connect the other TV monitor through a VCR. Video signals fed through VCRs may be affected by copyright protection systems and the picture will be distorted on the other TV monitor. For the details of the external equipment's connections, please refer to the operating manuals for the equipment. 12 Identifying Controls Front of the TV TV controls/indicators Selects channels in sequence Back of the TV Volume up/down Power indicator (on: red, off: no light) Changes the input mode POWER Displays the Main menu. POWER button C.A.T.S. sensor Plasma C.A.T.S. (Contrast Automatic Tracking System). (p. 24) Chooses menu and submenu entries. Remote control sensor Within about 23 feet (7 meters) in front of the TV set. Note The TV consumes a limited amount of power as long as the power cord is inserted into the wall outlet. Remote control Switches TV On or Off (Standby) Viewing from SD Card (p. 18-19) The equipment selection button (p. 20) Changes the input mode (p. 20) SUB MENU Displays Sub Menu (p. 16, 26) Colored buttons (used for various functions) (for example p. 18, 30) Channel up/down Changes aspect ratio (p. 17) Operates the Favorite channel list function. (p. 17) Switches to previously viewed channel or input modes. External equipment operations (VCRs, DVDs, etc.) (p. 20) VIERA Link menu (p. 30-31) Selects Audio Mode for TV viewing (p. 16) Displays Main Menu (p. 24) Exits from menu screen Selects/OK/Change Returns to previous menu Volume up/down Displays or removes the channel banner (p. 16) Sound mute On/Off Numeric keypad to select any channel (p. 16) or press to enter alphanumeric input in menus. (p. 20, 32, 34, 39) Direct channel access for DTV and DBS (p. 16) Swiches to input terminal that has "GAME" label. 13 Identifying Controls Basic Connection (AV cable connections) Quick Start Guide
-
 1
1 -
 2
2 -
 3
3 -
 4
4 -
 5
5 -
 6
6 -
 7
7 -
 8
8 -
 9
9 -
 10
10 -
 11
11 -
 12
12 -
13
-
14
-
15
-
16
-
17
-
18
-
19
-
20
-
21
-
22
-
23
-
24
-
25
-
26
-
27
-
28
-
29
 |
 |
