Panasonic TH-50PZ700 Operating Instructions - Page 20
Input Labels/Monitor Out, Closed Caption
 |
View all Panasonic TH-50PZ700 manuals
Add to My Manuals
Save this manual to your list of manuals |
Page 20 highlights
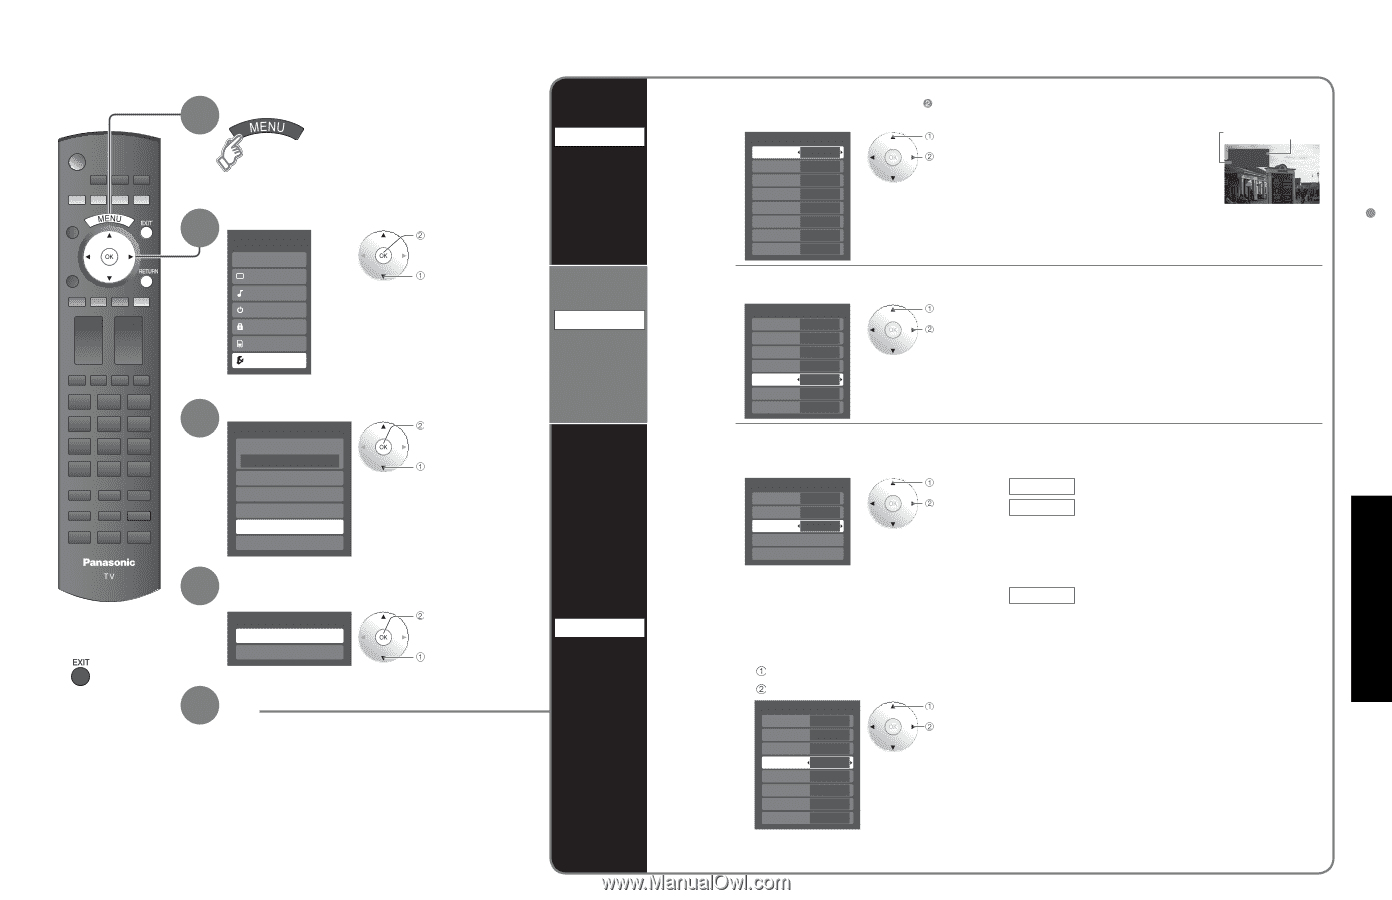
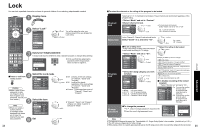
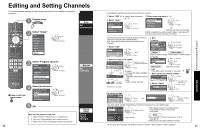
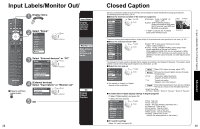
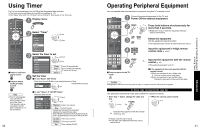
Input Labels/Monitor Out/ 1 Display menu 2 Select "Setup" Menu EZ Sync Picture Audio Timer Lock Memory card Setup next select 3 Select "External devices" or "CC" Setup 1/2 next Surf mode All Language select Clock Program channel External devices CC 4 ■Press to exit from menu screen (External devices) Select "Input labels" or "Monitor out" External devices Input labels Monitor out next select 5 Set Input labels Display labels of external devices Monitor out Stop output of the picture and audio CC Display Closed Caption 38 Closed Caption Devices connected to external input terminals can be labeled for easier identification during input selection. (In selecting input mode from p. 24 ) ■Select the terminal and label of the external equipment Input labels Comp. 1 Custom Comp. 2 Custom select set •Terminals: Comp. 1-2/HDMI 1-2/ • Video 1-3/PC Label: SKIP*/VCR/DVD/CABLE/ DBS/PVR/GAME/AUX/[BLANK] HDMI 1 3 (for PC terminal, only SKIP and HDMI 2 4 [BLANK] are available) Label Terminal Video 1 VCR Video 1 - Video 2 - Video 3 - * If "SKIP" is selected, the TV/VIDEO button press will skip its input. [example] PC - To prevent howling and image oscillation, stops output of the pictures and audio specified in this menu. (p. 30) ■Select the terminal and set "Off" Monitor out Comp. 1 On Comp. 2 On HDMI 1 On select set Select "Off" to stop output of picture and audio. •(Video 1/Video 2/Video 3) Comp. 1/Comp. 2/HDMI 1/HDMI 2 cannot output video •signals regardless of "Monitor out" setting. When equipment (STB, DVD, etc.) is connected to HDMI, HDMI 2 On COMPONENT or PC terminals, only audio signals can be Video 1 Off obtained. From the output terminals, no video signals can be Video 2 On passed. Video 3 On The television includes a built-in decoder that is capable of providing a text display of the audio. The program being viewed must be transmitting Closed Caption (CC) information. (p. 50) ■Select the item and set CC Mode On Analog CC1 Digital Primary Digital setting CC reset select set •The settings in "Analog" or "Digital" depend on the broadcaster. Mode Analog CC1-4: T1-4: Digital Select "On" (when not using, select "Off"). (Choose the Closed Caption service of Analog broadcasting.) Information related to pictures (Appears at bottom of screen) Textual information (Appears over entire screen) (The Digital Closed Caption menu lets you configure the way you choose to view the digital captioning.) •Select the setting. "Primary", "Second.", "Service 3", "Service 4", "Service 5", "Service 6" ■To make more in-depth display settings in digital programs Select "Digital setting" and press OK Select the item and set Digital setting Size Automatic Font Automatic Style Automatic Foreground Automatic Fore opacity Automatic Background Automatic Back opacity Automatic Outline Automatic select set Size: Text size Font: Text font Style: Text style (Raised, Depressed, etc.) Foreground: Color of text Fore opacity: Opacity of text Background: Color of text box Back opacity: Opacity of text box Outline: Outline color of text (Identify the setting options on the screen.) ■To reset the settings Select "CC reset" and press OK 39 Advanced Input Labels/Monitor Out/Closed Caption
-
 1
1 -
2
-
3
-
4
-
5
-
6
-
7
-
8
-
9
-
10
-
11
-
12
-
13
-
14
-
 15
15 -
 16
16 -
 17
17 -
 18
18 -
 19
19 -
 20
20 -
 21
21 -
 22
22 -
 23
23 -
 24
24 -
 25
25 -
26
-
27
-
28
-
29
-
30
 |
 |