Panasonic VDRD300 VDRD250 User Guide - Page 15
Parts Identification And Handling - vdr d300 ac adaptor
 |
View all Panasonic VDRD300 manuals
Add to My Manuals
Save this manual to your list of manuals |
Page 15 highlights
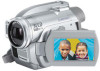
Before using Parts identification and handling Parts identification and handling 1 Lens (LEICA DICOMAR) (VDR-D300) Lens (VDR-D250) 1 2 Built-in flash (VDR-D300 only) (l 68) 3 Recording lamp (l 144) 4 White balance/remote control sensor (l 74, 21) 2 8 5 Terminal cover 6 Audio-video output terminal [A/V] (l 104, 108) 3 7 USB terminal [ ] (l 109, 123, 137) 4 9 8 Lens cover (VDR-D300 only) 5 9 Microphone (built-in, stereo) 10 Terminal for Magic Wire Remote Control [REMOTE] (l 22) Microphone terminal [MIC] 6 10 ≥ A compatible plug-in powered microphone can be 7 used as an external microphone. ≥ When the unit is connected with AC adaptor, sometimes noise may be heard depending on 15 microphone type. In that case, please switch to 16 battery for power supply and noise will stop. 11 11 Viewfinder (l 19) 17 18 Due to limitations in LCD production 12 19 technology, there may be some tiny bright or 13 dark spots on the viewfinder screen. 14 20 However, this is not a malfunction and does not affect the recorded picture. 12 Delete button [ ] (l 81, 92, 94) 13 LCD monitor open part [OPEN] (l 19) 21 22 23 24 14 Battery/DC cable holder (l 28, 30) 15 Power switch [OFF/ON] (l 30) 16 Status indicator (l 30) 17 Mode dial (l 35) 18 Joystick (l 36) ≥ Move up, down, left or right to select items. ≥ Press the center to enter the selection. 19 Recording start/stop button (l 50) 20 Menu button [MENU] (l 42) 21 Accessory shoe ≥ Accessories, such as a video DC light (optional), are attached here. 22 Eyepiece corrector knob (l 47) 23 Zoom lever [W/T] (l 56) Volume lever [sVOLUMEr] (l 77) 24 Photoshot button [PHOTO SHOT] (l 52) 15 LSQT1011
-
 1
1 -
2
-
3
-
4
-
5
-
6
-
7
-
8
-
9
-
 10
10 -
 11
11 -
 12
12 -
 13
13 -
 14
14 -
 15
15 -
 16
16 -
 17
17 -
 18
18 -
 19
19 -
 20
20 -
21
-
22
-
23
-
24
-
25
-
26
-
27
-
28
-
29
-
30
-
31
-
32
-
33
-
34
-
35
-
36
-
37
-
38
-
39
-
40
-
41
-
42
-
43
-
44
-
45
-
46
-
47
-
48
-
49
-
50
-
51
-
52
-
53
-
54
-
55
-
56
-
57
-
58
-
59
-
60
-
61
-
62
-
63
-
64
-
65
-
66
-
67
-
68
-
69
-
70
-
71
-
72
-
73
-
74
-
75
-
76
-
77
-
78
-
79
-
80
-
81
-
82
-
83
-
84
-
85
-
86
-
87
-
88
-
89
-
90
-
91
-
92
-
93
-
94
-
95
-
96
-
97
-
98
-
99
-
100
-
101
-
102
-
103
-
104
-
105
-
106
-
107
-
108
-
109
-
110
-
111
-
112
-
113
-
114
-
115
-
116
-
117
-
118
-
119
-
120
-
121
-
122
-
123
-
124
-
125
-
126
-
127
-
128
-
129
-
130
-
131
-
132
-
133
-
134
-
135
-
136
-
137
-
138
-
139
-
140
-
141
-
142
-
143
-
144
-
145
-
146
-
147
-
148
-
149
-
150
-
151
-
152
-
153
-
154
-
155
-
156
-
157
-
158
-
159
-
160
-
161
-
162
-
163
-
164
-
165
-
166
-
167
-
168
-
169
-
170
-
171
-
172
-
173
-
174
-
175
-
176
-
177
-
178
-
179
-
180
 |
 |
