Panasonic WVCF324 WVCF324 User Guide - Page 14
Zoom and focus adjustment, Notes, AF stays lighted. Failure to observe
 |
View all Panasonic WVCF324 manuals
Add to My Manuals
Save this manual to your list of manuals |
Page 14 highlights
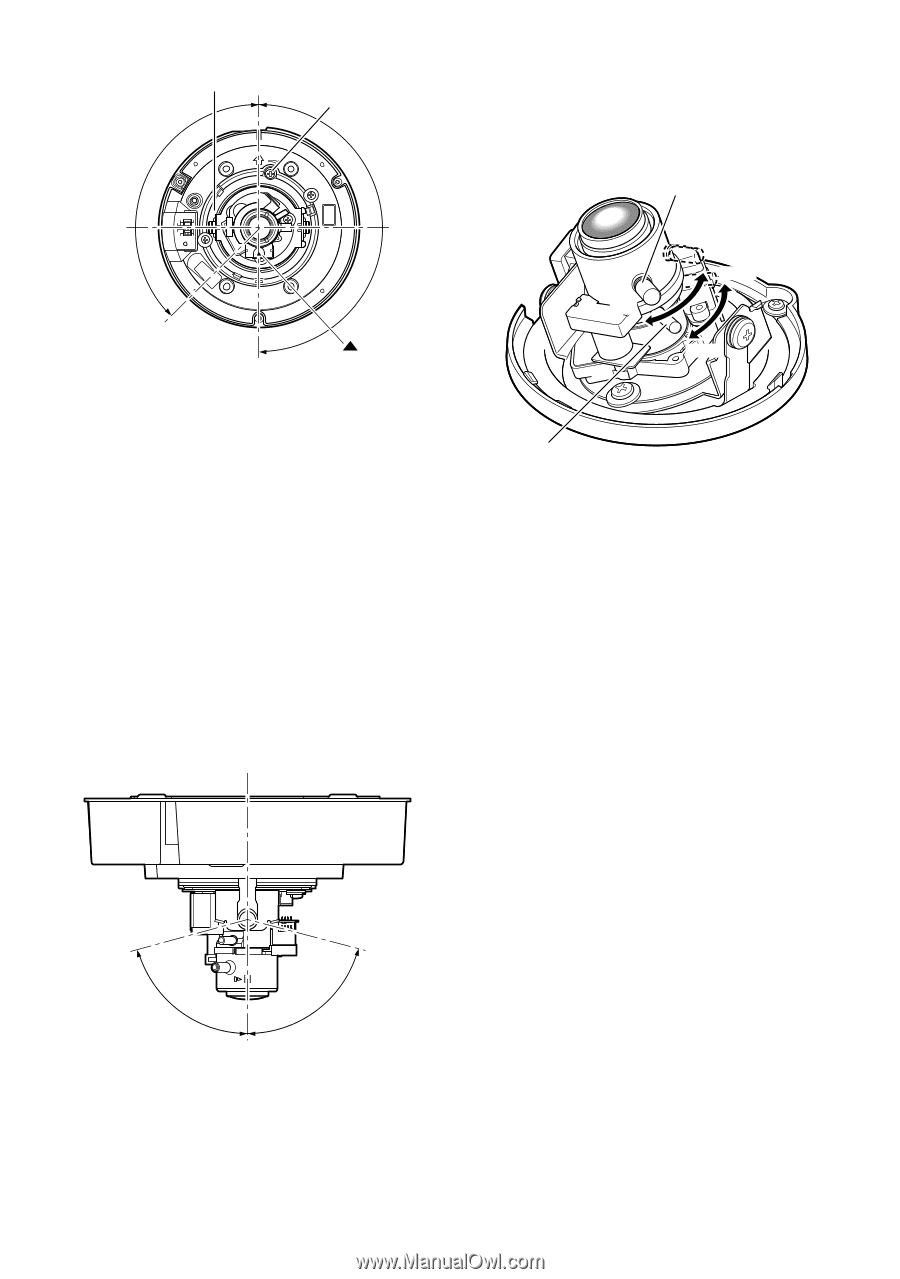
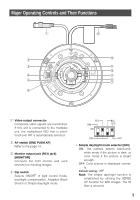
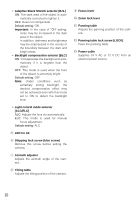
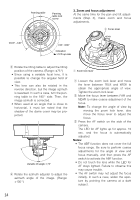
CCW: -140° D/NB.S ON AFOFF BLC ALC ELC Panning table MONITOR TOP LOCK Panning table lock screw 3. Zoom and focus adjustment At the same time for the pan and tilt adjustments (Step 2), make zoom and focus adjustments. w Focus lever CW: +180° Indication : CCD up-side FAR NEAR WIDE TELE w Rotate the tilting table to adjust the tilting position of the camera. (Range: ±75 °) • Since using a variable focal lens, it is possible to change the angular field of view. • This lens can also be rotated in the reverse direction, but the image azimuth is reversed. In such a case, turn the panning table to the 180 ° side. Then, the image azimuth is corrected. • When used at an angle that is close to horizontal, it must be noted that the shadow of the dome cover may be projected. Variable tilt angle: ±75° e Rotate the azimuth adjuster to adjust the azimuth angle of the image. (Range: ±100 °) q Zoom lock lever q Loosen the zoom lock lever and move the lever between TELE and WIDE to obtain the appropriate angle of view. Tighten the zoom lock lever. w Move the focus lever between FAR and NEAR to make coarse adjustment of the focus. Note: To change the angle of view by moving the zoom lock lever, also move the focus lever to adjust the focus. e Press the AF switch on the side of the camera. The LED for AF lights up for approx. 10 sec. and the focus is automatically adjusted. Notes: • The ABF function does not cover the full focus range. Be sure to perform coarse adjustments for the angle of view and focus manually, and then press the AF switch to activate the ABF function. • Do not touch the lens while the LED for AF stays lighted. Failure to observe this may cause trouble. • The AF switch may not adjust the focus initially. In such a case, widen the aperture by pointing the camera at a dark subject. 14
-
 1
1 -
2
-
3
-
4
-
5
-
6
-
7
-
8
-
 9
9 -
 10
10 -
 11
11 -
 12
12 -
 13
13 -
 14
14 -
 15
15 -
 16
16 -
 17
17 -
 18
18 -
 19
19 -
20
-
21
-
22
-
23
-
24
-
25
-
26
-
27
-
28
-
29
-
30
-
31
-
32
-
33
-
34
-
35
-
36
 |
 |