Panasonic WVCU650 WJSX150 User Guide - Page 3
Monitor Selection And Camera Selection, M04 - operating instructions
 |
UPC - 791871504277
View all Panasonic WVCU650 manuals
Add to My Manuals
Save this manual to your list of manuals |
Page 3 highlights
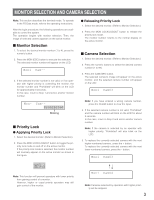
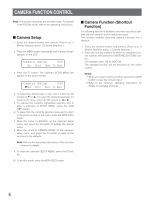
MONITOR SELECTION AND CAMERA SELECTION Note: This section describes the terminal mode. To operate in the PS·Data mode, refer to the operating instructions. After the login procedure, the following operations are available to control the system. The operation begins with monitor selection. Then, the image of selected camera appears on the active monitor. ■ Monitor Selection 1. To select the desired monitor number (1 to 4), press the numeric button. 2. Press the MON (ESC) button to execute the selection. The selected monitor number will appear on the LCD. Mon1 Cam-- 3. If the selected monitor number is not valid, or if an operator with higher priority is controlling the monitor, the monitor number and "Prohibited" will blink on the LCD for approximately 3 seconds. In this case, return to Step 1 and select another monitor number. Mon- Cam-Prohibited Blinking ■ Priority Lock ● Applying Priority Lock 1. Select the desired monitor. (Refer to Monitor Selection). 2. Press the MON LOCK/LOGOUT button to toggle the priority lock mode on and off on the active monitor. If the priority lock mode is selected, the monitor number will inversely appear on the active monitor as shown in the figure. ● Releasing Priority Lock 1. Select the desired monitor. (Refer to Monitor Selection.) 2. Press the MON LOCK/LOGOUT button to release the priority lock mode. The monitor number returns to the normal display on the active monitor. ■ Camera Selection 1. Select the desired monitor. (Refer to Monitor Selection.) 2. Press the numeric buttons to select the desired camera number (1 to 99). 3. Press the CAM (SET) button. The selected camera's image will appear on the active monitor, and the selected camera number will appear on the LCD. Mon1 Cam03 Note: If you have entered a wrong camera number, press the CLEAR button to clear the input. 4. If the selected camera number is not valid, "Prohibited" and the camera number will blink on the LCD for about 3 seconds. In this case, return to Step 2 and select another camera number. Note: If the camera is selected by an operator with higher priority, "Prohibited" will also blink on the LCD. 5. To replace the currently selected camera with the next higher-numbered camera , press the + button. To replace the currently selected camera with the next lower-numbered camera, press the - button. Mon1 Cam03 M04 Note: This function will prevent operators with lower priority from gaining control of a monitor. However, higher or equal priority operators may still gain control of the monitor. Mon1 Cam04 Note: Cameras selected by operators with higher priority will be skipped. 3
-
 1
1 -
 2
2 -
 3
3 -
 4
4 -
 5
5 -
 6
6 -
 7
7 -
 8
8 -
 9
9 -
10
-
11
-
12
-
13
-
14
-
15
-
16
-
17
-
18
-
19
-
20
-
21
-
22
-
23
-
24
-
25
-
26
-
27
-
28
-
29
-
30
-
31
-
32
-
33
-
34
-
35
-
36
-
37
-
38
-
39
-
40
-
41
-
42
-
43
-
44
-
45
-
46
-
47
-
48
 |
 |
