Pentax PC35AF-M PC35AF-M Manual - Page 29
Setting
 |
View all Pentax PC35AF-M manuals
Add to My Manuals
Save this manual to your list of manuals |
Page 29 highlights
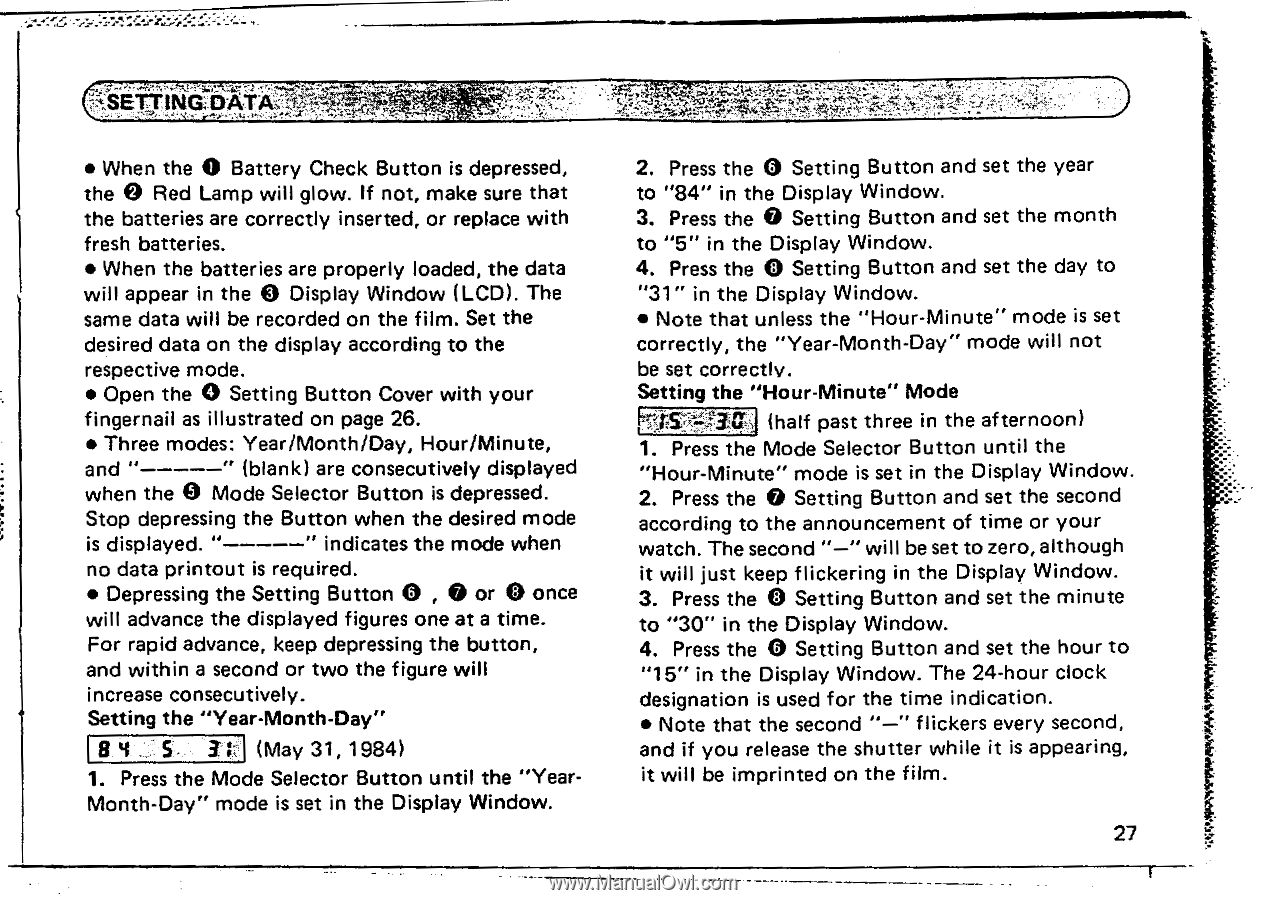
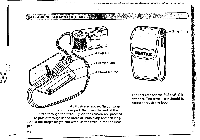
SETTING: A:TA • When the 0 Battery Check Button is depressed, the 0 Red Lamp will glow. If not, make sure that the batteries are correctly inserted, or replace with fresh batteries. • When the batteries are properly loaded, the data will appear in the 0 Display Window (LCD). The same data will be recorded on the film. Set the desired data on the display according to the respective mode. • Open the 0 Setting Button Cover with your fingernail as illustrated on page 26. • Three modes: Year/Month/Day, Hour/Minute, and " " (blank) are consecutively displayed when the 0 Mode Selector Button is depressed. Stop depressing the Button when the desired mode is displayed. " " indicates the mode when no data printout is required. • Depressing the Setting Button 0 , 0 or 0 once will advance the displayed figures one at a time. For rapid advance, keep depressing the button, and within a second or two the figure will increase consecutively. Setting the "Year-Month-Day" 4 S /:, (May 31, 1984) 1. Press the Mode Selector Button until the "YearMonth-Day" mode is set in the Display Window. 2. Press the 0 Setting Button and set the year to "84" in the Display Window. 3. Press the 0 Setting Button and set the month to "5" in the Display Window. 4. Press the 0 Setting Button and set the day to "31" in the Display Window. • Note that unless the "Hour-Minute" mode is set correctly, the "Year-Month-Day" mode will not be set correctly. Setting the "Hour-Minute" Mode Fig (half past three in the afternoon) 1. Press the Mode Selector Button until the "Hour-Minute" mode is set in the Display Window. 2. Press the 0 Setting Button and set the second according to the announcement of time or your watch. The second "-"will be set to zero, although it will just keep flickering in the Display Window. 3. Press the 0 Setting Button and set the minute to "30" in the Display Window. 4. Press the 0 Setting Button and set the hour to "15" in the Display Window. The 24-hour clock designation is used for the time indication. • Note that the second "-" flickers every second, and if you release the shutter while it is appearing, it will be imprinted on the film. 27
-
 1
1 -
2
-
3
-
4
-
5
-
6
-
7
-
8
-
9
-
10
-
11
-
12
-
13
-
14
-
15
-
16
-
17
-
18
-
19
-
20
-
21
-
22
-
23
-
 24
24 -
 25
25 -
 26
26 -
 27
27 -
 28
28 -
 29
29 -
 30
30 -
 31
31 -
 32
32 -
 33
33 -
 34
34 -
35
-
36
 |
 |