Pfaff C1100 Pro Owner's Manual - Page 50
Selecting Stitches - accessories
 |
View all Pfaff C1100 Pro manuals
Add to My Manuals
Save this manual to your list of manuals |
Page 50 highlights
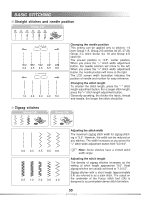
SELECTING STITCHES Using the selection buttons Ten of the most frequently used utility stitches can quickly be selected with the selection buttons. Select the desired stitch from those shown on the stitch chart. When the sewing machine is turned on, the straight stitch (center needle position) is automatically selected. 1. Determine the stitch that you wish to use. * Refer to Stitch Chart on page 39. 2. Determine which presser foot should be used with the selected stitch. The presser feet can be stored inside the accessory compartment. * For details on the stitches that can be sewn with a twin needle, refer to "Stitch Reference Chart" beginning on page 92. 3. Attach the correct presser foot for the selected stitch. * For details, refer to "Changing the Presser Foot" on page 34. 4. Turn on the sewing machine. * The straight stitch (center needle position) is shown selected within the LCD. 5. Press the " " button and the stitch group screen will automatically appear on the LCD screen. 6. Press the numbered button corresponding to the desired group of stitches that you wish to use. (e.g. press 2 for group "B") 7. Press the 2 digit stitch number from the selected group on the stitch chart. Note: When a stitch is selected, the icon for the presser foot that should be used appears in the screen. Check that the correct presser foot is attached before starting to sew. If the wrong presser foot is installed, turn off the sewing machine, attach the correct presser foot, and then select the desired stitch again. 49 STITCHES
-
 1
1 -
2
-
3
-
4
-
5
-
6
-
7
-
8
-
9
-
10
-
11
-
12
-
13
-
14
-
15
-
16
-
17
-
18
-
19
-
20
-
21
-
22
-
23
-
24
-
25
-
26
-
27
-
28
-
29
-
30
-
31
-
32
-
33
-
34
-
35
-
36
-
37
-
38
-
39
-
40
-
41
-
42
-
43
-
44
-
 45
45 -
 46
46 -
 47
47 -
 48
48 -
 49
49 -
 50
50 -
 51
51 -
 52
52 -
 53
53 -
 54
54 -
 55
55 -
56
-
57
-
58
-
59
-
60
-
61
-
62
-
63
-
64
-
65
-
66
-
67
-
68
-
69
-
70
-
71
-
72
-
73
-
74
-
75
-
76
-
77
-
78
-
79
-
80
-
81
-
82
-
83
-
84
-
85
-
86
-
87
-
88
-
89
-
90
-
91
-
92
-
93
-
94
-
95
-
96
-
97
-
98
-
99
-
100
-
101
-
102
-
103
-
104
-
105
-
106
-
107
-
108
 |
 |
