Pfaff ambition 610 Manual - Page 32
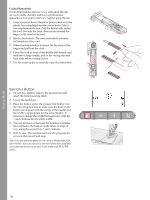
Sew On a Button
 |
View all Pfaff ambition 610 manuals
Add to My Manuals
Save this manual to your list of manuals |
Page 32 highlights
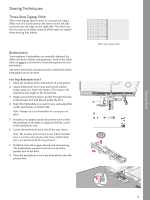
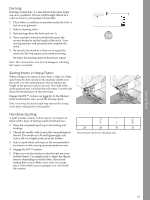
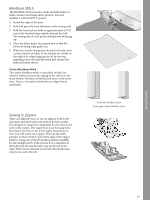
Corded Buttonhole Corded buttonholes that are sewn with gimp threads are more stable, durable and have a professional appearance. Use pearl cotton or a regular gimp thread. 1. Loop a piece of heavy thread or pearl cotton over the plastic bar extending from the center back of the 5 one step buttonhole foot. Pull the thread tails under 5 the foot, towards the front, then secure around the finger at the front of the foot. 2. Stitch a buttonhole. The satin buttonhole columns will stitch over the cord. 3. When the buttonhole is finished, lift the cord off the finger and pull out the slack. 4. Cross the cord in front of the needle and thread cord ends into a large needle, pull to the wrong side and knot ends before cutting excess. 5. Use the seam ripper to carefully open the buttonhole. Sew On a Button 1. To sew on a button, remove the presser foot and select the button sewing stitch. 2. Lower the feed dogs. 3. Place the button under the presser foot holder. Use the mirroring function to make sure the holes in the button are aligned with the swing of the needle and the width is appropriate for the actual button. If necessary change the width between holes with the + and - buttons next to stitch width. 4. You can increase or decrease the number of stitches that will fasten the button on the fabric in steps of two, using the second row + and - buttons. 5. Start to sew. The machine will sew the program for you and then tie-off and stop. Note: Use the multi-purpose tool to create a thread shank for your button. You can also use a sew-on button foot, available as an optional accessory at your local authorized PFAFF® dealer. Sewing Mode 32
-
 1
1 -
2
-
3
-
4
-
5
-
6
-
7
-
8
-
9
-
10
-
11
-
12
-
13
-
14
-
15
-
16
-
17
-
18
-
19
-
20
-
21
-
22
-
23
-
24
-
25
-
26
-
 27
27 -
 28
28 -
 29
29 -
 30
30 -
 31
31 -
 32
32 -
 33
33 -
 34
34 -
 35
35 -
 36
36 -
 37
37 -
38
-
39
-
40
-
41
-
42
-
43
-
44
 |
 |
