Pfaff ambition 610 Manual - Page 33
Darning, Sewing Hems in Heavy Fabric, Handlook Quilting
 |
View all Pfaff ambition 610 manuals
Add to My Manuals
Save this manual to your list of manuals |
Page 33 highlights
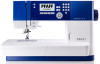
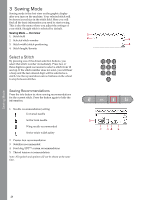
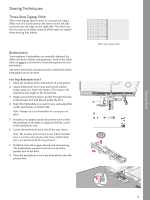
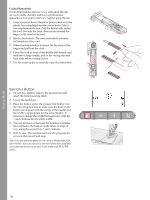
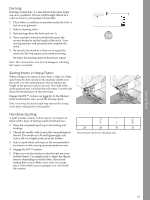
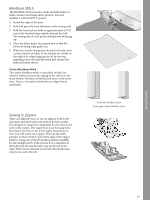
Darning Darning a small hole or a tear before it becomes larger can save a garment. Choose a lightweight thread in a color as close to your garment as possible. 1. Place fabric or stabilizer in position under the hole or tear in your garment. 2. Select a darning stitch. 3. Start sewing above the hole and over it. 4. Once you have sewn across the hole, press the reverse button to set the length of the stitch. Your sewing machine will automatically complete the stitch. 5. By default, the machine will be set to repeat the same size darning square, just continue sewing. Re-select the darning stitch to deactivate repeat. Note: The reverse button icon (1) will disappear, indicating that repeat is activated. Sewing Hems in Heavy Fabric When sewing over seams in extra heavy fabric or a blue jeans hem, the foot can tip as the machine climbs over the seam. Use the multi-purpose tool to balance the height of the presser foot as you sew. One side of the multi-purpose tool is thicker than the other. Use the side that suits the thickness of the seam best. Engage the IDT™ system, see page 20. At the thickest point on the fabric, slow down the sewing speed. Note: Increasing the stitch length may improve the sewing result when sewing hems in heavy fabric. Handlook Quilting A quilt usually consists of three layers, two layers of fabric with a layer of batting sandwiched between. 1. Baste the completed quilt top to the batting and backing. 28 29 30 31 2. Thread the needle with an invisible (monofilament) thread. Use needle size 90 and lightweight, soft cotton (60 wt or lighter) thread in the bobbin. Recommended stitches for a handlook quilt 3. Select a quilt stitch and snap on the recommended foot shown in the sewing recommendations view. 4. Engage the IDT™ system. 5. When you sew the stitch you should only see your bobbin thread. You might need to adjust the thread tension depending on which fabric, thread and batting that is used. Make a few tests on a scrap piece of the fabric you are going to sew and check the tension. Sewing Mode 33
-
 1
1 -
2
-
3
-
4
-
5
-
6
-
7
-
8
-
9
-
10
-
11
-
12
-
13
-
14
-
15
-
16
-
17
-
18
-
19
-
20
-
21
-
22
-
23
-
24
-
25
-
26
-
27
-
 28
28 -
 29
29 -
 30
30 -
 31
31 -
 32
32 -
 33
33 -
 34
34 -
 35
35 -
 36
36 -
 37
37 -
 38
38 -
39
-
40
-
41
-
42
-
43
-
44
 |
 |
