Pfaff coverlock 3.0 Owner's Manual - Page 10
thread overlock converter, Upper looper, Changing to coverstitch table B - used
 |
View all Pfaff coverlock 3.0 manuals
Add to My Manuals
Save this manual to your list of manuals |
Page 10 highlights
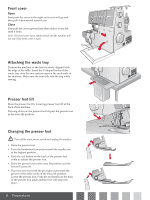
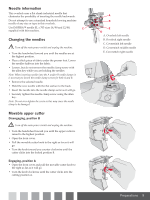
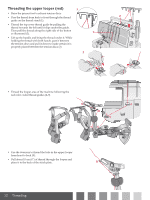
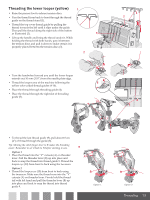
2-thread overlock converter A Engaging Turn off the main power switch and unplug the machine. 2-thread overlock stitches are sewn using one needle B thread and the lower looper thread. Before sewing, the 2-thread converter must be attached to the upper looper. • Open the front cover. • Raise the white handle on the 2-thread converter to insert the sharp edge (A) of the converter in the eye (B) of the upper looper. Disengaging Turn off the main power switch and unplug the machine. • Lower the white handle on the converter and remove the sharp edge (A) from the eye (B) of the upper looper. Upper looper Disengaging For coverstitch and chaintitch sewing the upper looper needs to be disengaged. • Turn the handwheel until the upper looper is in its lowest position. • Push the clutch lever to the right and back until position B is visible from the front. Engaging • Turn the handwheel until the upper looper is in its lowest position. • Pull the clutch lever toward you until position A is visible from the front. Changing to coverstitch table B 1 For coverstitch and chainstitch sewing the coverstitch table B should be used. • Lift the hook (1) to release the cutter cover A and pull it towards you. • Insert the coverstitch table B by Àtting the two front pins (2) into the holes (3) and make sure the hook (4) clicks into place. 10 Preparations A B 3 2 4
-
 1
1 -
2
-
3
-
4
-
 5
5 -
 6
6 -
 7
7 -
 8
8 -
 9
9 -
 10
10 -
 11
11 -
 12
12 -
 13
13 -
 14
14 -
 15
15 -
16
-
17
-
18
-
19
-
20
-
21
-
22
-
23
-
24
-
25
-
26
-
27
-
28
-
29
-
30
-
31
-
32
-
33
-
34
-
35
-
36
-
37
-
38
-
39
-
40
 |
 |
