Pfaff coverlock 3.0 Owner's Manual - Page 14
Threading chainstitch looper purple
 |
View all Pfaff coverlock 3.0 manuals
Add to My Manuals
Save this manual to your list of manuals |
Page 14 highlights
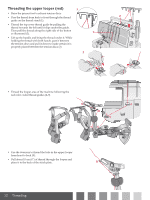
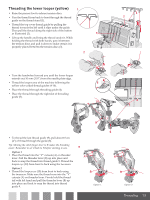
Threading chainstitch looper (purple) 1 • Raise the presser foot to release tension discs. • Pass the thread from back to front through the thread guide on the thread stand (1). • Thread the top cover thread guide by pulling the thread towards the left until it slips under the guide. Then pull the thread along the right side of the button as illustrated (2). 3 • Lift up the handle and bring the thread under it. While holding the thread with both hands, pass it between the tension discs and pull it down to make certain it is properly placed between the tension discs (3). 2 • Turn the handwheel toward you until the chainstitch looper is at the far right. • Thread the looper area of the machine following the purple color coded thread guides (4-11). • Place the thread through threading guide (4). • Place the thread through the front slot of threading 5 guide (5). 1 2 10 11 4 5 • Thread the chainstitch thread guide (8) by holding the thread in front of the thread guide pin and pulling the thread backward and up, until the thread rests inside the thread guide loop and under the spring. • To thread the last thread guide (10), pull about 10 cm (4") of thread through the guide (9). Tip: Moving the stitch Ànger lever to R makes the threading easier. Remember to set it back to N before starting to sew. Option 1 • Place the thread into the "V" cutouts (A) on threader lever. Pull the threader lever (B) up into place and back to snap the thread into thread guide 10. Thread the looper eye (11) from front to back using the tweezers. Option 2 • Thread the looper eye (11) from front to back using the tweezers. Make sure the thread runs into the left "V" cutout (A) on threader lever. Firmly hold the thread tail with left hand and pull the threader lever (B) up into place and back to snap the thread into thread guide 10. 9 8 8 10 A B Option 1 6 7 A B Option 2 14 Threading
-
 1
1 -
2
-
3
-
4
-
5
-
6
-
7
-
8
-
 9
9 -
 10
10 -
 11
11 -
 12
12 -
 13
13 -
 14
14 -
 15
15 -
 16
16 -
 17
17 -
 18
18 -
 19
19 -
20
-
21
-
22
-
23
-
24
-
25
-
26
-
27
-
28
-
29
-
30
-
31
-
32
-
33
-
34
-
35
-
36
-
37
-
38
-
39
-
40
 |
 |
