Pfaff coverlock 3.0 Owner's Manual - Page 31
Chainstitch sewing, Sewing hints
 |
View all Pfaff coverlock 3.0 manuals
Add to My Manuals
Save this manual to your list of manuals |
Page 31 highlights
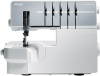
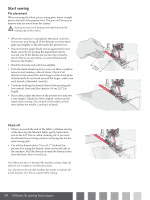
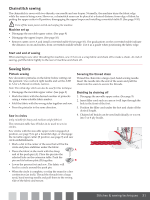
Chainstitch sewing The chainstitch is sewn with two threads, one needle and one looper. Normally, the machine trims the fabric edge while the seam is being sewn. However, a chainstitch seam can be placed at a desired distance from edge of fabric by putting the upper cutter in B position, disengaging the upper looper and installing coverstitch table B. (See page 9-10) Turn off the main power switch and unplug the machine. Machine set up • Disengage the movable upper cutter. (See page 9) • Disengage the upper looper. (See page 10) • Remove cutter cover A and install coverstitch table B (see page 10). The graduations on the coverstitch table indicate the distance, in cm and inches, from coverstitch middle needle. Use it as a guide when positioning the fabric edge. Start and end of sewing When starting to sew after threading the machine, sew 2-3 cm on a scrap fabric and chain off to make a chain. At end of sewing, pull the fabric lightly to the rear of machine and chain off. Sewing hints Pintuck sewing Securing the thread chain Sew decorative pintucks on the fabric before cutting out the garment. Use overlock right needle and set the ATD to A for a 3-thread overlock, narrow. Thread the chain into a large eyed, hand sewing needle. Insert the needle into the end of the seam and pull the chain into the seam to secure the threads. Note: The rolled edge stitch can also be used for this technique. • Disengage the movable upper cutter. (See page 9) Braiding by chaining off • Mark the fabric with the desired number of pintucks using a water-soluble fabric marker. • Fold the fabric with the wrong sides together and sew. • Press the pintucks in the same direction. 1. Disengage the movable upper cutter. (See page 9) 2. Insert Àller cord such as yarn or twill tape through the hole in the front of the foot. 3. Position the Àller cord under the foot and chain off the desired length. Sew in circles (only suitable for heavy and medium weight fabrics) 4. Chained off braids can be used individually or woven into 3 or 4 ply braids. The extension table has 13 holes in it, used to sew in circles. Sew circles with the movable upper cutter engaged (A position, see page 9) to get a beautiful edge, or disengage the movable upper cutter (B position, see page 9) and sew circle embellishments. • Mark a dot in the center of the area that will be the circle and place stabilizer under the fabric. A • Pierce the fabric at the mark with the sharp end of the push pin (A). Place the pin into the selected hole on the extension table. Push the pin and its bottom plate (B) together. B • Lower the presser foot and sew. The fabric will feed in a circle around the push pin. • When the circle is complete, overlap the seam for a few centimetres (an inch). Thread the threads into a large eyed, hand sewing needle and pull them to the wrong side of the fabric and secure. Stitches & sewing techniques 31
-
 1
1 -
2
-
3
-
4
-
5
-
6
-
7
-
8
-
9
-
10
-
11
-
12
-
13
-
14
-
15
-
16
-
17
-
18
-
19
-
20
-
21
-
22
-
23
-
24
-
25
-
 26
26 -
 27
27 -
 28
28 -
 29
29 -
 30
30 -
 31
31 -
 32
32 -
 33
33 -
 34
34 -
 35
35 -
 36
36 -
37
-
38
-
39
-
40
 |
 |