Pfaff creative sensation pro II Manual - Page 141
move the matching point to the right position
 |
View all Pfaff creative sensation pro II manuals
Add to My Manuals
Save this manual to your list of manuals |
Page 141 highlights
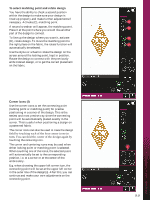
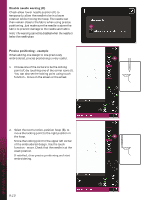
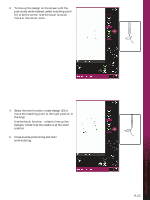
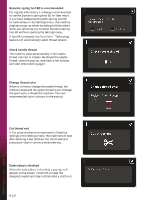
3. To line up the design on the screen with the previously embroidered, select matching point (C) to be the corner. Use the touch function move or the corner icons. C Embroidery mode - stitch-out 4. Select the next function, rotate design (D) to move the matching point to the right position in the hoop. Use the touch function - rotate to line up the designs. Check that the needle is at the exact position. D 5. Close precise positioning and start embroidering. 9:11
-
 1
1 -
2
-
3
-
4
-
5
-
6
-
7
-
8
-
9
-
10
-
11
-
12
-
13
-
14
-
15
-
16
-
17
-
18
-
19
-
20
-
21
-
22
-
23
-
24
-
25
-
26
-
27
-
28
-
29
-
30
-
31
-
32
-
33
-
34
-
35
-
36
-
37
-
38
-
39
-
40
-
41
-
42
-
43
-
44
-
45
-
46
-
47
-
48
-
49
-
50
-
51
-
52
-
53
-
54
-
55
-
56
-
57
-
58
-
59
-
60
-
61
-
62
-
63
-
64
-
65
-
66
-
67
-
68
-
69
-
70
-
71
-
72
-
73
-
74
-
75
-
76
-
77
-
78
-
79
-
80
-
81
-
82
-
83
-
84
-
85
-
86
-
87
-
88
-
89
-
90
-
91
-
92
-
93
-
94
-
95
-
96
-
97
-
98
-
99
-
100
-
101
-
102
-
103
-
104
-
105
-
106
-
107
-
108
-
109
-
110
-
111
-
112
-
113
-
114
-
115
-
116
-
117
-
118
-
119
-
120
-
121
-
122
-
123
-
124
-
125
-
126
-
127
-
128
-
129
-
130
-
131
-
132
-
133
-
134
-
135
-
 136
136 -
 137
137 -
 138
138 -
 139
139 -
 140
140 -
 141
141 -
 142
142 -
 143
143 -
 144
144 -
 145
145 -
 146
146 -
147
-
148
-
149
-
150
-
151
-
152
-
153
-
154
-
155
-
156
-
157
-
158
-
159
-
160
-
161
-
162
-
163
-
164
-
165
-
166
 |
 |

9:11
Embroidery mode - stitch-out
C
D
3.
To line up the design on the screen with the
previously embroidered, select matching point
(C) to be the corner. Use the touch function -
move or the corner icons.
4.
Select the next function, rotate design (D) to
move the matching point to the right position in
the hoop.
Use the touch function - rotate to line up the
designs. Check that the needle is at the exact
position.
5.
Close precise positioning and start
embroidering.