Philips 23PF5320 Quick start guide - Page 8
Igital, Eceiver, Atellite, Efinition, Utput, Onitor, Onnections - 720p
 |
UPC - 037849962947
View all Philips 23PF5320 manuals
Add to My Manuals
Save this manual to your list of manuals |
Page 8 highlights
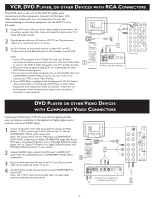
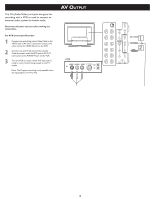
DIGITAL TV RECEIVER, OR A DIGITAL SATELLITE RECEIVER WITH HD (HIGH DEFINITION) OUTPUT A Digital TV Receiver or a Digital Satellite Receiver is able to produces HD (High Definition) video signal with 480p, 576p, 720p, and 1080i formats. A Component (Y Pb, Pr) Connection is required for this kind of setup. Note: This setup also support 480i/576i. 1 Using a Component Video cable, connect the Digital TV Receiver's Y, Pb, Pr jacks to the Y, Pb, Pr jacks on the TV. Use the HD IN 3 connections. Note: Component Video (Y, Pb, Pr) connections in HD IN connections is necessary to view 480p, 576p, 720p, and 1080i formats. Note that the Component Video Input in Side Connections can only support 480i/576i format. 2 Using an Audio cable, connect the Digital TV Receiver's AUDIO OUT jacks to the TV's AUDIO IN jacks in HD IN connections. 3 Plug the power cable into AC inlet on LCD TV set. Plug the power cable into an outlet and switch TV set on. 4 Use AV+ button on the remote control to select HD to watch DVD. Note: The Y, Pb, Pr jacks do not provide audio, so audio cables must be connected to provide sound. 4 Wall outlet 2 1 Digital Satellite Receiver with HD output PC (MONITOR) CONNECTIONS: This LCD TV can be used as a PC monitor. Your computer will have to equipped with a VGA type video output and VGA cable. 1 Using a VGA cable (not supplied), connect PC's VGA OUT connector to the VGA connector on the TV. Use the PC IN connections. 2 Using a MINI-JACK type AUDIO cable (not supplied), connect the PC's AUDIO OUT connector to the AUDIO connector on the TV. Use the PC IN connections. 3 3 Plug the power cable into AC inlet on LCD TV set. Plug the power cable into an outlet and switch TV set on. 4 Use AV+ button on the remote control to select PC to use your LCD TV as a PC monitor. Note: Please refer to "Setting Up the PC Mode" section for all the supported PC display modes. If possible, use the 1280 x 720@60Hz video mode to obtain the best PC image quality. 2 Wall outlet 1 4 Computer 8
-
 1
1 -
2
-
 3
3 -
 4
4 -
 5
5 -
 6
6 -
 7
7 -
 8
8 -
 9
9 -
 10
10
 |
 |
