Philips 60PP9202 Quick start guide - Page 5
Sing The, Nstallation, Eatures, Continued, Autochron
 |
View all Philips 60PP9202 manuals
Add to My Manuals
Save this manual to your list of manuals |
Page 5 highlights
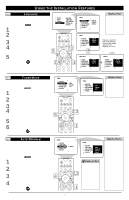
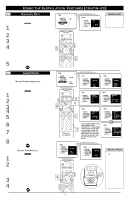
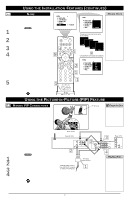
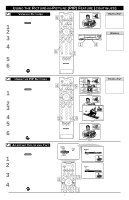
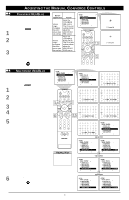
USING THE INSTALLATION FEATURES (CONTINUED) PICTURE SOUND FEATURES INSTALL LANGUAGE TUNER MODE AUTO PROGRAM CHANNEL EDIT AutoChron CHANNEL EDIT T his feature allows you to edit or skip channels from the channel list that have bad or weak signals or channels you do not want to watch. 1 Press the MENU/SELECT button. The onscreen menu appears. Then press the CURSOR RING DOWN repeatedly until INSTALL is highlighted. Press the CURSOR RING right to enter the INSTALL submenu. 2 Press the CURSOR RING DOWN repeatedly until CHANNEL EDIT is highlighted. Then press the CURSOR RING RIGHT or LEFT to access the CHANNEL EDIT list. 3 Press the CURSOR RING UP or DOWN to scroll through the list of channels. Or press the NUMBER buttons on your remote control to select a specific channel. 4 With the channel you want to edit selected, press the CURSOR RING RIGHT to mark the channel as SKIPPED. (Channels you mark SKIPPED will not appear when you use the CH[annel] +/- buttons to change channels while watching TV.) When you want to add a channel that has been marked SKIPPED, press the CURSOR RING UP or DOWN to highlight the channel. Then press the CURSOR RING RIGHT to remove the word SKIPPED. 5 Press the STATUS/EXIT button to exit the menu. INSTALL LANGUAGE AV3 TUNER MODE AV4 AUTO PROGRAM 1 CHANNEL EDIT 2 AutoChron 3 POWER INSTALL LANGUAGE TUNER MODE AUTO PROGRAM CHANNEL EDIT AutoChron AV3 AV4 1 2 SKIPPED 3 5 3TV SWAP SOUND VCR PIP CH DN UP ACC ACTIVE CONTROL FREEZE PICTURE 4 STATUS/ EXIT MENU/ SELECT MUTE 2VOL 1 CH 123 456 HELPFUL HINT Channels that Auto Program (see page 4) determined not to contain active broadcast signals are marked SKIPPED. PICTURE SOUND FEATURES INSTALL LANGUAGE TUNER MODE AUTO PROGRAM CHANNEL EDIT AutoChron AutoChron AutoChron™ gives you the option of setting the time manually or automatically. SETTING TIME AUTOMATICALLY The steps in this section tell you how to set AutoChron™ to download the time from your PBS station to your TV. After successful setup, AutoChron™ will automatically maintain the correct time using your PBS station until you set the time manually. 1 Press the MENU/SELECT button. The onscreen menu appears. Then press the CURSOR RING DOWN repeatedly until INSTALL is highlighted. 2 Press the CURSOR RING RIGHT to enter the INSTALL submenu. Then press the CURSOR RING DOWN repeatedly until AutoChron is highlighted. 3 Press the CURSOR RING RIGHT to enter the AutoChron SET TIME area. 4 Press the CURSOR RING RIGHT again to select AUTO. Within a few seconds, a menu containing the time-zone options appears. 5 If necessary, press the CURSOR RING UP or DOWN to highlight your correct time zone. Then press the CURSOR RING RIGHT. Within a few seconds, the option of Daylight Savings Time appears on screen. 6 If the Daylight Savings Time option you want to select is not highlighted, press the CURSOR RING UP or DOWN to highlight the option. Then press the CURSOR RING RIGHT to activate your selection. 7 Press the number buttons on your remote to enter the channel number for your PBS station (02, 15, or 121, for example). Wait until the TV completes its search. If the time was not found, you will need to locate the correct channel number for your PBS station and input that number. 8 Press the STATUS/EXIT button to exit the menu. SETTING TIME MANUALLY 1 Follow steps 1-3 above, then press the CURSOR RING DOWN to highlight MANUAL and CURSOR RING RIGHT to enter the MANUAL time input area. 2 Use the number buttons on your remote control to input the first digit for the time. You can also press the CURSOR RING UP or DOWN to select a digit. Press the CURSOR RING RIGHT to move to the next digit input slot and input the time. If you should need to change a number you have input, you can cursor left or right to the digit input slot to make the correction. 3 After you have input the time, press the CURSOR RING RIGHT to enter the AM/PM area. Then press the CURSOR RING UP or DOWN to select AM or PM. 4 Press the STATUS/EXIT button to exit the menu. INSTALL LANGUAGE TUNER MODE AUTO PROGRAM CHANNEL EDIT AutoChron SET TIME AUTO MANUAL INSTALL LANGUAGE TUNER MODE AUTO PROGRAM CHANNEL EDIT AutoChron SET TIME AUTO MANUAL INSTALL LANGUAGE TUNER MODE AUTO PROGRAM CHANNEL EDIT AutoChron TIME ZONE? CENTRAL MOUNTAIN PACIFIC POWER TV 5,6 24,3, SWAP VCR PIP CH ACC ACTIVE CONTROL FREEZE DN UP 8 SOUND PICTURE STATUS/ EXIT MENU/ SELECT MUTE VOL 1 CH 123 456 789 TV/VCR A/CH 0 SURF POSITION PIP 7 INSTALL LANGUAGE TUNER MODE AUTO PROGRAM CHANNEL EDIT AutoChron DAYLIGHT SAVING TIME? YES NO INSTALL LANGUAGE TUNER MODE AUTO PROGRAM CHANNEL EDIT AutoChron SEARCH FOR TIME ENTER CHANNEL 02 PBS INSTALL LANGUAGE TUNER MODE AUTO PROGRAM CHANNEL EDIT AutoChron SEARCH FOR TIME PLEASE WAIT 15 PBS The message shown to the right indicates that AutoChron™ is not finding a PBS station at the channel you input. Check the channel number for your PBS station.You will need to input the correct number for the time to be found. INSTALL LANGUAGE TUNER MODE AUTO PROGRAM CHANNEL EDIT AutoChron SEARCH FOR TIME TIME FOUND END: PRESS STATUS 11:15 AM OR INSTALL LANGUAGE TUNER MODE AUTO PROGRAM CHANNEL EDIT AutoChron SEARCH FOR TIME TIME NOT FOUND RE-ENTER CHANNEL 15 PBS INSTALL LANGUAGE TUNER MODE AUTO PROGRAM CHANNEL EDIT AutoChron SET TIME AUTO MANUAL POWER 4 TV SWAP 1SOUND VCR PIP CH DN UP ACC ACTIVE CONTROL FREEZE 3 PICTURE STATUS/ EXIT MENU/ SELECT MUTE 2VOL CH 123 5 INSTALL LANGUAGE TUNER MODE AUTO PROGRAM CHANNEL EDIT AutoChron ENTER TIME 11:00 AM 789 TV/VCR A/CH 0 SURF SURF PIP ON/OFF REC • FORMAT SLEEP SAP AV DOLBY V PROG.LIST ITR/ RECORD HOME VIDEO HOME PERSONAL MOVIES CLOCK Button POSITION PIP HELPFUL HINTS • The CLOCK button \ on your remote provides another way in which you can set the TV's clock manually. • After setting the clock, you will be able to access the time by pressing the STATUS/EXIT button. Or you can view the time constantly in the upper right-hand corner of the screen by turning the DISPLAY control on (see page 38 in the Directions for Use manual).
-
 1
1 -
 2
2 -
 3
3 -
 4
4 -
 5
5 -
 6
6 -
 7
7 -
 8
8
 |
 |
