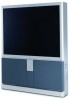
Philips 60PP9202 Quick start guide - Page 6
Sing The, Nstallation, Eatures, Continued, Icture, Eature, Pip C
 |
View all Philips 60PP9202 manuals
Add to My Manuals
Save this manual to your list of manuals |
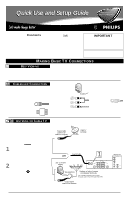
Page 6 highlights
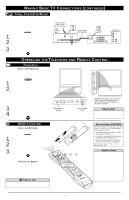
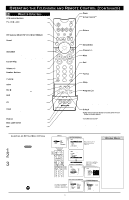
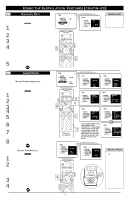
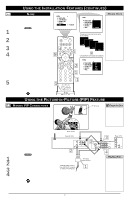
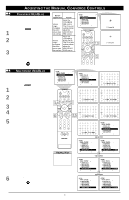
USING THE INSTALLATION FEATURES (CONTINUED) PICTURE SOUND FEATURES INSTALL LANGUAGE TUNER MODE AUTO PROGRAM CHANNEL EDIT AutoChron NAME T he channel NAME feature allows you to list the "call" letters of your favorite stations beside their channel numbers when they appear on the screen. The TV has in memory a list of the 50 most popular channel names (NBC, ABC, or FOX, for example). You also can enter a custom name (up to five characters). 1 Press the NUMBER buttons, the CH(annel) +/- buttons, or the AV button to select a TV channel or input source to which you want to assign a name or whose name you want to modify. 2 Press the MENU/SELECT button. The onscreen menu appears. Then press the CURSOR RING DOWN repeatedly until INSTALL is highlighted. Press the CURSOR RING RIGHT to enter the INSTALL submenu. 3 Press the CURSOR RING DOWN repeatedly until the NAME control is highlighted. Then press the CURSOR RING RIGHT to highlight the NAME options area. 4 At this point you can choose between options of creating a personal name for the channel or selecting a preset one from a list. To create your own personal name for the channel or change a personal name you created previously, press the CURSOR RING RIGHT. Then press the CURSOR RING UP or DOWN to select the first character of the name. You can input up to five characters for the name. When finished, press the MENU/SELECT button. Or To choose from the list of preset names, press the CURSOR RING UP or DOWN to highlight your choice for the channel name. Press the CURSOR RING RIGHT to select the name. Then press the MENU/SELECT button. 5 Press the STATUS/EXIT button to exit the menu. When you press the STATUS/EXIT button when no onscreen display is present or change to the channel you've named, the name will appear on screen next to the channel number or signal source name. INSTALL TUNER MODE AUTO PROGRAM CHANNEL EDIT AutoChron NAME PERSONAL INSTALL TUNER MODE AUTO PROGRAM CHANNEL EDIT AutoChron NAME PERSONAL Create your own personal name for a channel. POWER 5 4TV SWAP SOUND VCR PIP CH DN UP ACC ACTIVE 4 CONTROL FREEZE PICTURE STATUS/ EXIT MENU/ SELECT WXWXYWXYZWXYZ3 OR Choose from a list of preset options. INSTALL MUTE 3VOL 2 CH 1 123 456 789 TV/VCR A/CH 0 SURF SURF PIP ON/OFF REC • FORMAT SLEEP SAP AV DOLBY V PROG.LIST 1 1 TUNER MODE USA AUTO PROGRAM VH CHANNEL EDIT WGN AutoChron WOR NAME WTHR ITR/ RECORD HOME VIDEO HOME PERSONAL MOVIES POSITION PIP HELPFUL HINTS • The five PERSONAL name characters you can input may be letters, a dash, or the numbers 0 through 9. • If you begin inputting a personal name or changing an existing one and decide you'd rather select a name from the preset list, press the MENU/SELECT button. This will return you to the INSTALL submenu, with NAME highlighted. Simply press the CURSOR RING RIGHT to highlight the NAME options area again and choose a preset name as explained in step 4 to the left. USING THE PICTURE-IN-PICTURE (PIP) FEATURE MAKING PIP CONNECTIONS Picture-In-Picture (PIP) is the showing of two pictures on the TV screen at the same time-one main screen picture and one small picture, or PIP. The picture for the PIP window can come from an antenna or cable TV signal, or from AV1, AV2, or AV3. NOTE: CVI cannot be displayed in the PIP window, and AV 4 does not function with PIP. The following connections explained below will allow you to use a VCR as a second tuner specifically for PIP. In other words, you can use the VCR to select channels for viewing in the PIP window. This is just one example of how you can use PIP. Note, too, that you can swap the main and PIP pictures on screen. See page 7 in this publication for information on viewing PIP pictures and using the PIP buttons. To make the connections shown in this example, you will need: • a two-way signal splitter • two coaxial cables (75Ω) • one cable for a video connection (standard RCA connector) • two cables for audio connections (standard RCA connectors). NOTE: The two-way signal splitter and cables are not supplied with your TV. You should be able to buy them at most stores that sell electronics. Or you can call our Customer Care Center at 1-800-531-0039. 1 Connect an antenna or cable TV signal to a two-way signal splitter. 2 Use coaxial cables to connect from the two-way signal splitter to the ANTENNA IN 75Ω jack on the rear of the TV and to the ANTENNA IN jack on the rear of the VCR. 3 Connect the VIDEO OUT jack on the VCR to the INPUT-AV1 VIDEO jack on the rear of the TV. 4 Connect the AUDIO OUT jacks, L(eft)/R(ight), on the rear of the VCR to the INPUT-AV 1 AUDIO jacks, L(eft)/R(ight,) on the rear of the TV. PIP Window c CHECK IT OUT You can use a variety of connections to provide input sources for viewing in PIP. For more information, see the section on "Connecting Accessory Devices to Your TV," beginning on page 6 in the Directions for Use manual. Main Screen Rear of VCR ANTENNA OUT ANTENNA IN 2 Coaxial Cable Lead-in from VHF/UHF Antenna or Cable TV Company OUT OUT VIDEO R AUDIO L IN IN 2 3 ANTENNA IN 75Ω INPUT-AV 1 OUTPUT Y VIDEO S-VIDEO L Pb L AUDIO Pr R INPUT-AV 2 VIDEO S-VIDEO L L AUDIO R Rear of TV HD INPUT-AV 4 G/Y R/Pr B/Pb V SYNC H L AUDIO R 4 Two-way Signal Splitter 1 HELPFUL HINT If your VCR is mono (nonstereo), you will connect only one audio cable. You must be sure that the TV is set to MONO for the AV input source to which you've connected the VCR (INPUT-AV 1, INPUT-AV 2, or the side panel inputs [AV3]). Otherwise, you will receive sound from only one of the TV's speakers. See page 34 in the Directions for Use manual that came with the TV. 6
-
 1
1 -
 2
2 -
 3
3 -
 4
4 -
 5
5 -
 6
6 -
 7
7 -
 8
8
 |
 |
