Philips AJ260 User manual - Page 8
English, Controls - weather station clock radio
 |
UPC - 609585129580
View all Philips AJ260 manuals
Add to My Manuals
Save this manual to your list of manuals |
Page 8 highlights
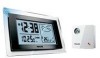
English Controls Supplied accessories - 1 X certified AC 7.5V adapter (Input: 120 ~ 60Hz, 4.5W Output: 7.5V 250mA) - 1 X outdoor sensor Controls (see 1) 1 ALM 1/ ALM 2 - activates/confirms ALARM 1 /ALARM 2 time setting - switches off the alarm 2 RADIO ON/OFF - switches the radio on/off - switches the set on or to standby - stops the active buzzer or radio alarm for 24 hours - switches off the sleep timer 3 TIME SET/RCC SYNC - activates/confirms clock/date setting - activates RCC (Radio Controlled Clock) reception 4 AUTO SCAN/DATE - programs preset radio stations - displays month and day information in standby mode - changes display order between month and day during setting time - receives transmission from the sensor 5 DISPLAY - toggles between indoor temperature, indoor humidity and outdoor temperature 6 RADIO•BUZ - selects alarm mode: radio or buzzer 7 REPEAT ALARM/BRIGHTNESS CONTROL - pushes to switch off alarm for a 9-minute period - changes the brightness of the display illumination 8 LCD Display - shows the clock/ alarm time or radio and weather forecast information 9 SLEEP/ALARM RESET - switches off radio for timer mode - adjusts timer options for radio playback - stops the active buzzer or radio alarm for 24 hours 0 PRESET +/- selects a preset radion station ! TUNING +/- tunes to radio stations - adjusts clock / alarm time @ VOL- adjusts sound level # Color lamp- indicates the different forth- coming weather situation $ Battery compartment - opens to insert 4 x 1.5V AAA batteries % RESET - press if the set / display does not react to operation of any button ^ (oC oF) Slide Switch - selects between Centigrade (oC) or Fahrenheit (oF) temperature unit display & DC 7.5V - socket for AC/DC 7.5V adapter * Pigtail - FM antenna to improve FM reception Controls on the sensor (see 1) 1 LCD display - shows current temperature, and low battery indication of the sensor 2 LED light - flashes when the sensor is transmitting 3 RESET - resets to start transmitting 4 (oC oF) Slide Switch - selects between Centigrade (oC) or Fahrenheit (oF) temperature unit display 5 CHANNEL 1/ 2 /3 - selects RF channel to transmit and receive between the senor and the main unit 6 Door lock - turns to lock and un-lock the sensor door. 7 Sensor support - pulls out to stand the sensor Power supply Make sure you remove the plug from the set and wall outlet before inserting batteries. Batteries (not supplied) for the main unit and the outdoor sensor 1 Open the battery door and insert 4 batteries, typed AAA for the main unit, and 2 batteries typed AA for the sensor, with the correct polarity as indicated by the "+" and "-" symbols inside the compartment.
-
 1
1 -
2
-
 3
3 -
 4
4 -
 5
5 -
 6
6 -
 7
7 -
 8
8 -
 9
9 -
 10
10 -
 11
11 -
 12
12 -
 13
13 -
14
-
15
 |
 |
