Philips AJ260 User manual - Page 9
Power supply, Clock and Date - 12
 |
UPC - 609585129580
View all Philips AJ260 manuals
Add to My Manuals
Save this manual to your list of manuals |
Page 9 highlights
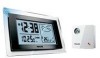
Power supply Clock and Date 2 Replace the battery door, making sure the To adjust to your local time batteries are firmly and correctly in place.The • The time searched by RCC is CST.To adjust set is now ready to operate. to your local time, you need to calculate the Batteries contain chemical substances, time zone difference between your local time so they should be disposed of properly. and the CST time, and do the steps Perchlorate Material-special handling described at "Manual setting": may apply. See www.dtsc.ca.gov/ hazardouswaste/perchlorate. 1 For hour offsetting, press and hold TIME SET / RCC SYNC for 2 seconds. Mains Adapter. Note: Remove the batteries before you use the AC adapter. 2 Press set until HR and shown. 3 Press TUNING +/- to set the hour offset between CST. 1 Connect the mains adapter to the set's DC 7.5V socket and to the power socket. About reception • The broadcast signal can be received any- Helpful hints: To avoid damage to the set, use only the adapter supplied! where in the continental USA. • To get the best reception of broadcast signal, place the set nearer to a window and change All markings are located on the bottom of the set. direction if one direction does not work. • Same as all wireless devices, some environ- Setting the clock and date (see 2) mental effects may affect the reception, such as surrounded by heavy concrete, metal panel and electronic interference, nearby mountains The clock uses 12-hour time format. and valleys, long transmitting distance, etc. Auto setting (RCC - Radio Controlled Clock) The set has a built-in radio controlled clock (RCC).The clock automatically synchronizes the current time and date when it is brought Manual setting You may also set or adjust time manually. 1 Press TIME SET / RCC SYNC for 3 seconds until the year starts to flash on the within the range of the radio signal WWVB screen. 60KHz generated from Fort Collins, Colorado. 2 On this screen, enter the year, month and 1 Press TIME SET / RCC SYNC for 3 seconds until the year starts to flash on the screen. date. ➜ Press TIME SET / RCC SYNC to 2 Press TIME SET / RCC SYNC until Hr is displayed. ➜ Press TIME SET / RCC SYNC to move between fields. 3 Press TUNING +/- based on your location in relation to the Central Time Zone. ➜ The unit finds the RCC signal and sets time automatically. ➜ The time setting takes 24 - 48 hours. move between fields. 3 Press TIME SET / RCC SYNC to move to the time screen. 4 On this screen, enter the U.S. Central Standard Time. ➜ Do not enter your local time here! 5 Press TIME SET / RCC SYNC until Hr is displayed. 6 Press TUNING +/- based on your location in relation to the Central Time Zone. Pacific Time Mountain Time Standby power consumption (clock mode 1.5W Central Time Eastern Time
-
 1
1 -
2
-
3
-
 4
4 -
 5
5 -
 6
6 -
 7
7 -
 8
8 -
 9
9 -
 10
10 -
 11
11 -
 12
12 -
 13
13 -
 14
14 -
15
 |
 |
