Philips DC190 User manual - Page 9
Get started - ipod docking clock radio
 |
UPC - 609585174115
View all Philips DC190 manuals
Add to My Manuals
Save this manual to your list of manuals |
Page 9 highlights
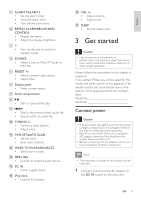
a ALARM 1/ALARM 2 • Set the alarm timer. • View the alarm time. • Turn off the alarm tone. b REPEAT ALARM/BRIGHTNESS CONTROL • Repeat the alarm. • Adjust the display brightness. c • Turn on the unit or switch to standby mode. d SOURCE • Select a source: iPod, FM tuner or MP3 link. e PRESET +/• Select a preset radio station. • Adjust time. f Display panel • Show current status. g Dock compartment h • Start or pause iPod play. i / • Skip to the previous/next audio file. • Search within an audio file. j TUNING +/• Tune to a radio station. • Adjust time. k TIME SET/AUTO SCAN • Set the clock. • Scan radio stations. l WAKE TO iPod/RADIO/BUZZ • Select alarm mode. m MP3-LINK • Jack for an external audio device. n DC IN • Power supply socket. o iPod dock • Load an iPod player. p VOL +/• Adjust volume. • Adjust time. q SLEEP • Set the sleep timer. 3 Get started Caution • Use of controls or adjustments or performance of procedures other than herein may result in hazardous radiation exposure or other unsafe operation. Always follow the instructions in this chapter in sequence. If you contact Philips, you will be asked for the model and serial number of this apparatus.The model number and serial number are on the bottom of the apparatus.Write the numbers here: Model No Serial No Connect power Caution • Risk of product damage! Ensure that the power voltage corresponds to the voltage printed on the back or underside of the apparatus. • Risk of electric shock! When you unplug the AC adaptor, always pull the plug from the socket. Never pull the cord. • Before connecting the AC adaptor, ensure you have completed all other connections. Note • The type plate is located on the bottom of the main unit. 1 Connect one end of the AC adaptor to the DC IN socket on the main unit. EN 9 English
-
 1
1 -
2
-
3
-
 4
4 -
 5
5 -
 6
6 -
 7
7 -
 8
8 -
 9
9 -
 10
10 -
 11
11 -
 12
12 -
 13
13 -
 14
14 -
15
 |
 |