Philips DC910 User manual - Page 10
Mounting the set onto wall, Using Remote Control
 |
UPC - 609585153790
View all Philips DC910 manuals
Add to My Manuals
Save this manual to your list of manuals |
Page 10 highlights
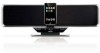
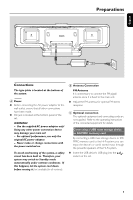
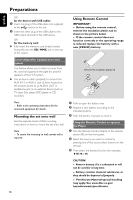
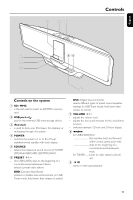
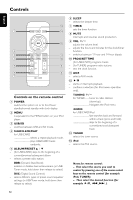
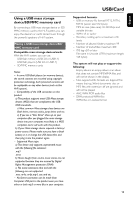
Preparations English OR for the devices with USB cables: 1 Insert one plug of the USB cable (not supplied) to the socket on the set. 2 Insert the other plug of the USB cable to the USB output terminal of the USB device. OR for the memory card: ● Fully insert the memory card (metal contact facing left) into the SD / MMC slot on the top of the system. Using Remote Control IMPORTANT! - Before using the remote control, remove the insulation plastic tab as shown in the picture below. - If the remote control does not function correctly or the operating range is reduced, replace the battery with a new (CR2025) battery. Connecting other equipment to your system This feature allows you to listen to music from the external equipment throught the powrful speakers of the Hi-Fi system. ● Use an Aux-in cable (supplied) to connect the AUX IN-1 or AUX-2 jack (3.5mm, located on the bottom panel) to an AUDIO OUT or headphone jack on an external device (such as TV, Laser Disc player, DVD player or CD recorder). Note: - Refer to the operating instructions for the connected equipment for details. Mounting the set onto wall See the separate sheet of Wall mounting instructions on how to mount the set onto wall. Note: - To secure the mounting on wall, cement wall is required. 1 Push to open the battery tray. 2 Replace a new battery according to the indicated polarity. 3 Push the battery tray back to close it. Using the Remote Control to operate the Player 1 Aim the Remote Control directly at the remote sensor (IR) on the front panel. 2 Select the source you wish to control by pressing one of the source select buttons on the remote. 3 Then select the desired function (for example, ÉÅ, ¡ or ™). CAUTION! - Remove battery if it is exhausted or will not be used for a long time. - Battery contains chemical substances, so they should be disposed of properly. - Perchlorate Material-special handling may apply. See www.dtsc.ca.gov/ hazardouswaste/perchlorate. 10
-
 1
1 -
2
-
3
-
4
-
 5
5 -
 6
6 -
 7
7 -
 8
8 -
 9
9 -
 10
10 -
 11
11 -
 12
12 -
 13
13 -
 14
14 -
 15
15 -
16
-
17
-
18
-
19
-
20
-
21
-
22
-
23
-
24
-
25
 |
 |