Philips DVD740VR Owners Manual - Page 7
Hookups - dvd vcr
 |
View all Philips DVD740VR manuals
Add to My Manuals
Save this manual to your list of manuals |
Page 7 highlights
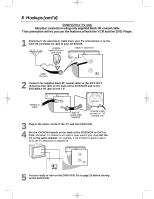
DVD740VR 4/12/02 12:08 PM Page 7 Hookups 7 Determining the best possible connection... Your hookup will be determined primarily by your existing equipment, especially your TV. However, the following guidelines describe which options have the best picture (video) and sound (audio) quality. ૽૽૽૽ If your television has Component Video In jacks (which also could be labelled Y Cr Cb, Y Pr Pb, or YUV and may be green, blue, and red), use the Component Video jacks (Y Cr Cb) for the best picture quality. If you use only this video connection, only the DVD features of the DVD/VCR will be available. To see DVD features on the TV, set the TV to its Component Video In channel. Details are on page 12. If your TV has S-Video In jacks (which also may be labelled Y/C or S-VHS), use the S-Video jack for excellent picture quality. If you use only this video connection, only the DVD features of the DVD/VCR will be available. To see DVD features on the TV, set the TV to its S-Video In channel. Details are on page 11. If your TV has a single yellow Video In jack (which also may be labelled CVBS, Composite, or baseband), use the yellow Video jack for good picture quality. This connection allows you to use both the DVD and VCR features. To see DVD or VCR features on the TV, set the TV to its Video In channel. Details are on page 11. If your TV only has an RF-style jack, usually labelled Antenna In, RF In, or 75 ohm, use the ANT-OUT jack of the DVD/VCR to connect to the TV. Set your TV to channel 3 or 4 - the same channel to which the CH3/CH4 switch of the DVD/VCR is set. This connection allows you to use both the DVD and VCR features. Details are on page eight. If you have a Stereo Receiver with DIGITAL AUDIO IN jacks, digital audio connections provide the clearest sound. Connect the DVD/VCR's COAXIAL DIGITAL AUDIO OUT jack to your Stereo Receiver for the best sound quality. If you use only this audio connection, only the DVD features of the DVD/VCR will be available. Details are on page 13. If digital audio connections are not possible, connect the DVD/VCR's red and white AUDIO OUT jacks to the Audio In jacks of your Stereo Receiver or TV. This connection allows you to use both the DVD and VCR features. Details are on page 11. Before you begin... q Refer to the manuals of your TV, Cable Box, Stereo Receiver, or other devices as necessary. Note the style of jacks and connectors on the other equipment. Determine how to choose different Audio and Video In channels on your other equipment so you can see and hear the DVD/VCR material playing on the TV, Stereo, etc. q Disconnect all equipment from the power outlets. Connect the equipment to the power outlets only after you have finished hooking up everything. Never make or change connections with equipment connected to the power outlet. Remember... q Set the TV to the correct Video In channel. Such channels may be called AUX or AUXILIARY IN, AUDIO/VIDEO or A/V IN, EXT1 or External In, etc. These channels often are located near channel 00. See your TV owner's manual for details. If you do not see the DVD or VCR playback on the TV, just keep changing TV channels until you see the DVD or VCR picture on the TV. q Set the Stereo Receiver to the correct channel or "source" mode. q Depending on your connection, you may need to purchase additional cables. q To use the VCR features, you must include a connection with the supplied yellow video cable and red/white audio cables or with the supplied RF coaxial cable. Once you determine the best option, find your choice on pages 8-13. Follow the specific steps for the hookup you choose. After hooking up the DVD/VCR, go to page 15 before turning on the DVD/VCR.
-
 1
1 -
 2
2 -
 3
3 -
 4
4 -
 5
5 -
 6
6 -
 7
7 -
 8
8 -
 9
9 -
 10
10 -
 11
11 -
 12
12 -
13
-
14
-
15
-
16
-
17
-
18
-
19
-
20
-
21
-
22
-
23
-
24
-
25
-
26
-
27
-
28
-
29
-
30
-
31
-
32
-
33
-
34
-
35
-
36
-
37
-
38
-
39
-
40
-
41
-
42
-
43
-
44
-
45
-
46
-
47
-
48
-
49
-
50
-
51
-
52
-
53
-
54
-
55
-
56
-
57
-
58
-
59
-
60
-
61
-
62
-
63
-
64
-
65
-
66
-
67
-
68
-
69
-
70
-
71
-
72
-
73
-
74
-
75
-
76
-
77
-
78
-
79
-
80
 |
 |
