Philips DVDR75 Quick start guide - Page 4
Setting Up the DVD Recorder - remote code
 |
View all Philips DVDR75 manuals
Add to My Manuals
Save this manual to your list of manuals |
Page 4 highlights
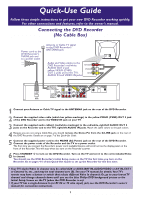
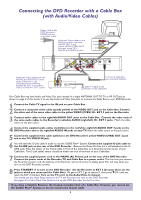
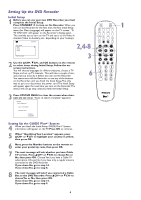
Setting Up the DVD Recorder Initial Setup 1 Before you can use your new DVD Recorder, you must complete the Initial Setup. Press STANDBY y to turn on the Recorder. When you turn on the Recorder for the first time, the first Initial Setup REC/OTR STANDBY TIMER REC MODE PLAY MODE TV/DVD 1 menu (for Menu Language) will appear on the TV screen. "IS TV ON? C03" will appear on the Recorder's display panel. This reminds you to turn on the TV and set it to the Video In channel (Video In, Auxiliary, etc., depending on your hookup). MONITOR DIM RETURN T/C •TV DISC MANAGER FSS SELECT E ~ Initial Setup SUBTITLE AUDIO ` ANGLE ZOOM Menu Language English K L Español Français 2,4-8 MENU GUIDE/TV DISC CH+ OK Press OK to continue 2 Use the 8CH+, 9CH-, and OK buttons on the remote to select items during Initial Setup. Follow the onscreen instructions. You will choose languages for different features, choose a TV Shape, and set up TV channels. This will take a couple of minutes, but you must do it before you can use the Recorder. You cannot turn off the Recorder or use any of the buttons on the Recorder until you finish the Initial Setup. The only way to quit is to disconnect the power cord. The Initial Setup will appear again the next time you turn on the Recorder. The menus will not go away until you finish the Initial Setup. 3 SYSTEM CH- STOP PLAY TV VOLUME Ç SLOW PAUSE H k G 6 CLEAR MUTE 3 Press SYSTEM MENU to clear the screen when channels are set (when "Auto ch. search complete" appears). Installation Auto Ch. Programming Auto ch. search complete 024 Channels found To exit press SYSTEM MENU Setting Up the GUIDE Plus+® System 4 When you finish the Initial Setup, GUIDE Plus+® System information will appear on the TV. Press OK to continue. 5 When "Identifying Your Location" appears, press 8CH+ or 9CH- to highlight your country in yellow, then press OK. 6 Next, press the Number buttons on the remote to enter your postal zip code, then press OK. 7 The next message will ask whether you have Cable TV service. Press 8CH+ or 9CH- to choose Yes or No, then press OK. Choose Yes if you have a Cable TV subscription. Choose No if you have only a regular antenna connected to the DVD Recorder. If you chose No, go to step 14. If you chose Yes, go to step 8. 8 The next message will ask if you connected a Cable Box to the DVD Recorder. Press 8CH+ or 9CH- to choose Yes or No, then press OK. If you chose No, go to step 14. If you chose Yes, go to step 9. 4
-
 1
1 -
 2
2 -
 3
3 -
 4
4 -
 5
5 -
 6
6 -
 7
7 -
 8
8
 |
 |