Philips FWP900 User manual - Page 27
Preparation for Recording, One Touch Recording, CD Synchro Recording, Dubbing Tapes, Digital
 |
View all Philips FWP900 manuals
Add to My Manuals
Save this manual to your list of manuals |
Page 27 highlights
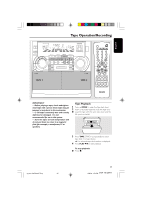
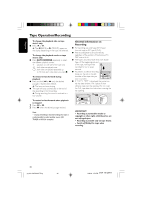
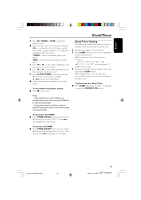
English Tape Operation/Recording Preparation for Recording 1 Press TAPE (TAPE 1•2) to select TAPE 2. 2 Load a recordable tape into tape deck 2. 3 Press í or ë to select the recording tape side. ➜ A appears on the display for reverse side. ➜ B appears on the display for forward side. 4 Press AUTO REVERSE repeatedly to select playback modes for recording. ➜ å for recording on one side only. ➜ ∂ for recording on both sides. 5 Prepare the source to be recorded. CD - load the disc(s). TUNER - tune to the desired radio station. TAPE - load the prerecorded tape into tape deck 1 with the full spool to the left. AUX - connect external equipment. When recording in progress ➜ REC starts flashing. G It is not possible to change tape side. G It is not possible listen to another source except for Dubbing Tapes. G It is not possible to activate the timer function. One Touch Recording 1 Press CD, TUNER or AUX to select the source. 2 Start playback of the selected source. 3 Press RECORD to start recording. To stop recording G Press Ç. Note: - One Touch Recording is not possible in TAPE mode "SELECT SOURCE" will be displayed. CD Synchro Recording 1 Press CD 1•2•3 to select the disc. G Press í or ë (or Digit 0-9 on the remote control) to select the desired track to start recording. G You can program the tracks in the order you want them to be recorded (refer to "CD Operation - Programming the disc tracks"). 2 Press RECORD to start recording. ➜ The disc will start playback automatically. To select another track during recording 1 Press PAUSEÉÅ to interrupt recording. 2 Pressí or ë (or Digit 0-9 on the remote control) to select the desired track. 3 Press PLAYÉÅ to resume recording. To stop recording G Press Ç. ➜ Recording and disc playback will stop simultaneously. Dubbing Tapes 1 Load the prerecorded tape in tape deck 1. G You can set the tape to the desired passage where recording will start. 2 Press DUB (HSD) once for normal speed dubbing or twice (within 2 seconds) for high speed dubbing. ➜ Playing and recording will start simultaneously. ➜ "NORMAL" (normal speed) or "FAST" (high speed) will be displayed, followed by "DUB" with indication on selected tape side direction. ➜ During high speed dubbing, the volume will be reduced and HSD will appear on the display G Dubbing of tapes is possible on one side of tape only. To continue record on reverse side, at the end of side A, flip the tapes to side B and repeat the procedure. To stop dubbing G Press Ç. Notes: - Only å mode is available during dubbing. - Dubbing of tapes is possible only from tape deck 1 to tape deck 2. - To ensure good dubbing, use tapes of the same length. - You can listen to another source while dubbing. Digital Recording via Digital Out For CD digital recording, please refer to the instructions manuals for the CD recorder, digital audio equipment and so forth. pg 001-033/P900/37-Eng 27 27 12/8/00, 1:53 PM 3139 115 20411
-
 1
1 -
2
-
3
-
4
-
5
-
6
-
7
-
8
-
9
-
10
-
11
-
12
-
13
-
14
-
15
-
16
-
17
-
18
-
19
-
20
-
21
-
 22
22 -
 23
23 -
 24
24 -
 25
25 -
 26
26 -
 27
27 -
 28
28 -
 29
29 -
 30
30 -
 31
31 -
 32
32 -
33
 |
 |
