Philips LC5131 User Guide - Page 15
Operation, Preparation
 |
UPC - 037849905722
View all Philips LC5131 manuals
Add to My Manuals
Save this manual to your list of manuals |
Page 15 highlights
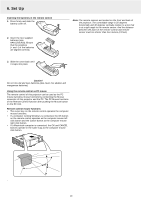
8. Operation Preparation Preparation General 1. Press the Standby/On button to switch on the projector. - The Standby/On indicator flashes green and the start up screen appears for 5 seconds. - After the lamp has been operating for 1000 hours or longer, the Status indicator will light and the "LAMP USAGE" icon which shows hours of total lamp usage will be displayed on the screen. When this happens, turn off the projector and replace the lamp cartridge with a new one. The projector will not turn on after 1100 hours. (It will turn off if it is in use) For lamp cartridge replacement see the section under Maintenance. - When the lamp is on, the Standby/On indicator lights up green. 2. Select the required source (Data/YCbCr, Video or S-Video) by pressing the Input selection button on the projector or the Video/Data buttons on the remote control. Note: The Input selection button on the projector toggles between Data/YCbCr, Video or S-Video input. 3. Switch on the PC or start video playback. - A feedback message appears on the screen, indicating the selected source. Feedback messages - General explanation Feedback messages are displayed in the center of the screen. They are displayed when: - a signal comes up or goes down, - when an input source is changed, - when the A/V Mute is addressed, - when the Auto image function is set to ON. These messages will only be displayed when the menu option FEEDBACK is set to 'ON' in the SETTINGS menu. All messages, except the A/V Mute message, will be removed automatically after 4 seconds. Some examples: On Screen Display menu - General explanation All video and data adjustments and settings (except A/V Mute) are done via On Screen Displays and with help of Menu and Cursor Control on the remote control. The basic settings, concerning image and lamp usage, are presented in the normal menu. This menu will be displayed when the Menu button is pressed with the remote control Flip cover closed. Advanced feature settings are presented in the advanced menu. This menu will be displayed when the Menu button is pressed with the remote control Flip cover open. 1. Press Menu. - The menu bar appears on the screen. The first item is highlighted and its sub menu is shown. 2. Use Cursor Control left and/or right to move the cursor to any other item in the menu bar. 3. Select the sub menu item to be adjusted using Cursor Control up and/or down. 4. Adjust the selected item, using Cursor Control left and/or right. 5. Press OK to confirm and store this adjustment. 6. Select the next item to be adjusted in the sub menu and adjust as described above. 7. Press Cancel to close the On Screen Display. Language selection The projector can display menus in one of eight different languages. 1. Open Flip cover and press Menu. - The menu bar appears on the screen. 2. Use Cursor Control to select OPTION in the menu bar. 3. Use Cursor Control to select LANGUAGE from the sub menu. 4. Press OK to confirm the language selection menu. 5. Use Cursor Control to select the required language in the action window. 6. Press OK to confirm and store the selected language. 7. If required, select the next item to be adjusted or press Cancel to exit the menu setting mode. Note: The menu disappears automatically after the time, that has been set in DISPLAY TIME setting, is passed. DATA VIDEO NO SIGNAL Data selected as source Video selected as source, no input signal. AV MUTE Data, Video or S-Video selected as source, A/V muted 15
-
 1
1 -
2
-
3
-
4
-
5
-
6
-
7
-
8
-
9
-
 10
10 -
 11
11 -
 12
12 -
 13
13 -
 14
14 -
 15
15 -
 16
16 -
 17
17 -
 18
18 -
 19
19 -
 20
20 -
21
-
22
-
23
-
24
 |
 |
