Philips LC5131 User Guide - Page 7
Functional Overview, See illustrations - lamp
 |
UPC - 037849905722
View all Philips LC5131 manuals
Add to My Manuals
Save this manual to your list of manuals |
Page 7 highlights
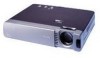
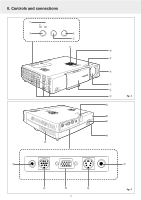
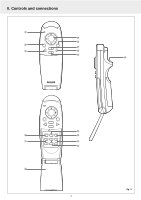
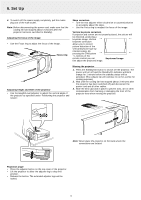
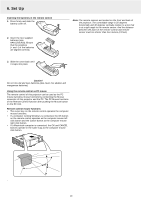
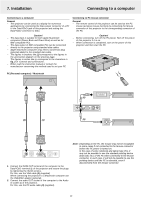
5. Functional Overview See illustrations Projector front (fig. 1) 1 Indicators Standby / On (y |) indicator - Lights up orange in Standby mode - Flashes green when the lamp is starting up (1 min.) - Lights up green when the lamp is on - Flashes orange when the projector is switched from the on into the standby mode (1 min) Status indicator (see also page 24) - Off: projector is in normal mode - On: lamp life of the projection lamp nears or the end or is expired. 2 Standby/On For switching the projector in the power standby mode. 3 Input selection button To toggle between Video, S-Video and Data signal. 4 Auto image button 5 Ventilation slots 6 Sliding lens cap 7 Lens 8 IR sensor Receives the signals from the remote control. 9 Focus ring To adjust the focus of the projected image. 0 Height adjuster button To adjust the projection angle of the projector. ! Built-in speaker rear (fig. 2) @ Ventilation slots # Audio in Input sockets for connection to the Audio OUT sockets of a video recorder (S-VHS, PAL, NTSC, SECAM) or to the Audio OUT socket of a PC. $ Mouse Socket for connecting a computer mouse. % Data / YCbCr Input socket for connecting to the Data out terminal of a computer or the component video signal output. ^ S-Video in Input socket for connecting to the S-VIDEO OUT socket of a S-VHS video recorder, a VCR, Laser Disc player, video camera or TV. & Video in Input socket for connecting to the VIDEO OUT socket of a video recorder, Laser Disc player, video camera or TV with AV output socket (PAL, NTSC, SECAM). * Skew adjuster To adjust the skew of the horizontal line of the projected image. ( Power socket To connect the projector to the mains. ) Lock slit To insert an optional locking device (Kensington lock). ¡ IR sensor Receives the signals from the remote control. Remote control (fig. 3) flip cover open ™ LED The red LED lights during infrared transmission. £ Mouse To activate the mouse control function by means of the cursor key as mouse control navigator, OK button as the Lclick mouse button and the Cancel button as the R-click mouse button. (Lights up red when in function). º Auto image To automatically size and position the image to fit optimally in the screen picture in accordance with the resolution. Functions only in Data mode. ⁄ D-Zoom +/- (Digital Zoom) To enlarge the picture to a maximum of ten times the original size. ≤ Video To select the video signal as the current projection source. ∞ Cancel (R-click mouse) To cancel the selected menu function. § Data To selecting the DATA signal as the current projection source. ≥ Menu To activate and de-activate the menu. ¤ Flip cover ‹ D-Keystone +/- (Digital Keystone) To correct picture distortion of the vertical keystone type. › Volume +/To adjust the audio volume via the built-in speaker. fi AV Mute To turn off the image and mute the sound at the same time. To restore the picture and sound, press the button again. • Standby/On For switching the projector in the power standby mode. ª Cursor Control To manipulate the mouse cursor on the connected computer as long as the menu is not active. When the menu is active the Cursor Control controls the menu cursor. fl D-Freeze (Digital Freeze) To display a still image of the current frame. To restore the present picture, press the button again. ‡ OK (L-click mouse) To confirm action in the menu when the menu is on screen. 7
-
 1
1 -
 2
2 -
 3
3 -
 4
4 -
 5
5 -
 6
6 -
 7
7 -
 8
8 -
 9
9 -
 10
10 -
 11
11 -
 12
12 -
13
-
14
-
15
-
16
-
17
-
18
-
19
-
20
-
21
-
22
-
23
-
24
 |
 |
