Philips MZ3 User manual - Page 9
General Information, Power Supply
 |
View all Philips MZ3 manuals
Add to My Manuals
Save this manual to your list of manuals |
Page 9 highlights
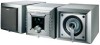
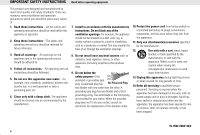
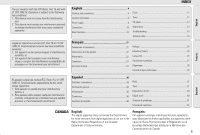
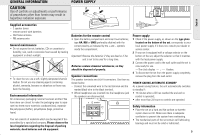
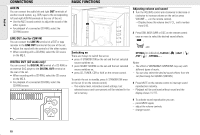
GENERAL INFORMATION CAUTION Use of controls or adjustments or performance of procedures other than herein may result in hazardous radiation exposure POWER SUPPLY 2 1 English Supplied accessories - 2 speaker boxes - remote control with batteries - AM frame antenna - FM antenna wire General maintenance • Do not expose the set, batteries, CDs or cassettes to humidity, rain, sand or excessive heat caused by heating equipment or direct sunlight. • To clean the set, use a soft, slightly dampened chamois leather. Do not use any cleaning agents containing alcohol, ammonia, benzene or abrasives as these may harm the housing. Environmental information All unnecessary packaging material has been omitted. We have done our utmost to make the packaging easy to separate into three mono-materials: cardboard (box), expandable polystyrene (buffer), polyethylene (bags, protective foam). Your set consists of materials which can be recycled if disassembled by a specialized company. Please observe the local regulations regarding the disposal of packing materials, dead batteries and old equipment. Batteries for the remote control • Open the battery compartment and insert two batteries, type AA, R06 or UM3 (preferably alkaline) with the correct polarity as indicated by the + and - symbols inside the compartment. Important! Remove the batteries if they are dead or if the unit is not to be used for a long time. Batteries contain chemical substances, so they should be disposed of properly. Speaker connections The speaker terminals are click-fit connectors. Use them as shown below. - Connect the unmarked wire to the red terminal and the marked black wire to the black terminal. • When headphones are inserted into the headphone jack the speakers are disconnected. AUX in 8 Ω speakers LEFT LEFT - + RIGHT - RIGHT + Power supply 1 Check if the power supply, as shown on the type plate located on the bottom of the set, corresponds to your local power supply. If it does not, consult your dealer or service center. 2 If your set is equipped with a voltage selector on the bottom of the set, adjust the selector so that it matches with the local power supply. 3 Connect the power cord to the wall outlet and the set is now ready for use. ™ The clock display ... : ... flashes. 4 To disconnect the set from the power supply completely, remove the plug from the wall outlet. POWER-SAVING AUTOMATIC STANDBY As a power-saving feature, the unit automatically switches to standby if: • 15 minutes after a CD has reached the end and no control is operated; • after more than 24 hours no controls are operated. Safety information • Place the set on a hard and flat surface so that the system does not tilt. Make sure there is adequate ventilation to prevent the system from overheating. • The mechanical parts of the set contain self-lubricating bearings and must not be oiled or lubricated. 9
-
 1
1 -
2
-
3
-
 4
4 -
 5
5 -
 6
6 -
 7
7 -
 8
8 -
 9
9 -
 10
10 -
 11
11 -
 12
12 -
 13
13 -
 14
14 -
15
-
16
-
17
-
18
-
19
-
20
-
21
-
22
-
23
-
24
-
25
-
26
-
27
-
28
-
29
-
30
-
31
-
32
-
33
-
34
-
35
-
36
-
37
-
38
-
39
-
40
-
41
-
42
-
43
 |
 |