Pioneer AVH-220EX Owners Manual - Page 39
Picture Adjustment]
 |
View all Pioneer AVH-220EX manuals
Add to My Manuals
Save this manual to your list of manuals |
Page 39 highlights
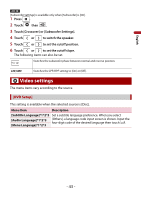
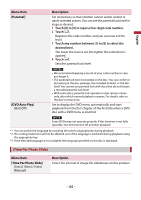
English Menu Item [Dimmer Duration] Description Adjust the time that the dimmer is turned on or off by dragging the cursors or touching or . You can use this function when [Dimmer Trigger] is set to [Time]. TIPS • Each touch of or moves the cursor backward or forward in the 15 minute width. • When the cursors are placed on the same point, the dimmer available time is 0 hours. • When the cursor for off time setting is placed on the left end and the cursor for on time setting is placed on the right end, the dimmer available time is 0 hours. • When the cursor for on time setting is placed on the left end and the cursor for off time setting is placed on the right end, the dimmer available time is 24 hours. NOTES • The time display of the dimmer duration adjusting bar depends on the clock display setting (page 46). • This setting is available only when you stop your vehicle in a safe place and apply the parking brake. [Picture Adjustment] You can adjust the picture for each source and rear view camera. CAUTION For safety reasons, you cannot use some of these functions while your vehicle is in motion. To enable these functions, you must stop in a safe place and apply the parking brake. To adjust following menu, touch , , , to adjust. Menu Item [Brightness] [-24] to [+24] [Contrast] [-24] to [+24] [Color]* [-24] to [+24] [Hue]* [-24] to [+24] [Dimmer] [+1] to [+48] Description Adjust the black intensity. Adjust the contrast. Adjust the color saturation. Adjust the tone of color (which color is emphasized, red, or green). Adjust the brightness of the display. - 39 -
-
 1
1 -
2
-
3
-
4
-
5
-
6
-
7
-
8
-
9
-
10
-
11
-
12
-
13
-
14
-
15
-
16
-
17
-
18
-
19
-
20
-
21
-
22
-
23
-
24
-
25
-
26
-
27
-
28
-
29
-
30
-
31
-
32
-
33
-
 34
34 -
 35
35 -
 36
36 -
 37
37 -
 38
38 -
 39
39 -
 40
40 -
 41
41 -
 42
42 -
 43
43 -
 44
44 -
45
-
46
-
47
-
48
-
49
-
50
-
51
-
52
-
53
-
54
-
55
-
56
-
57
-
58
-
59
-
60
-
61
-
62
 |
 |
