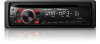
Pioneer DEH-1300MP Owner's Manual - Page 4
Menu operations identical, for function settings/audio, adjustments/initial settings, Tuner, - good
 |
UPC - 884938116442
View all Pioneer DEH-1300MP manuals
Add to My Manuals
Save this manual to your list of manuals |
Page 4 highlights
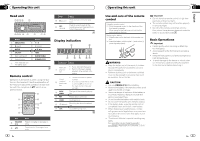
Section 02 Operating this unit Removing the front panel to protect your unit from theft 1 Press the detach button to release the front panel. 2 Push the front panel upward and pull it toward you. Note When this unit's blue/white lead is connected to the vehicle's auto-antenna relay control terminal, the vehicle's antenna extends when this unit's source is turned on. To retract the antenna, turn the source off. 3 Always keep the detached front panel in a protection device such as a protection case. Re-attaching the front panel 1 Slide the front panel to the left. Make sure to insert the tabs on the left side of the head unit into the slots on the front panel. Menu operations identical for function settings/audio adjustments/initial settings Returning to the ordinary display Canceling the initial setting menu ! Press B (BAND/ESC). You can also cancel initial settings by holding down SRC/OFF until the unit turns off. 2 Press the right side of the front panel until it is firmly seated. If you cannot attach the front panel to the head unit successfully, make sure that you are placing the front panel onto the head unit correctly. Forcing the front panel into place may result in damage to the front panel or head unit. Turning the unit on 1 Press SRC/OFF to turn the unit on. Turning the unit off 1 Press SRC/OFF and hold until the unit turns off. Selecting a source 1 Press SRC/OFF to cycle through the sources listed below: TUNER (tuner)-CD (built-in CD player)-AUX (AUX) Adjusting the volume 1 Turn SRC/OFF to adjust volume. CAUTION For safety reasons, park your vehicle when removing the front panel. Tuner Basic Operations Selecting a band 1 Press B (BAND/ESC) until the desired band (F1, F2, F3 for FM or AM) is displayed. Manual tuning (step by step) 1 Press c or d. Seeking 1 Press and hold c or d, and then release. You can cancel seek tuning by briefly pressing c or d. While pressing and holding c or d, you can skip stations. Seek tuning starts as soon as you release c or d. Storing and recalling stations for each band % When you find a station that you want to store in memory, press one of the preset tuning buttons (1 to 6) and hold until the preset number stops flashing. Stored radio station frequency can be recalled by pressing the preset tuning button. # Press a or b to recall radio station frequencies. 6 En Operating this unit Section 02 English Function settings % Press FUNC to select the function. After selecting, perform the following procedures to set the function. BSM (best stations memory) BSM (best stations memory) automatically stores the six strongest stations in the order of their signal strength. Storing broadcast frequencies with BSM may replace broadcast frequencies you have saved using 1 to 6. 1 Press a to turn BSM on. The six strongest broadcast frequencies are stored in the order of their signal strength. To cancel the storage process, press b. LOCAL (local seek tuning) Local seek tuning lets you tune in to only those radio stations with sufficiently strong signals for good reception. 1 Press a or b to turn local seek tuning on or off. 2 Press c or d to set the sensitivity. FM: LOCAL 1-LOCAL 2-LOCAL 3-LOCAL 4 AM: LOCAL 1-LOCAL 2 The highest level setting allows reception of only the strongest stations, while lower levels allow the reception of weaker stations. CD Basic Operations Playing a CD/CD-R/CD-RW 1 Insert the disc into the disc loading slot with the label side up. Ejecting a CD/CD-R/CD-RW 1 Press h. Selecting a folder 1 Press a or b. Selecting a track 1 Press c or d. Fast forwarding or reversing 1 Press and hold c or d. When playing compressed audio, there is no sound during fast forward or reverse. Switching between compressed audio and CD-DA 1 Press B (BAND/ESC). Displaying text information Selecting the desired text information 1 Press D (DISP/SCRL). Scrolling the text information to the left 1 Press and hold D (DISP/SCRL). Notes ! Depending on the version of iTunes used to write MP3 files to a disc or media file types, incompatible text stored within an audio file may be displayed incorrectly. ! Text information items that can be changed depend on the media. Function settings % Press FUNC to select the function. After selecting, perform the following procedures to set the function. RPT (repeat play) 1 Press c or d to select the repeat range. DSC - Repeat all tracks TRK - Repeat the current track FLD - Repeat the current folder RDM (random play) 1 Press a or b to turn random play on or off. When random play is on, RDM appears in the display. If you turn random play on during folder repeat, FRDM appears in the display. SCAN (scan play) Scan play searches for a song within the selected repeat range. 1 Press a to turn scan play on. If you turn scan play on during FLD, FSCN appears in the display. 2 When you find the desired track press b to turn scan play off. If the display has automatically returned to the playback display, select SCAN again by pressing FUNC. After scanning of a disc (folder) is finished, normal playback of the tracks begins. PAUSE (pause) 1 Press a or b to pause or resume. SRTRV (sound retriever) En 7
-
 1
1 -
 2
2 -
 3
3 -
 4
4 -
 5
5 -
 6
6 -
 7
7 -
 8
8 -
 9
9 -
 10
10 -
11
-
12
-
13
-
14
-
15
-
16
-
17
-
18
-
19
-
20
-
21
-
22
-
23
-
24
-
25
-
26
-
27
 |
 |
