Pioneer DEH-1300MP Owner's Manual - Page 5
Audio Adjustments, Other Functions, Operating this unit - setting the clock
 |
UPC - 884938116442
View all Pioneer DEH-1300MP manuals
Add to My Manuals
Save this manual to your list of manuals |
Page 5 highlights
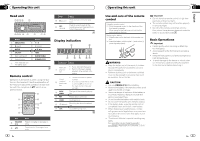
Section 02 Operating this unit Automatically enhances compressed audio and restores rich sound. 1 Press a or b to select your favorite setting. OFF (off)-1-2 1 is effective for low compression rates, and 2 is effective for high compression rates. FF/REV (fast forward/reverse) You can switch the search method between fast forward/reverse and searching every 10 tracks. Selecting ROUGH enables you to search every 10 tracks. 1 Press d to select ROUGH. FF/REV - Fast forward and reverse ROUGH - Searching every 10 tracks To select FF/REV, press c. 2 Press B (BAND/ESC) to return to the playback display. 3 Press and hold c or d to search every 10 tracks on a disc (folder). If the rest of track number is less than 10, press and hold c or d recalls the first (last) one. Audio Adjustments Audio Adjustments % Press AUDIO to select the audio function. After selecting, perform the following procedures to set the audio function. FAD (fader/balance adjustment) 1 Press a or b to adjust fader (front/rear speaker balance). 2 Press c or d to adjust the balance (left/right speaker balance). BASS/MID/TREBLE (equalizer adjustment) ! Adjusted equalizer curve settings are stored in CUSTOM. 1 Press a or b to adjust the level. Adjustment range: +6 to -6 LOUD (loudness) Loudness compensates for deficiencies in the lowand high-frequency ranges at low volume. 1 Press a or b to turn loudness on or off. 2 Press c or d to select the desired setting. LOW (low)-HI (high) ! You can also turn loudness on or off by pressing and holding E (EQ/LOUD). 8 En SLA (source level adjustment) SLA (Source Level Adjustment) lets you adjust the volume level of each source to prevent radical changes in volume when switching between sources. ! When selecting FM as the source, you cannot switch to SLA. ! Settings are based on the FM volume level, which remains unchanged. ! The AM volume level can also be adjusted with this function. 1 Press a or b to adjust the source volume. Adjustment range: SLA +4 to SLA -4 Using the equalizer % Press E (EQ/LOUD) to select the equalizer. DYNAMIC-VOCAL-NATURAL-CUSTOM -FLAT-POWERFUL ! CUSTOM allows you to create a customized setting. Other Functions Adjusting initial settings 1 Press SRC/OFF and hold until the unit turns off. 2 Press SRC/OFF and hold until the clock appears in the display. 3 Press FUNC to select the initial setting. After selecting, perform the following procedures to set the initial setting. Setting the clock 1 Press c or d to select the segment of the clock display you wish to set. Hour-Minute 2 Press a or b to put a clock right. AUX (auxiliary input) Activate this setting when using an auxiliary device connected to this unit. 1 Press a or b to turn auxiliary setting on or off. Operating this unit Displaying the clock % Press to turn the clock display on or off. # The clock display disappears temporarily when you perform other operations, but the clock display appears again after 25 seconds. Using an AUX source 1 Insert the stereo mini plug into the AUX input jack. 2 Press SRC/OFF to select AUX as the source. # AUX cannot be selected unless the auxiliary setting is turned on. For more details, refer to AUX (auxiliary input) on the previous page. Section 02 En 9 English
-
 1
1 -
 2
2 -
 3
3 -
 4
4 -
 5
5 -
 6
6 -
 7
7 -
 8
8 -
 9
9 -
 10
10 -
 11
11 -
12
-
13
-
14
-
15
-
16
-
17
-
18
-
19
-
20
-
21
-
22
-
23
-
24
-
25
-
26
-
27
 |
 |
