Pioneer DJM-900NXS Operating Instructions - Page 12
Pioneer DJM-900NXS Manual
 |
View all Pioneer DJM-900NXS manuals
Add to My Manuals
Save this manual to your list of manuals |
Page 12 highlights
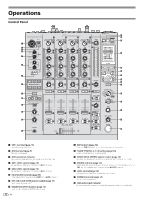
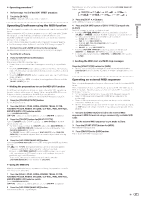
Operations Control Panel POWER MIC MIC1 USB CD/ LINE PHONO DIGITAL USB 1/ 2 f CD/ LINE LINE DIGITAL USB 3 /4 f CD/ LINE LINE DIGITAL USB 5/ 6 f CD/ LINE PHONO DIGITAL USB 7/ 8 f g o TRIM MASTER LEVEL ON/ OFF MIDI START / STOP LFO FORM w x y WAKE UP 1 2 3 4 5 TRIM OVER g TRIM g TRIM g UTILITY BEAT EFFECTS 0 p h i OVER 10 7 4 2 1 MIC 1 0 10 7 9 h i OVER 10 7 4 2 1 9 h i OVER 10 7 4 2 1 9 h i OVER 10 7 4 2 1 9 CH SELECT 1 MIC AUTO TAP 2 A 3 B 4 MST PARAMETER z LEVEL 4 2 HI HI HI HI GRID BPM % MIC 2 0 ms 1 0 -26 / 6 0 HI -1 MID -1 -2 -26 / 0 6 MID -1 -2 -26 / 0 6 MID -1 -2 -26 / 0 6 MID -1 -2 6 LOW 12 12 EQ -2 -3 -5 X- PAD EQ/ ISO 6 -3 -5 - 7 -26 / -10 -15 -24 6 EQ/ ISO -3 -5 - 7 -26 / -10 -15 -24 6 EQ/ ISO -3 -5 - 7 -26 / -10 -15 -24 6 EQ/ ISO -3 -5 -7 -10 -15 -24 A B BEAT 12 12 - 7 -26 / -10 -15 TALK OFF ON OVER LOW LOW LOW LOW 7 DUB ECHO GATE/ COMP -24 dB -26 / 6 C R dB j k -26 / 6 dB j k -26 / 6 dB j k -26 / 6 L dB j BALANCE AUTO / TAP TAP QUANTIZE D E 9 SPACE COLOR COLOR COLOR COLOR 8 SOUND COLOR FX NOISE CRUSH FILTER k q LOW HI L R CUE LOW HI LOW HI LOW HI LINK CUE 9 CUE 9 CUE 9 CUE 9 9 CUE STEREO FLANGER PHASER FILTER ROBOT TRANS REVERB SPIRAL MELODIC SLIP ROLL ROLL REV ROLL MIDI LFO SND/ RTN 9 a 1 2 CUE MONO F ECHO DELAY FADER START 3 4 10 10 9 8 7 6 5 4 3 2 1 10 9 8 7 6 5 4 3 2 1 9 8 7 6 5 r 3 4 MIC CF.A CF.B MASTER HEADPHONES MONO SPLIT STEREO BOOTH MONITOR 2 1 G b MIXING s 0 TIME 4 3 2 1 c CUE MASTER l LEVEL A THRU B 0 l A THRU B 0 l A THRU B 0 l A THRU B ISOLATOR EQ EQ CURVE H t CH FADER LEVEL / DEPTH d 0 I m u MIN MAX m m CROSS FADER ASSIGN m CROSS FADER ON / OFF PHONES v A B J e n 1 MIC1 terminal (page 15) Connect a microphone here. 9 CUE buttons (page 14) Press the [CUE] button(s) for the channel(s) you want to monitor. 2 USB terminal (page 9) Connect the computer. a FADER START (1, 2, 3, 4) buttons (page 14) These turn the fader start function on/off. 3 USB connection indicator Lights when signals are being exchanged with the computer. b MONO SPLIT, STEREO selector switch (page 14) Switches how the monitor sound output from the headphones is distributed. 4 MIC1 LEVEL control (page 15) Adjusts the sound level output from the [MIC1] channel. c MIXING controls (page 14) These adjust the monitor volume balance of the sound of channels for which the [CUE] button is pressed and the sound of the [MASTER] channel. 5 MIC2 LEVEL control (page 15) Adjusts the sound level output from the [MIC2] channel. d LEVEL control (page 14) Adjusts the sound level output from the headphones. 6 EQ (HI, LOW) controls (page 15) These adjust the tone quality of the [MIC1] and [MIC2] channels. e PHONES terminal (page 14) Connect headphones here. 7 OFF, ON, TALK OVER selector switch (page 15) Turns the microphone on/off. f USB audio input indicator Lights when sound is being input from the computer to the various channels. 8 SOUND COLOR FX buttons (page 15) These turn the SOUND COLOR FX effects on/off. 12 En
-
 1
1 -
2
-
3
-
4
-
5
-
6
-
 7
7 -
 8
8 -
 9
9 -
 10
10 -
 11
11 -
 12
12 -
 13
13 -
 14
14 -
 15
15 -
 16
16 -
 17
17 -
18
-
19
-
20
-
21
-
22
-
23
-
24
-
25
-
26
-
27
-
28
 |
 |
