Pioneer DJM-T1 Owner's Manual - Page 23
Changing the settings - setup
 |
View all Pioneer DJM-T1 manuals
Add to My Manuals
Save this manual to your list of manuals |
Page 23 highlights
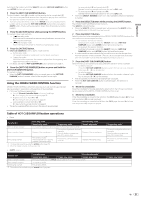
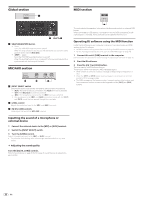
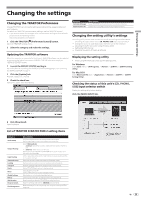
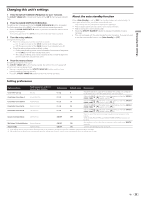
Changing the settings Changing the settings Changing the TRAKTOR Preferences Change TRAKTOR's environmental settings according to the usage conditions of your hardware. For details on TRAKTOR's environmental settings, see the TRAKTOR manual. ! If you wish to restore the changes to the environmental settings to their defaults, please check the following website. http:/ / www.prodjnet.com/ support/ 1 Click the TRAKTOR [ (Preferences Button)] button. Open the TRAKTOR settings menu. 2 Select the category and make the settings. Updating the TRAKTOR software When the computer is connected to the Internet, TRAKTOR software can be updated by accessing the Native Instruments SERVICE CENTER (referred to simply as "SERVICE CENTER" below). 1 Launch the SERVICE CENTER and log in. For instructions on launching the SERVICE CENTER and logging in, see Launching the SERVICE CENTER on page 7. 2 Click the [Update] tab. Available updates are checked. 3 Check the check box. Specify the update to be downloaded. Category Controller Manager Traktor Kontrol X1 Descriptions Assign TRAKTOR functions to this unit's controls and buttons. Set this when using Native Instruments' Traktor Kontrol X1. Changing the setting utility's settings The setting utility can be used to make the checks and settings described below. - Checking the status of this unit's [CD, PHONO, USB] input selector switch - Setting the source of audio data output from this unit to the computer - Adjusting the buffer size (when using Windows ASIO) - Setting the MIDI channel - Checking the version of the driver software Displaying the setting utility ! When using TRAKTOR, be sure to quit the settings utility. For Windows Click [Start] menu > [All Programs] > [Pioneer] > [DJM-T1] > [DJM-T1 Setting Utility]. For Mac OS X Click [Macintosh HD] icon > [Application] > [Pioneer] > [DJM-T1] > [DJM-T1 Setting Utility]. Checking the status of this unit's [CD, PHONO, USB] input selector switch Display the setting utility before starting. Click the [MIXER INPUT] tab. 4 Click [Download]. Updating begins. List of TRAKTOR SCRATCH DUO 2 setting items Category Audio Setup Output Routing Input Routing Timecode Setup Loading Transport Decks Mixer Global Settings Effects Mix Recorder Browser Details File Management Descriptions Select the audio devices to be used for audio input/output. Set the audio latency when using a Macintosh computer. Select [Mixing Mode]. - [Internal]: Select this to control TRAKTOR mixer section from this unit. - [External]: Select this to use this unit. Set the association between the TRAKTOR deck's audio outputs and this unit's input channels. Set the association between the TRAKTOR deck's audio inputs and this unit's output channels. Set this to use time codes (CONTROL CD/CONTROL VINYL). Set the conditions and functions for loading tracks to the decks. Make the settings related to the tempo and key lock functions. Set the TRAKTOR deck section's display method. Set auto gain to on or off. Set the TRAKTOR mixer section's display method. Set whether or not to display the global section. Set the types of effects to be displayed when selecting effects. Make the settings related to TRAKTOR recording functions. Make the settings related to the [BROWSE] area and fonts. Make the settings for track importing, auto analysis, the analysis BPM range, etc. En 23
-
 1
1 -
2
-
3
-
4
-
5
-
6
-
7
-
8
-
9
-
10
-
11
-
12
-
13
-
14
-
15
-
16
-
17
-
 18
18 -
 19
19 -
 20
20 -
 21
21 -
 22
22 -
 23
23 -
 24
24 -
 25
25 -
 26
26 -
 27
27 -
 28
28 -
29
-
30
-
31
-
32
 |
 |